Customerlabs CDP Documentation
Track and send HubSpot Forms effectively to Ad platforms!
For a lead generation business, HubSpot is ideal—it allows you to easily create lead forms on your website, automatically capturing user information and creating contacts seamlessly. This makes managing and nurturing leads highly efficient.
How to send these form submits to Meta for effective performance?
After speaking with over 100 companies, I’ve noticed a common issue: their event match quality is alarmingly low, often below 4 or 5, severely impacting campaign performance.
The challenge lies in sending complete user information to ad platforms, as shown in the image below. While using Google Tag Manager’s Data Layer is a standard method for tracking user behavior and sending data to ad platforms, not all companies have the necessary developer support to implement this effectively.
Marketers solution to send form submits without developer support
With HubSpot, there are some limitations when it comes to directly updating the JavaScript code to track lead forms. HubSpot isn’t exactly user-friendly in that department.
Here’s a simple workaround:
- Create a Hidden Field: Add a hidden field to your HubSpot form. Whenever a user fills out the form, assign them a unique user ID (let’s call it the “CL Unique User ID”). This ID will be passed through the URL query parameter when the form is submitted.
- Use Webhooks for Lead Information: Connect HubSpot to your system via a webhook. This webhook will directly receive the lead information (like email ID, first name, last name, phone number—basically all the PIIs).
- Unification of Both Browser and Server Side Lead Events: Now, you can merge the server-side webhook data with the browser-side form submission data using the “CL Unique User ID.”
This method allows for accurate lead tracking by combining the data collected from both the client and server sides.
Enjoy! Send form submits with industry best event match quality
Industry best event match quality for accurate campaign optimization for effective performance.
Also, we can create audience segments based on the lead stages and website behaviour.

Follow the Below Steps to Complete the Integration:
Requirements :
- The GTM code needs to be implemented on the form page.
- GTM Access
- Hubspot Admin Access
GTM Integration : Phase 1
Update the CustomerLabs tracking code in the GTM as shown below if the code already exists its not required to update the Code again in the GTM
Step 1 :
Create a New GTM Tag and Name it as CL tracking code for better identification.

Step 2 :
Create a trigger the tag

Step 3:
Choose the trigger type as Initialization

We’ve implemented filter conditions in GTM to make the tracking code load in respective page. Now, the code only activates on the relevant pages where your forms are located. This focused approach helps us track form submissions accurately without cluttering other parts of your website.
Step 4:
Save and publish the container

If you complete the above configuration through GTM save and publish the container
Note :Filter conditions only apply if you want to load the tracking code on a particular page.
GTM Configuration is Completed.
Hub Spot Integration : Phase 2
Step 5:
Log In to Hubspot make sure you have the admin access to publish the form
In Hubspot choose Marketing

Step 6:
After Clicking the Marketing Choose “Forms”

Step 7:
All your Forms will be visible on the forms section and choose the form which you want to track and Click edit as shown below.

Once you edit the form there will be a tab “Create New” for creating a new contact property.

Step 8:
Use the form field “Single-line text”

Step 9:
Once you choose the “Single Line Text” new pop screen will appear.

Choose the field as shown in screenshot and name the label field as “Cluid”

Step 10:
Click “Next” once the field is updated, on the final screen click “Create”

After creation of the contact property add the contact property to the contact field in the Form as shown below.
Step 11:
Add the contact property to the contact field in the Form as shown below.

Step 12:
Now drag the contact property to the bottom of the contact form .

Step 13:
Once you add the Contact property click the “Pencil Icon” to edit the form and switch on the toggle to make the field hidden.
Why are we creating a new contact property and keeping the field hidden?
We initially store a unique ID in the window variable. we transfer the same unique ID to a hidden field within the lead form. This hidden field will captures the ID and submits it with the form data.

Step 14:
After updating the contact property, publish the form and then log in to Customer Labs.
Note:
Follow the below steps
Customerlabs—–>Destination —-> Custom Integration
Name the configuration as Cluid and update the below script in the script field as shown below and save the integration
Script :
var cluid = document.querySelector(‘form input[name=”cluid”]’);if (cluid) {cluid.value = window.CLabsgbVar.generalProps.uid;}

Step 15:
Now the entire configuration is completed to ensure everything is working in place just try to fill the form and check the contact information in the hubspot contact.
Please find the below screenshot for reference

Now that the Cluid is stored within the Contact field, we can proceed with the hubspot integration.
Connecting Hubspot via webhook to bring the lead informations
Follow the below steps for connecting Hubspot via webhook and bringing the lead information
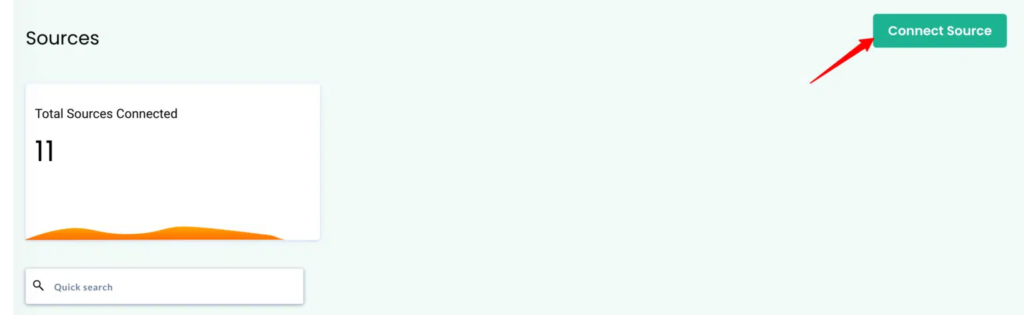
Step 16:
Login to CustomerLabs → Sources → Connect Source
Step 17:
Select HubSpot from the list of Sources

Step 18:
Click on Authenticate HubSpot

Step 19:
You will be redirected to your HubSpot account
Post login, Choose the HubSpot account that you want to link with CustomerLabs

Step 20:
Grant CustomerLabs to access HubSpot Contact & Account details.

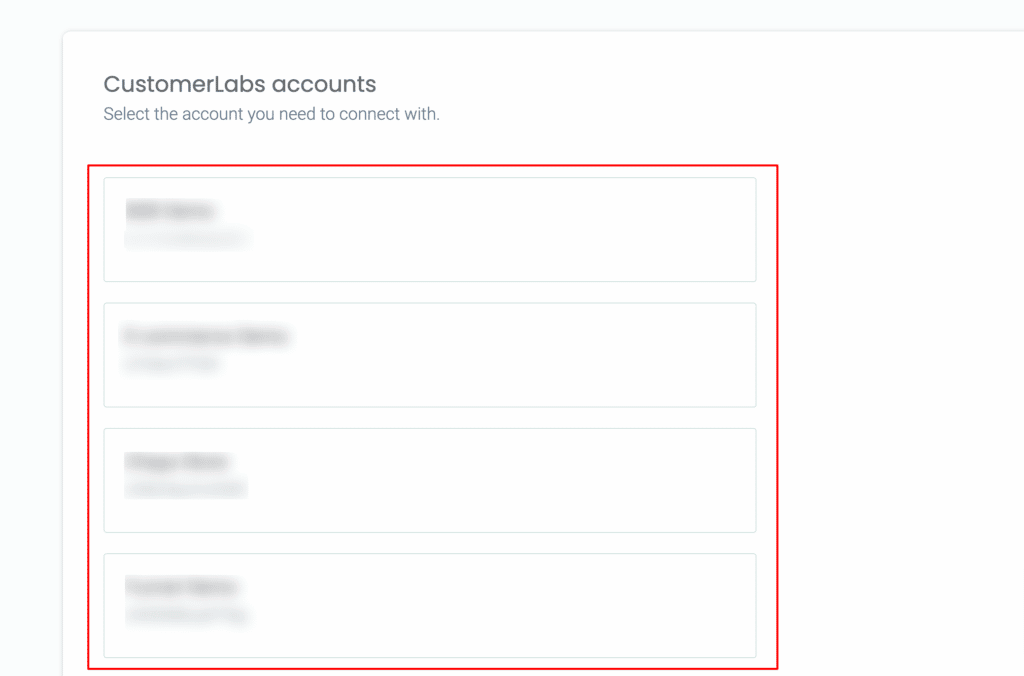
Step 21:
You will now be prompted to select the CustomerLabs account that you want to link HubSpot with. (in case you have multiple accounts choose one)
Step 22:
Voila! Your HubSpot account is now linked with CustomerLabs

Step 23:
On this Step you need to edit the contact information to add the custom field inside the workflow to process the data from the source (hubspot) as shown in the step 24
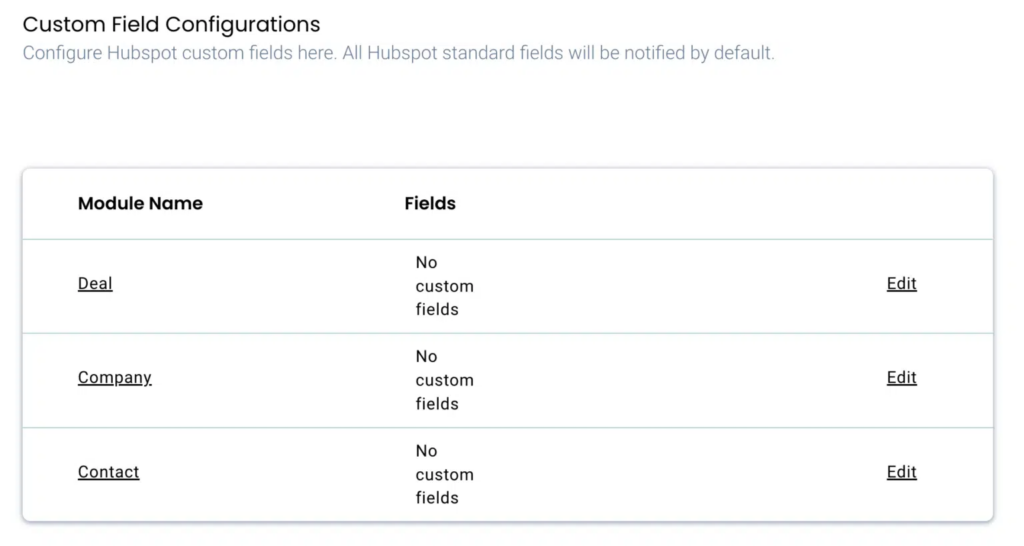
Step 24:
Go to the contact module—> edit—->enter “cluid” in the text box given and save it
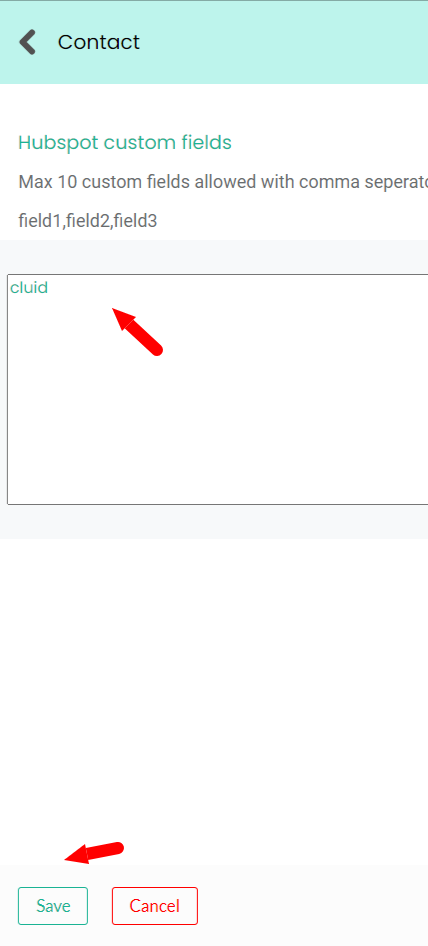
Note: This is one of the important steps. On this step we are adding the custom field which is created inside the hubspot form by adding this field will help the system to merge the browser and server side data to enrich the profile and to complete the user journey from the browser side.
Step 25:
HubSpot Webhook Subscriptions
Once you’ve finished the integration, HubSpot will begin sending all default event subscriptions to CustomerLabs.
Webhook event subscriptions in HubSpot consist of
- Object type-( Contacts)
- Events (Contacts Created)
- Properties.
Learn more about HubSpot event subscriptions here.
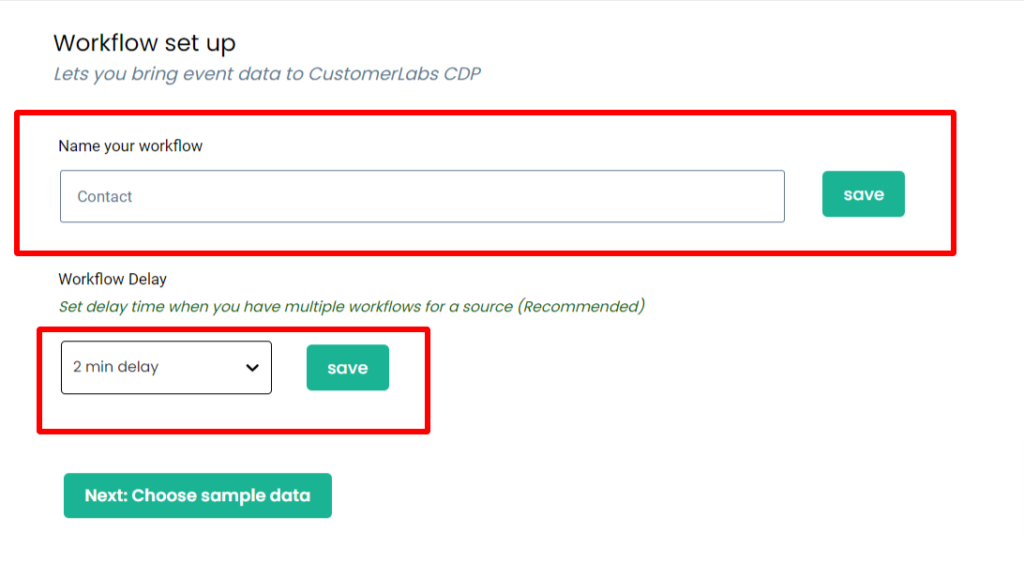
Step 26:
Workflow Configuration
Give a name to your workflow and before proceeding, Create a test contact in HubSpot to get related data samples. Once a new contact is created, click on Choose sample data.
Step 27:
Click on Fetch new data view relevant event samples in CustomerLabs.

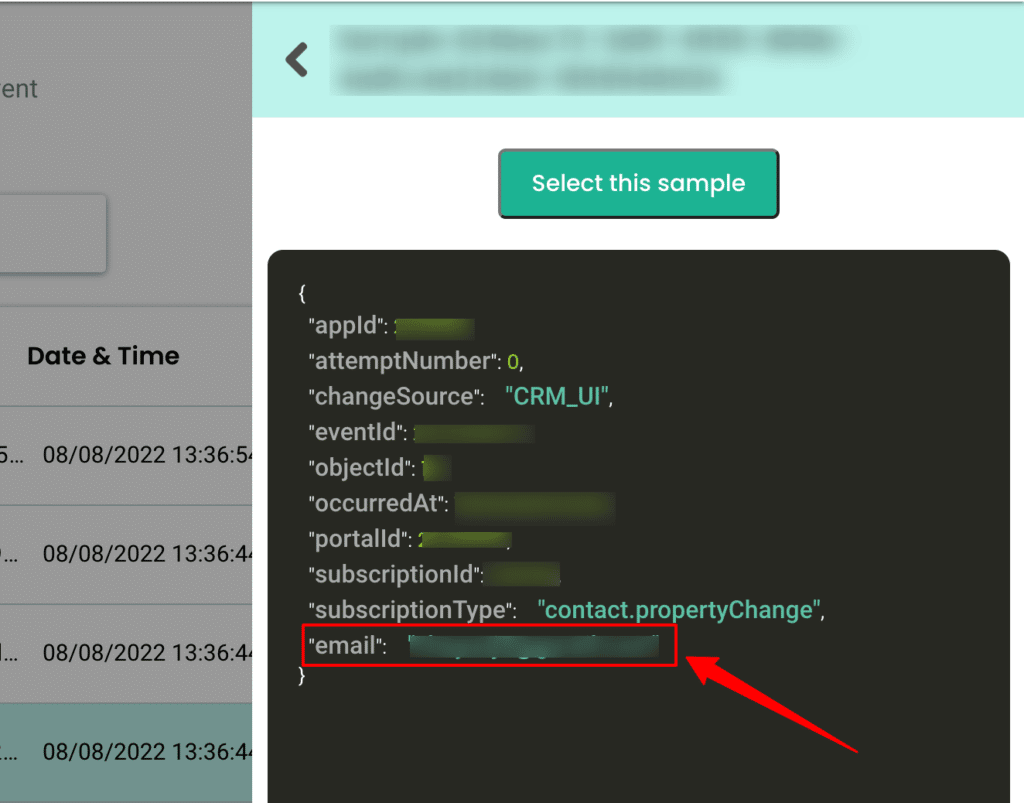
Step 28:
Click on View details to know more about incoming information. In the case of HubSpot, all incoming contact fields will be sent in different samples. You can find only the contact email in a sample as shown below.
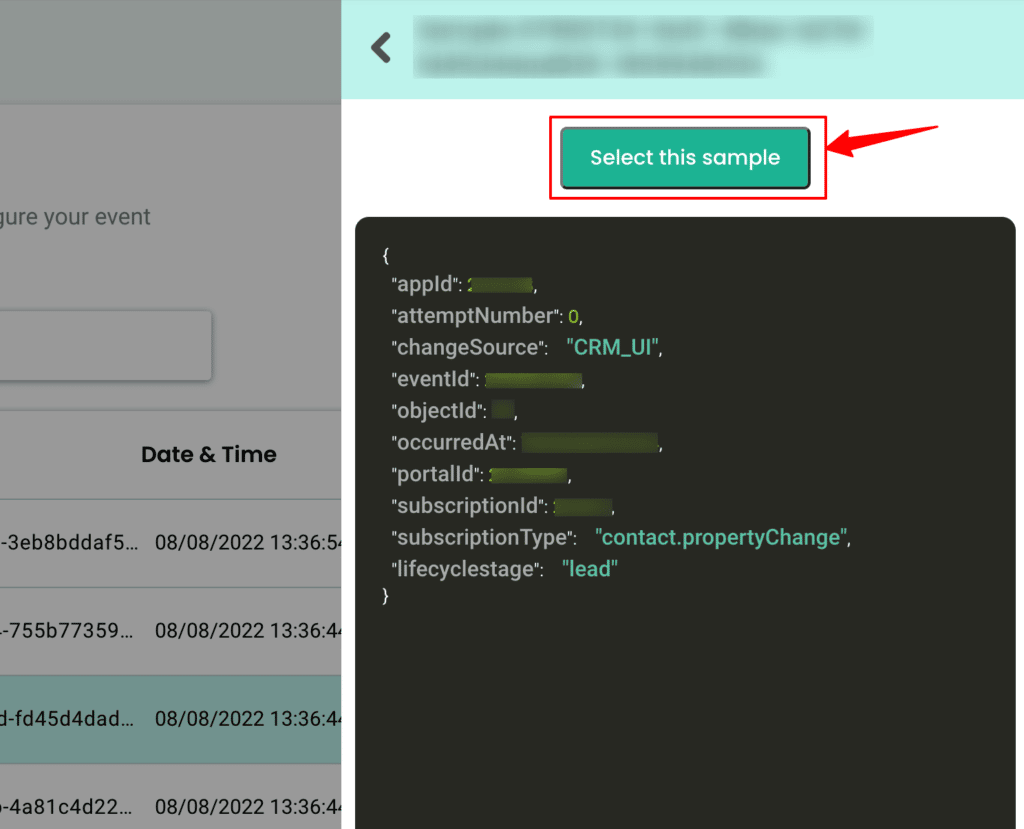
Step 29:
Likewise, contact first name, last name, lifecycle stage etc, will be sent as different events. But the common user ID parameter here will be the object ID.

Now select any 1 contact related event sample by clicking on “Select this sample” and hit Filter
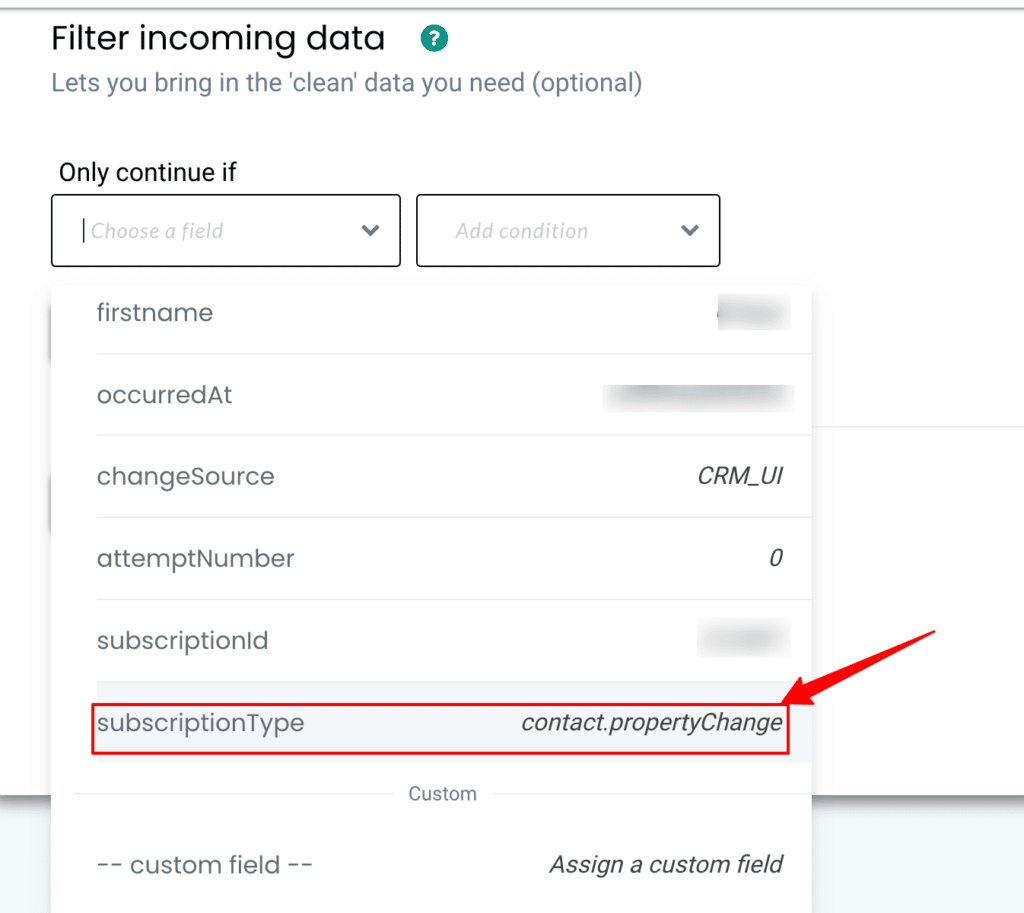
Step 30:
The filter screen acts as a roadblock to stop other non-related event data coming in from HubSpot & skew existing information.
Click on “Create filter criteria” to give your filter condition – this will allow only “contact.propertyChange” event from HubSpot to enter this workflow in the future.
Choose the Event type from the dropdown.
Step 31:
Add conditions and make sure to give the Event name as it is shown in the sample data.

Step 32:
Here’s a detailed breakdown of the event configuration screen
Give a name to your incoming event. You can select a predefined event name as shown below or give a custom name based on your requirements.

Step 33:
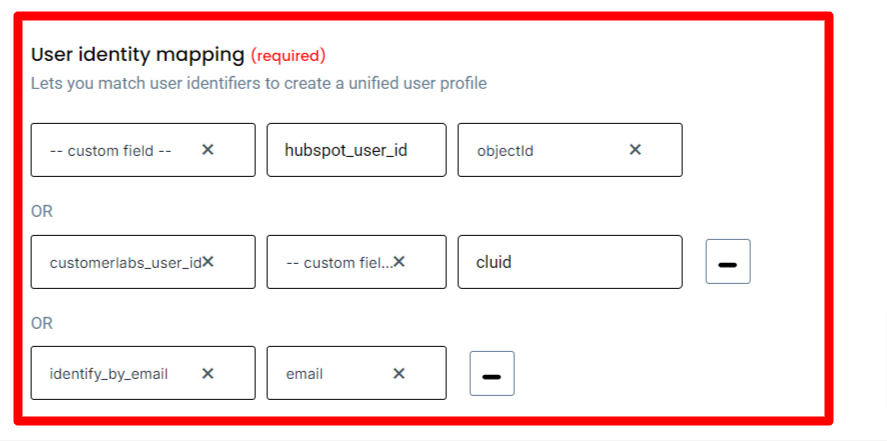
User Identity mapping lets you combine all user-related events, since an incoming contact has an email address & is assigned a HubSpot Object ID we can select three identifiers (identify_by_email,hubspot_user_id and customerlabs user id) from the drop-down and assign relevant values.
Step 34:
Once the user mapping is done, you can categorically map other incoming information into different buckets as shown below,

Step 34:
Below is the list of Contact Subscriptions that will be sent to CustomerLabs when a Contact is created in HubSpot. You can add them to relevant buckets with the help of the table below.
Additional custom properties created can be mapped under relevant CustomerLabs attributes based on requirements
Object: Contact
| Property | Events | CustomerLabs Attributes |
| ext_id | contact.propertyChanged | User External IDs |
| salutation | contact.propertyChanged | User traits |
| firstname | contact.propertyChanged | User traits |
| lastname | contact.propertyChanged | User traits |
| contact.propertyChanged | User traits | |
| phone | contact.propertyChanged | User traits |
| mobilephone | contact.propertyChanged | User traits |
| fax | contact.propertyChanged | User traits |
| usertoken | contact.propertyChanged | User traits |
| address | contact.propertyChanged | User traits |
| state | contact.propertyChanged | User traits |
| city | contact.propertyChanged | User traits |
| zip | contact.propertyChanged | User traits |
| country | contact.propertyChanged | User traits |
| lifecyclestage | contact.propertyChanged | User traits |
| jobtitle | contact.propertyChanged | User traits |
| hs_language | contact.propertyChanged | User traits |
| message | contact.propertyChanged | User traits |
| closedate | contact.propertyChanged | User traits |
| website | contact.propertyChanged | User traits |
| numemployees | contact.propertyChanged | User traits |
| industry | contact.propertyChanged | User traits |
| associatedcompanyid | contact.propertyChanged | User traits |
| twitterhandle | contact.propertyChanged | User traits |
| followercount | contact.propertyChanged | User traits |
| twitterprofilephoto | contact.propertyChanged | User traits |
| hs_persona | contact.propertyChanged | User traits |
| hs_analyticssource | contact.propertyChanged | User traits |
| hs_legal_basis | contact.propertyChanged | User traits |
Step 35:
Destination
Send incoming data to third-party apps to boost marketing effectiveness. Learn more about the destination tools we support.


