Tracking every user action can help maximize the ROI of your campaigns. However, managing multiple tags, triggers, and tracking scripts can become overwhelming, especially on platforms like Shopify.
When tags are incorrectly placed, it can result in missing conversion data, which skews your reports and limits your ability to optimize effectively. Incomplete tracking is the last thing you want, as it can disrupt your ad performance.
That’s where Shopify GTM integration comes in. By setting up Shopify GTM integration (Google Tag Manager), you can streamline all your tags and scripts under one platform, Enhance Ecommerce tracking, allowing you to track events like product views, add-to-cart actions, and purchases.
However, there’s another easy way, an alternative to GTM integration with Shopify store to track all the events you want such as product view, add to cart, purchase, and more, including the custom event tracking. That ideal and simplest way would be direct integration of your Shopify store with CustomerLabs 1PD Ops.
This guide will walk you through the step-by-step process of integrating GTM on your Shopify store as well as direct integration with the GTM alternative. Additionally, it will also provide you insights to identify the efficient integration process using the 1PD Ops platform and the manual setup process.
Overview of Google Tag Manager (GTM)
Google Tag Manager (GTM) is a powerful tool that simplifies tracking code management to a certain extent.
Instead of manually adding each script to track every single event on your Shopify store, GTM lets you manage all your tags in one place. This helps you keep things organized, minimize errors, and optimize performance.
GTM helps you integrate smoothly with platforms like Google Analytics, Meta Ads, and other marketing tools. It ensures accurate tracking, enabling better data-driven decisions. GTM also helps you deploy and manage different tags for deeper insights.
Benefits of GTM for Shopify eCommerce store:
- Centralized Tag Management: GTM allows you to manage multiple tags from different platforms in one place, eliminating the need to edit your Shopify theme repeatedly.
- Enhanced Flexibility: With Shopify GTM integration, you can quickly add or remove tags, enabling advanced tracking like remarketing and conversion optimization.
- Faster Page Load Times: By reducing the number of scripts directly on your Shopify store, GTM minimizes the impact on site speed, which is crucial for eCommerce performance.
- Improved Data Accuracy: GTM helps ensure that all tags fire correctly, especially on key pages like checkout, giving you reliable data for decision-making.
To set up GTM in Shopify, you have two options: CustomerLabs Integration Setup (the recommended & easy method) and Manual Setup.
Let’s examine each one individually.
Method 1: Shopify Direct Integration to Setup Conversion Tracking
Shopify’s direct integration with CustomerLabs allows you to easily set up conversion tracking, giving you valuable insights into customer behavior and helping optimize your marketing efforts. Follow this guide to get started with the initial setup (Setup does not take more than 10 minutes [without 1P domain tracking]).
- First, log into your CustomerLabs account and go to the homepage. Under “Connect your domain”, simply enter your website URL and hit Save.
- Click on Shopify on the dashboard, and choose your store method (with purchase or without purchase).
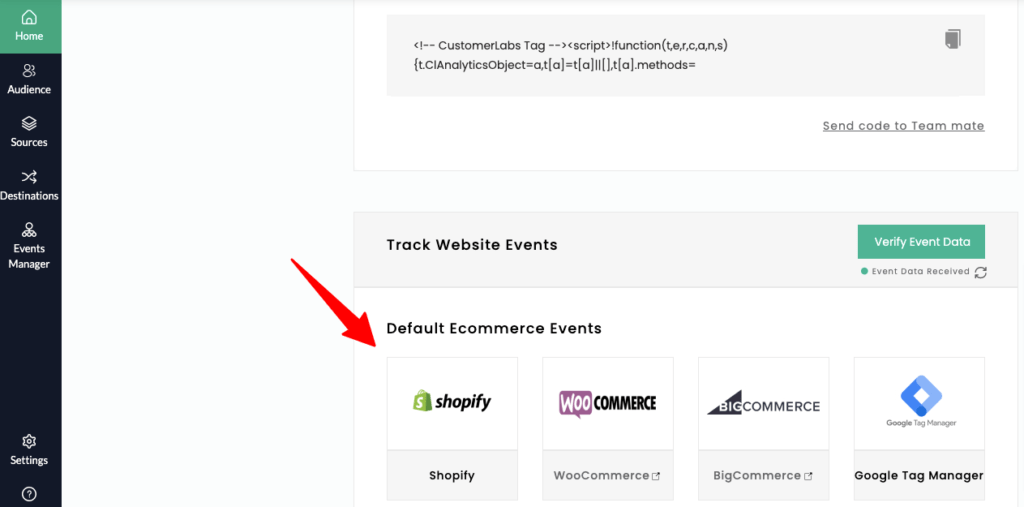
- Next, copy the tracking code. Before pasting it into your Shopify store, we recommend setting up 1P Domain Tracking for better attribution—especially with third-party cookies becoming less effective. This tracking solution ensures more accurate data by using your domain instead of cookies, making it a smart choice for eCommerce stores.
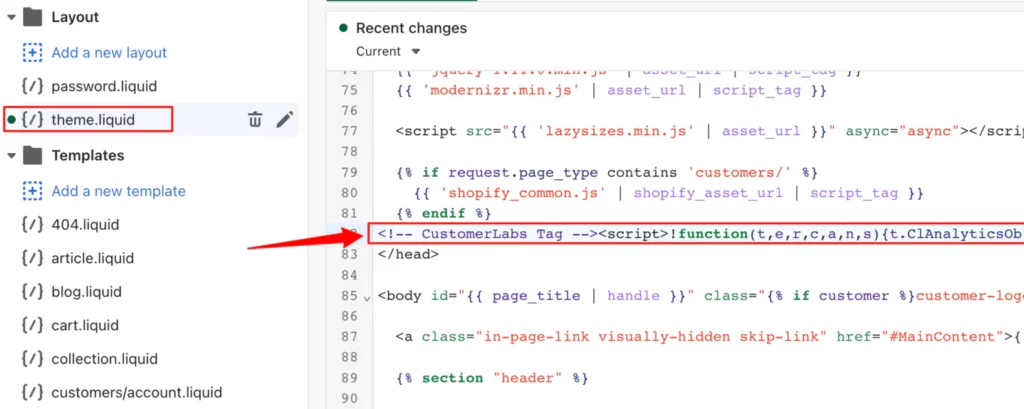
- Now, head to your Shopify account. Under Online Store, go to Themes and click Actions → Edit code. In the theme.liquid file, search for the </head> tag and paste the CustomerLabs tracking code (you will get this code from CustomerLabs as soon as you enter your URL and save) just above it. Save the changes.
- Finally, to track all customer events, create a custom pixel in Shopify. Go to Settings → Customer events → Add custom pixel, name it CustomerLabs, and click Add Pixel.
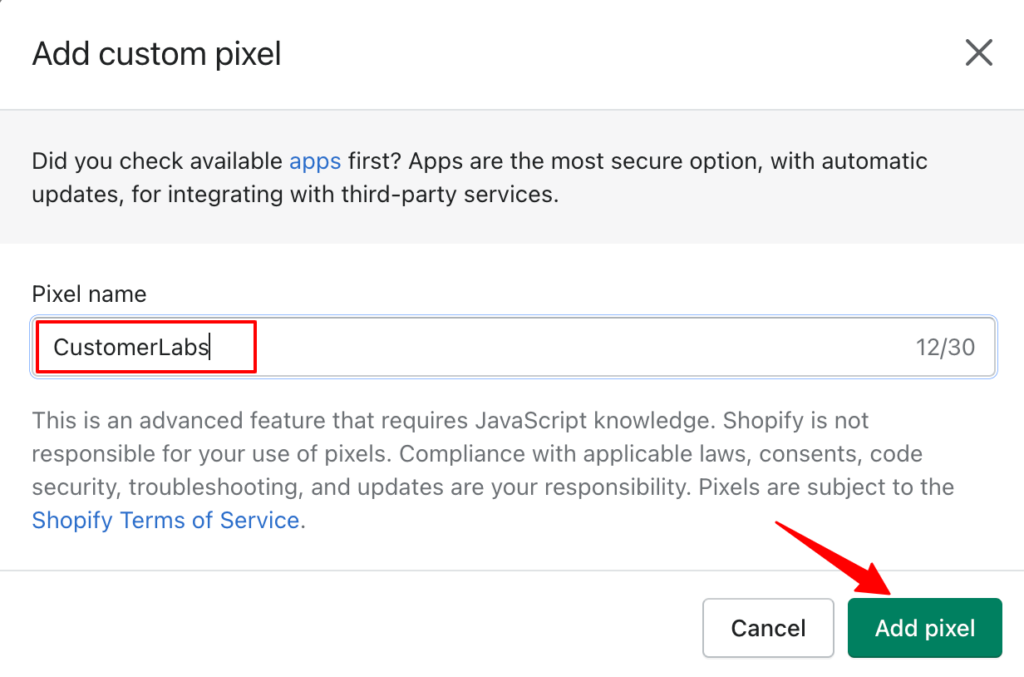
- Here you’ll add the tracking code you get from the second step in CustomerLabs
Once set up, you’ll start seeing real-time data and insights on your customer behavior, helping you optimize your marketing efforts and improve your eCommerce strategies. For a detailed guide on how to integrate your Shopify store with CustomerLabs, refer to the CustomerLabs Shopify Integration Documentation.
With CustomerLabs, you can track all your Shopify store events in just five minutes! The 1PD Ops platform helps you set up server-side tracking, meaning you get accurate data without needing cookies or complicated setups. This makes it easier to track customer actions reliably, even as browser tracking becomes less effective.
CustomerLabs 1PD Ops is a game-changer for businesses looking to simplify their tracking and enhance the accuracy of their marketing. This solution also ensures compliance with data privacy regulations such as GDPR and CCPA.
Method 2: Installation of GTM on Shopify
To manually set up Google Tag Manager (GTM) on Shopify, follow a few key steps to ensure seamless tracking.
This method gives you full control over the integration process, allowing you to directly add GTM to your Shopify theme files. By doing this, you’ll be able to manage all your tags from one place, simplifying the process of tracking conversions, remarketing, and other metrics vital for you. Here’s how to complete the Shopify GTM integration:
Access Google Tag Manager (GTM) Account
Start by clicking on the button for your GTM account to access the Google Tag Manager home screen. Once you’re in, you’ll be on the GTM home screen, where you can access the necessary code snippets for integration.

Locate the GTM Code Snippets
On the GTM home screen, you’ll find two snippets of code: “snippet 1” and “snippet 2”. These are the pieces of code labeled “snippet 1” and “snippet 2,” that you need to install on your Shopify website. These snippets serves a different purpose for accurate tracking.

Find the Code Snippets in Admin
Alternatively, you can also find both code snippets by navigating to Admin → Install Google Tag Manager within the GTM interface. Under the “Install Google Tag Manager” section, you’ll see both snippets that you’ll need to copy for the next steps.
Install Snippet 1 and Snippet 2 in the Correct Sections
- Snippet 1: This snippet should be placed in the <head> section of your Shopify store’s HTML code. It’s important that this snippet is installed in the right location to ensure proper loading of your tags.
- Snippet 2: This snippet goes into the <body> section of your store’s HTML code. It ensures that GTM functions correctly across different pages of your store.
Access Shopify Admin to Add Snippets
Finally, log into the Admin section of your Shopify backend. Once inside, you can access the HTML of your Shopify theme and paste the code snippets in their respective locations. This step is essential for activating GTM across your store.
Installing Snippets in Google Tag Manager
- Head over to your Shopify admin panel. Navigate to Online Store > Themes > Actions > Edit Code. This will open the HTML code of your website.
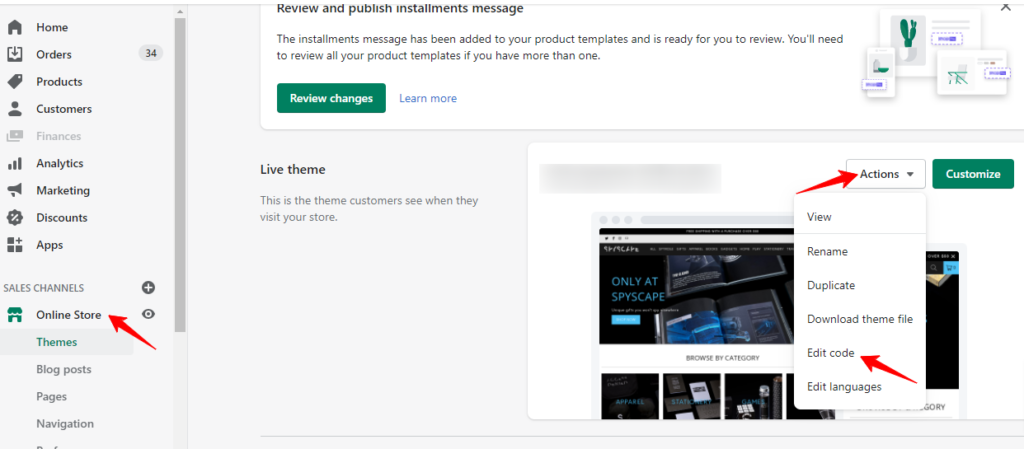
2. In the screen that appears after clicking Edit Code, find and open the theme.liquid file. This file controls the structure of your store’s pages.
3.Copy “Snippet 1” and insert it into the <head> section of the page. It’s typically near the top of the page, right after the opening <html> tag. Paste Snippet 1 directly below the <meta> tags.
4. Now, scroll through the code to find the <body> tag. It might appear in different places depending on your theme’s setup. To speed up the process, search for the word “body” using your browser’s search feature. Once you find the <body> tag, paste Snippet 2 right underneath it.
5. After making these changes, click Save to keep the updated code. This final step ensures that the code updates are implemented properly.
Now, you’ve added the snippets to your theme file.
Tracking the Purchase Event by Installing Google Tag Manager on the Thank You Page
When you track the thank you page on Shopify, you can understand that a purchase has taken place. Here’s how you can install Google Tag Manager on the Thank You page in Shopify to track the purchase event:
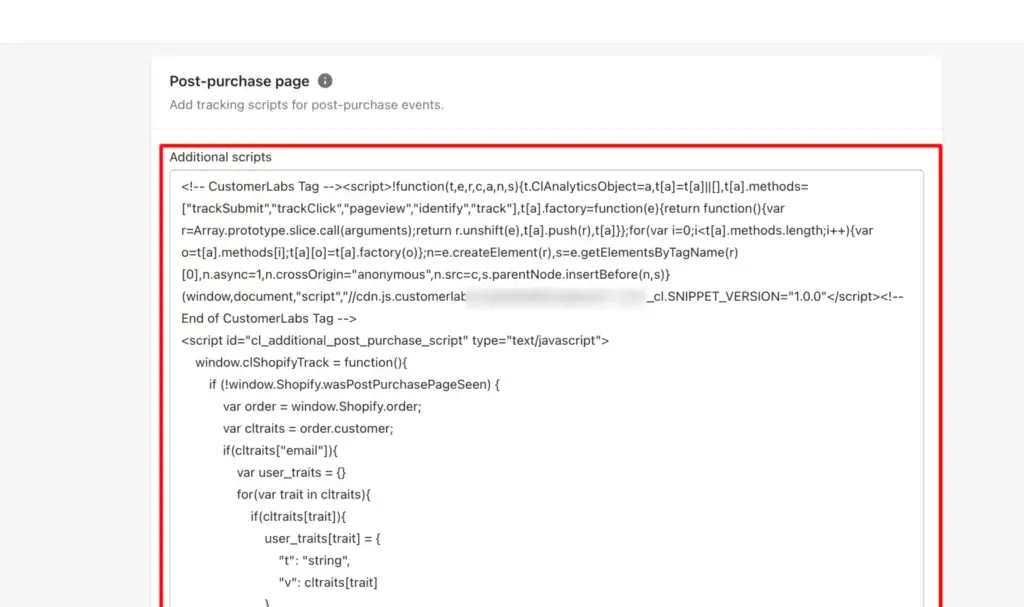
- Log in to your Shopify backend and go to Settings → Checkout.
You’ll find the Additional Scripts section under the order processing status. This is where we’ll add the Tag Manager code for both snippets. - Copy “snippet 1” and “snippet 2” in the correct order. Paste them into the box in the Additional Scripts section.
- Once done, click Save.
4. Test the Setup:
- Go to your website and add a product to the cart.
- Click View Cart to open the cart page

5. Open the Tag Assistant to check the data being tracked. You’ll see events related to the shopping cart being captured.
6. Now, go back to the cart page and click Check Out. This page collects contact and payment details, but the Tag Assistant can’t track it because it’s restricted by Google Tag Manager.
Note: If you’re on Shopify Plus, you can edit the checkout files to track these activities.
7. Proceed with your order by entering the required contact and payment details.
8. After confirming your order, you’ll be redirected to the Thank You page, where Google Tag Manager will reconnect.
9. You’ll see that the Tag Assistant tracks the Thank You page activity successfully.
Now, Google Tag Manager will track data across all pages on your Shopify site, except for the checkout pages (unless you’re on Shopify Plus, where you can edit checkout files). This setup helps you gain valuable insights into customer behavior and conversions.
Testing and Verifying GTM Installation on Shopify
Testing and verifying your Google Tag Manager (GTM) installation is crucial to ensure that your tags fire correctly, especially on key pages like product and purchase confirmations. For performance marketers like you, data accuracy is everything, and improper tag setups can lead to missed conversions or inaccurate analytics.
- Open the Workspace in Google Tag Manager.
- Click Preview to check if the installation is working.
If your Google Tag Manager is new and hasn’t been set up with any Tags or versions yet, you won’t see the Preview option. In that case, create an initial version by clicking Submit.

After submitting, give your version a name and publish it.
Now, you’ll be able to access the Preview mode, which will direct you to the Google Tag Assistant.
- Enter your website URL in the field and click Connect.
- If you see the “Connected” pop-up, that means your Google Tag Manager is installed correctly.
- In the Tag Assistant, you’ll see entries showing the number of recent visits to your site.
- Try opening another page on your website. Google Tag Assistant will track this new page in another tab.
You can also test by clicking on different products or items to verify your setup. Each page you visit will show up in the Tag Assistant.
At this point, Google Tag Manager is successfully installed on most pages of your Shopify website.
If you’re looking for a simpler and more streamlined approach, consider using Customerlabs for direct integration and conversion tracking on your Shopify store. Here’s how you can do it.
Optional: Setting Up Enhanced Ecommerce Tracking
Enhanced e-Commerce Tracking in Google Analytics provides deeper insights into user behavior, from product impressions to purchase events.
By configuring enhanced ecommerce in Shopify, you can track detailed interactions like cart additions, product views, and transactions, giving you a clear understanding of your sales funnel.
To set up Shopify GTM integration for Enhanced Ecommerce, follow these steps:
- First, Enhanced Ecommerce tracking should be enabled within the Shopify Google Analytics settings. This will ensure that Shopify sends e-commerce data to GA.
- Next, configure GTM to capture enhanced e-commerce events by setting up tags and triggers that fire on key actions, such as checkout completions or product detail views.
- Finally, verify that e-commerce data is being tracked correctly in Google Analytics. Use GTM’s Preview Mode or Google Analytics reports to check whether events like purchases and abandoned carts are being captured accurately.
To know more detailed information on the whys and hows of conversion tracking for Shopify, read this guide.
Best Practices and Tips for GTM Setup
To get the most out of your Google Tag Manager (GTM) setup, it’s essential to follow best practices. Optimizing GTM ensures accurate data tracking and simplifies tag management, which directly impacts campaign performance. Here are key tips for refining your Shopify GTM integration:
- Centralize tag management by using GTM as your main platform for managing all tags, reducing the risk of errors, and improving overall control.
- Conduct frequent verification and testing of your tags to ensure consistent data tracking. Use tools like GTM Preview Mode and Google Tag Assistant for this.
- Document any changes you make using GTM’s built-in version control, allowing you to track updates and roll back if needed.
- Leverage GTM for advanced event tracking, such as scroll depth or video plays. Additionally, monitor site speed impact, ensuring that your GTM implementation doesn’t slow down page load times.
- Use CustomerLabs to track all the eCommerce events on the Shopify store without any hassle.
Conclusion
In conclusion, Google Tag Manager (GTM) plays a vital role in eCommerce by streamlining how you track and manage your marketing efforts.
With Shopify GTM integration, you can centralize all your tags in one place, making it easier to control and monitor your tracking systems. This centralized approach offers better data accuracy, faster tag deployment, and easier troubleshooting.
Keeping your Shopify GTM integration updated ensures that your data collection remains precise, allowing you to make informed marketing decisions. As your business grows, maintaining a well-structured GTM setup becomes even more crucial.
For marketers looking to maximize their data potential, CustomerLabs offers an advanced first-party data solution that can simplify Shopify event tracking as a piece of cake.
With seamless integration for platforms like Google Analytics and Facebook Ads through Conversions API, you can unify customer profiles, segment audiences, and even improve your custom audience match rates by up to 3X.
Whether you want to track conversions, retarget visitors, or improve data accuracy, we can streamline the process without the need for complex coding.


