It takes more than merely releasing advertisements and monitoring clicks to run a successful advertising campaign. You must understand which interactions generate actual income.
The information you need to optimize for higher returns on ad spend (ROAS) is provided by Google Ads conversion tracking. Without it, you risk missing out on important clients or wasting money on unsuccessful advertisements.
Conversion tracking allows you to match your objectives with bidding methods like Target CPA or Maximize Conversions. This enables you to use sophisticated tools like Enhanced Conversions to track and manage your budget more effectively.
Conversion tracking enables you to remain adaptable and make swift adjustments as necessary, whether you’re running advertisements across various platforms or attempting to win back lost clients. Studies show that companies that use conversion tracking enjoy a 30% increase in return on investment.
To fully benefit from these tools, you need to set up tracking correctly from the start. In this guide, we’ll show you how to do setup easily with a few clicks and then the hard labour way. Before moving into the implementation, let’s get started with Google Ads conversion tracking and its importance.
What is Google Ads Conversion Tracking?
As a performance marketer, you know the value of precise data in making informed decisions. Conversion tracking in Google helps you monitor users’ critical actions on your website.
These could include form submissions, purchases, or even clicks on key CTAs. By implementing conversion tracking Google effectively, you gain visibility into which campaigns and keywords are driving valuable interactions.
The Importance of Conversion Tracking for Business Goals
Conversion tracking is not just a technical metric; it is a strategic tool that directly influences the success of your advertising campaigns. Here’s why it’s essential for achieving your business goals and optimizing advertising strategies:
Aligning Campaigns with Business Objectives:
Conversion tracking provides actionable insights by measuring key actions that reflect your business goals, such as lead generation, sales, or app installs. This helps tailor campaigns to achieve specific objectives.
Improving Customer Acquisition Costs (CAC):
By understanding which campaigns drive the most conversions, businesses can optimize ad spend to reduce CAC, ensuring a better return on investment.
Enhancing Retargeting Strategies:
Knowing which users have completed specific actions allows for more effective retargeting. This boosts campaign efficiency by focusing efforts on high-intent audiences.
Leveraging First-Party Data for Precision:
Using first-party data enhances the accuracy of conversion tracking, particularly in an era of increasing privacy regulations. This ensures campaigns remain effective while respecting user privacy.
Maximizing ROI with Google Ads:
Accurate conversion tracking empowers advanced bidding strategies, such as Target ROAS (Return on Ad Spend) and Maximize Conversions, helping you achieve the best results for every dollar spent.
Preventing Campaign Underperformance:
Without reliable conversion tracking, advertisers risk running campaigns blind, leading to misallocated budgets, missed opportunities, and underwhelming results.
Detailed Insights with Enhanced Conversion Tracking:
Google’s Enhanced Conversion Tracking offers a more granular view of customer actions by syncing conversion data. This improves match rates and enables more precise targeting.
By effectively implementing conversion tracking, businesses can ensure their advertising strategies are data-driven and goal-oriented. It’s not just about tracking performance but about steering campaigns toward meaningful outcomes that align with overarching business goals.
In the next section, you will learn the simple, clear and efficient way to implement, saving you from all the chaos of the traditional setup process. We’ll guide you through the process of setting up conversion tracking effectively using tools like CustomerLabs, ensuring seamless integration and accurate data capture.
Setting Up Conversion Tracking with CustomerLabs
Setting up conversion tracking with CustomerLabs is straightforward and ensures that your campaigns leverage first-party data for precise attribution and retargeting. Here’s how you can set it up:
1. Create a CustomerLabs Account and Connect Your Data Sources
Start by signing up for a CustomerLabs account. Connect all relevant data sources such as your website, CRM, email marketing tools, and analytics platforms. This step ensures your first-party data is centralized.
2. Authenticate Google Ads Account
- Go to the “Destinations” page in CustomerLabs.
- Search and select “Google Ads” from the list.
- Click “Configuration Settings” and then “Authenticate Google Ads” to sync your account.
3. Track Website Conversions in Google Ads
- Sign in to Google Ads and go to Goals > Conversions > + New Conversion Action.
- Choose the Website and enter your domain URL to scan.
- Select Add Conversion Action Manually.
- Enter the conversion details and click Save and Continue.
- Skip the event snippet setup; CustomerLabs handles that automatically. Click Done.
4. Map Conversion Actions in CustomerLabs
- In CustomerLabs, go to Destinations > Google Ads > Configuration Settings.
- Map the conversion actions you set in Google Ads to events tracked in CustomerLabs (e.g., “Purchase” in Google Ads to “Purchased” in CustomerLabs).
- Click the + icon to add it and Save Changes.
5. Sync Events with Google Ads
- In CustomerLabs, go to Setup Event Workflow under Google Ads Customization.
- Toggle on the events you want to sync.
- Click Save Changes to complete the setup.
6. Tracking Offline Conversions
- In Google Ads, set up offline conversion actions by going to Tools & Settings > Conversions > + New Conversion Action.
- Choose Import from External Sources > Track Conversions from Clicks and follow the prompts to create the action.
- Once created, map these offline conversions in CustomerLabs under Destinations > Google Ads > Configuration Settings.
7. Sync Offline Events with Google Ads
- Go to Setup Event Workflow in CustomerLabs and toggle on the server-side (offline) events.
- Click Save Changes to sync these offline conversions with your Google Ads account.
By following these steps, you can easily set up and sync both website and offline conversions with Google Ads using CustomerLabs, all without needing any coding.
8. Enable Advanced Features
You can also activate features like audience segmentation and enhanced attribution in CustomerLabs to optimize your campaigns. These features help you refine retargeting efforts and maximize ROI, ensuring you get the most out of your marketing spend.
Ready to get started? Book a demo with CustomerLabs to see how it can streamline your conversion tracking and elevate your Google Ads campaigns.
The next section is for the people who want to do this the hard way. We’ll guide you through the foundational steps required to set up and implement your tracking framework.
Set Up Google Ads Conversion Tracking: Foundational Steps
Setting up conversion tracking in Google Ads involves several essential steps, which can be chaotic when you choose to do it the hard way. However, a well-implemented setup provides reliable data that helps you measure the success of your campaigns.
Let’s begin by identifying the conversion actions you want to track.
Step 1: Create a Conversion Action
The first step in setting up website conversion tracking is to create a conversion action. To do this,
Log in to Google Ads
- Navigate to the Tools icon in the upper-right corner.
- Under the Measurement section, click Conversions.

Create a New Conversion Action
- Click the blue + New Conversion Action button.
- Select Website as your conversion source.
Enter Domain Information
- Input the domain of your website.
- Select +Add Conversion Action Manually to proceed.
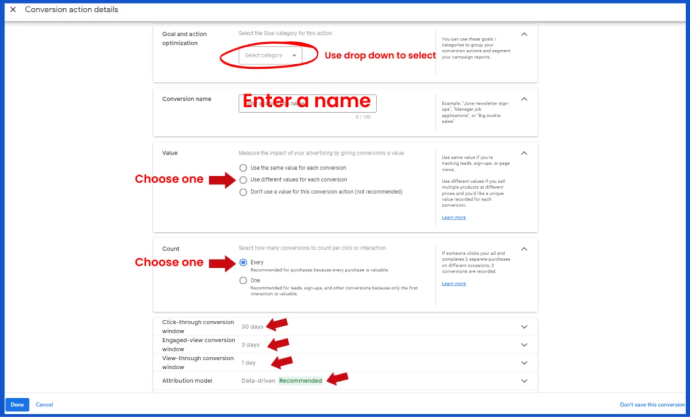
Name the Conversion Action
- Give the conversion a descriptive name, such as “Contact Form Submission” or “Purchase.”
- Adding the creation date can help track and organize multiple conversion actions.
Choose a Conversion Category
- Use the dropdown menu to select the category that best fits your action:
- Purchase/Sale for e-commerce sales.
- Lead for form submissions or inquiries.
- Other categories include Sign-up, Page View, or Other.
Define the Conversion Value
- Decide how to assign a value:
- Don’t use a value for leads or actions without a monetary figure.
- Use the same value for each conversion for fixed-value sales.
- Use different values for each conversion if the value varies (e.g., product purchases).
Select the Conversion Count
- One: Tracks one conversion per ad click, suitable for leads or sign-ups.
- Every: Tracks all conversions, ideal for purchases or other repeatable actions.
Set the Conversion Window
- Define the time period for tracking conversions after an ad click (range: 7–90 days).
- For view-through conversions (conversions after viewing, but not clicking, an ad), the range is 1–30 days.

Save and Finalize
- Review your settings.
- Click Create and Continue to save the conversion action.
Next, you’ll learn how to set up the Google tag to ensure these actions are captured seamlessly across your digital assets.
Step 2: Set Up Your Google Tag
Once you’ve set up your conversion action in Google Ads, you need to implement the tracking code on your website. Here’s how:
Install the Global Site Tag

- Log into Google Ads and select “Install the tag yourself” when prompted.
- The global site tag is a piece of code that you need to place on all pages of your website. If you’ve already installed Google Analytics or another Google product, check if this tag is already in place to avoid duplication.
- If the global site tag is not yet installed, copy the code and paste it between the <head></head> tags of every page on your website.

If you’re updating an existing tag, add this line to the code to configure it for conversion tracking: gtag(‘config’, ‘AW-CONVERSION_ID’);
Implement the Event Snippet
- After the global site tag is set, you’ll need to implement the event snippet for the specific conversion action you’re tracking.
- There are two main options for tracking conversions:
- Page Load: If you’re tracking a conversion on a thank-you or confirmation page, use this option. Place the event snippet in the <head></head> tags of that page.
- Click: For tracking clicks on a button or link, use this option. You’ll need to add the event snippet to pages containing the button or link, and include additional code to specify the click element.

Copy the event snippet code and add it to the designated page or button as instructed. If you’re tracking a click event, make sure to follow Google’s guidelines for adding the additional code required for tracking the button or link click.
Test and Verify
- After the global site tag and event snippet are implemented, it’s crucial to test that everything is working correctly. You can use Google’s Tag Assistant or Google Tag Manager’s Preview mode to verify the tags are firing properly. This ensures the conversion tracking will provide accurate data on the actions you’re monitoring.
Once you’ve added the global site tag and event snippet to your website, Google Ads will begin tracking conversions, helping you measure and optimize your campaigns effectively. If you’re unsure about any of these steps or need assistance, it’s advisable to consult a web developer to ensure the code is correctly implemented and configured.
In the next section, you’ll explore additional setup options, including advanced configurations, to enhance your tracking capabilities.
Additional Setup Options
Exploring advanced setup options can enhance conversion tracking capabilities if you are looking for more flexibility and precision. Google Ads offers multiple ways to implement tracking, ranging from manual setup to using Google Tag Manager (GTM).
Additionally, specific tools like Conversion Linker tags ensure data accuracy by properly attributing conversions across sessions and devices.
Explore manual setup or setup using Google Tag Manager for advanced configurations:
- Manual Setup: If you prefer direct control, you can manually implement the Google tag (gtag.js) on relevant pages. This approach involves placing the global site tag in the <head> section and adding event snippets on conversion-specific pages like the checkout or thank-you page. While this setup offers flexibility, technical expertise is required to ensure proper installation.
- Using Google Tag Manager (GTM): GTM simplifies tag deployment by allowing you to manage all your tags from a single interface. It reduces the need for code changes by letting you create tags and triggers within the platform. For example, setting up a trigger to fire a conversion event when users click the “Add to Cart” button can be easily done. GTM also enables more sophisticated tracking by integrating with tools like CustomerLabs for additional analytics and data enrichment.
Understand the use of Conversion Linker tags for ensuring tracking accuracy:
- Conversion Linker tags are essential for cross-domain tracking and ensuring that conversions are correctly attributed even when users switch between devices or sessions. They capture and pass critical data, such as the GCLID (Google Click Identifier), from one page to another.
- In GTM, you can create a Conversion Linker tag to fire on all pages. You will not lose any attribution data when users engage across different sessions. This step becomes crucial for running multi-touch attribution models or complex retargeting campaigns.
- Using Consent Mode, a consent-seeking process integrated with Conversion Linker ensures compliance with data privacy regulations such as GDPR by dynamically managing cookie usage based on user consent.
These advanced setup options empower you to capture more detailed and accurate conversion data, which you can use to fine-tune your campaign performance. As complex campaigns grow, these tools ensure that every conversion is accounted for, leading to more precise optimization decisions.
In the following section, you’ll explore how to analyze your conversion data and adjust campaign settings based on the insights you gather.
Analyzing Conversion Data
After setting up conversion tracking, you can use Google Ads’ reporting tools to gain insights into how your ads are driving valuable customer actions. Here’s how to view and interpret conversion metrics:
View Conversion Metrics
- In your Google Ads account, go to the Goals icon and select Conversions from the dropdown menu.
- Click on Summary to see a detailed view of your conversion data.
Conversion Column Overview
- The Conversions column shows the number of conversions you’ve received from all your tracked actions, including modeled conversions (if some are untracked).
- This column helps you see how often your ads lead to actions that matter for your business.
Customize Conversion Tracking
- You can customize your conversion settings:
- Account-Default Conversion Goals: Choose whether or not to include certain conversion actions in the summary.
- Campaign-Level Conversion Settings: Tailor conversion tracking to specific campaigns or groups of campaigns.
- Attribution Models: Decide how to distribute credit across customer interactions.
- Conversion Counting: Opt to count one conversion per interaction or every conversion after an interaction.
Related Conversion Metrics
- Cost per Conversion (“Cost / conv.”) tells you the average cost per conversion, calculated by dividing your total cost by the conversions.
- Conversion Rate (“Conv. rate”) indicates how frequently an interaction leads to a conversion, by dividing conversions by total interactions.
- Total Conversion Value is the total monetary value for your conversions, provided you’ve set up values for each conversion action.
- Conversion Value per Cost (“Conv. value / cost”) shows your return on investment by dividing total conversion value by total costs.
- Value per Conversion (“Value / conv.”) tells you how much each conversion is worth on average.
- All Conversion Value aggregates the value for each conversion action, useful when different actions (like form submissions or purchases) have different values.
Optimizing Campaigns with Conversion Data
- Use these metrics to assess the effectiveness of your campaigns.
- Adjust keywords, budgets, and bidding strategies to optimize based on the conversion data you gather. For example, if a keyword drives many conversions at a low cost, consider increasing its budget to maximize return.
- Leverage automated bidding strategies based on conversions to enhance campaign performance.
By regularly analyzing these metrics, you can gain valuable insights into your ad performance and make data-driven decisions to improve your marketing efforts.
Troubleshooting Common Issues
Even with proper setup, issues can arise in conversion tracking that affect the accuracy of your data. Identifying and resolving these problems promptly ensures that campaigns run smoothly and performance insights remain reliable.
- Address issues when conversion columns show no data due to delays or installation errors:
- A common cause for missing data is the Google tag (gtag.js) not firing correctly or a misconfigured trigger in Google Tag Manager. Verify the tag installation using tools like Tag Assistant.
- Due to processing delays, conversion data may also experience a time lag of up to 24 hours. In such cases, monitor the status over time before taking corrective actions.
- Ensure your website pages don’t block the Google tag through browser ad blockers or strict cookie consent policies, which can interrupt data collection.
- Evaluate campaign structure if there are many clicks but few conversions:
- Many clicks with minimal conversions often indicate a misalignment between ads and landing pages. Ensure your ad copy, call-to-action, and landing page content align to deliver a cohesive experience.
- Check if your keywords attract the wrong audience. Irrelevant keywords can bring in traffic that is unlikely to convert. Using negative keywords can help filter out unqualified traffic.
- Evaluate the post-click experience that can discourage users from completing the desired action. Make adjustments to improve the conversion funnel.
Resolving these issues ensures that your conversion tracking setup remains accurate, giving you reliable data for campaign optimization.
Conclusion
Setting up Google Ads conversion tracking is essential for performance marketers who want to measure the impact of their campaigns, optimize ad spend, and drive better ROI.
With clear conversion actions, properly implemented tags, and ongoing analysis, you ensure that every valuable interaction is tracked accurately.
Regular testing and troubleshooting keep your tracking setup reliable, helping you make data-driven decisions.
While Google Ads provides robust tracking tools, integrating a Customer Data Platform (CDP) like CustomerLabs can elevate your strategy further. CustomerLabs CDP helps unify first-party data across touchpoints, ensuring more accurate conversion attribution even across multiple sessions and channels.
Syncing first-party data directly with Google Ads improves audience segmentation, enhances retargeting efforts, and achieves better match rates—especially useful with advanced tracking setups like Google Enhanced Conversions.
Automate audience creation, streamline campaign workflows, and minimize manual effort with CustomerLabs. Book a Demo.


