Several users might land on your website and perform some actions, but what is the use if you don’t track these interactions or actions? Studying these interactions will help you identify patterns and trends in how visitors engage with your website. But for doing that, you need a proper conversion tracking setup, which is reliable and easy to set up. By setting up Google Analytics (GA4) and Conversion Tracking on Shopify, you can get invaluable information that you can use to strategise and maximize your ad campaign performance.
In this blog, I will be guiding you through the step-by-step process of easily tracking conversions & user behavior (custom events that matter to your business) from your Shopify store in Google Analytics (GA4). Trust me, it’ll be a cake walk with 1PD Ops, and this blog will help you to walk through the entire setup process. It’s going to be simple and much more reliable. Let’s get started.
Tracking Conversions in your Shopify Store without coding in just a few clicks
Integrating your Shopify store with CustomerLabs is as easy as a few clicks (new integration is yet to be live). However, I’ll talk about the current setup, which again, doesn’t need you to sit and code or use a GTM (Google Tag Manager) to track conversions, including custom conversions on your Shopify store.
All you have to do is – login to CustomerLabs and just paste your website link, click save.
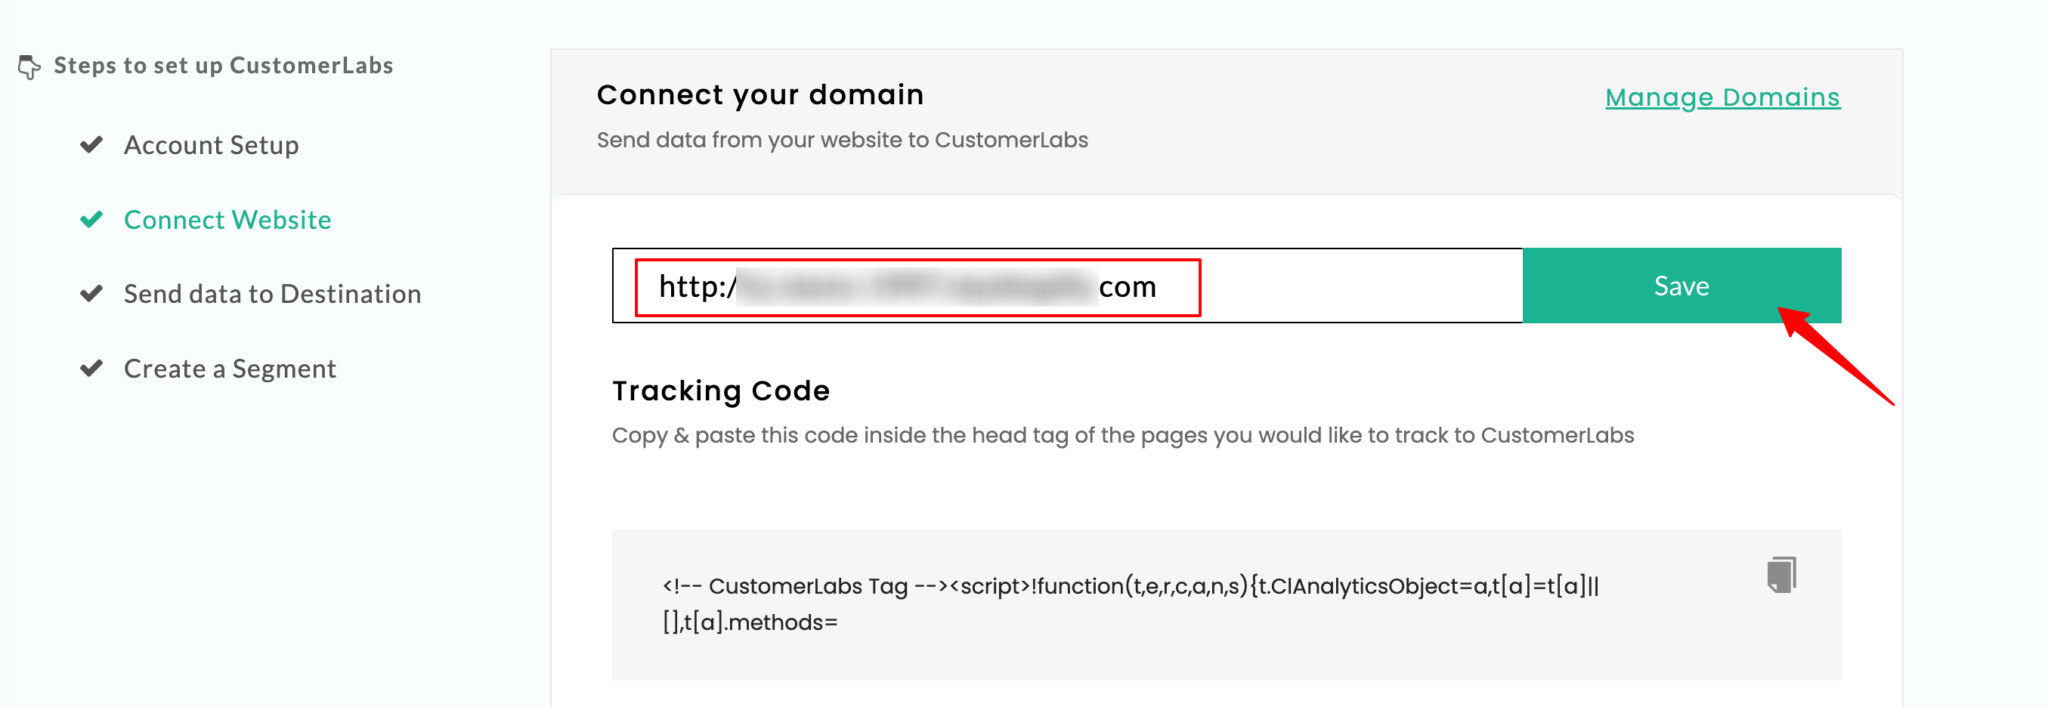
Copy the Tracking code displayed and paste it into your Shopify Store.
Here are the steps to do that.
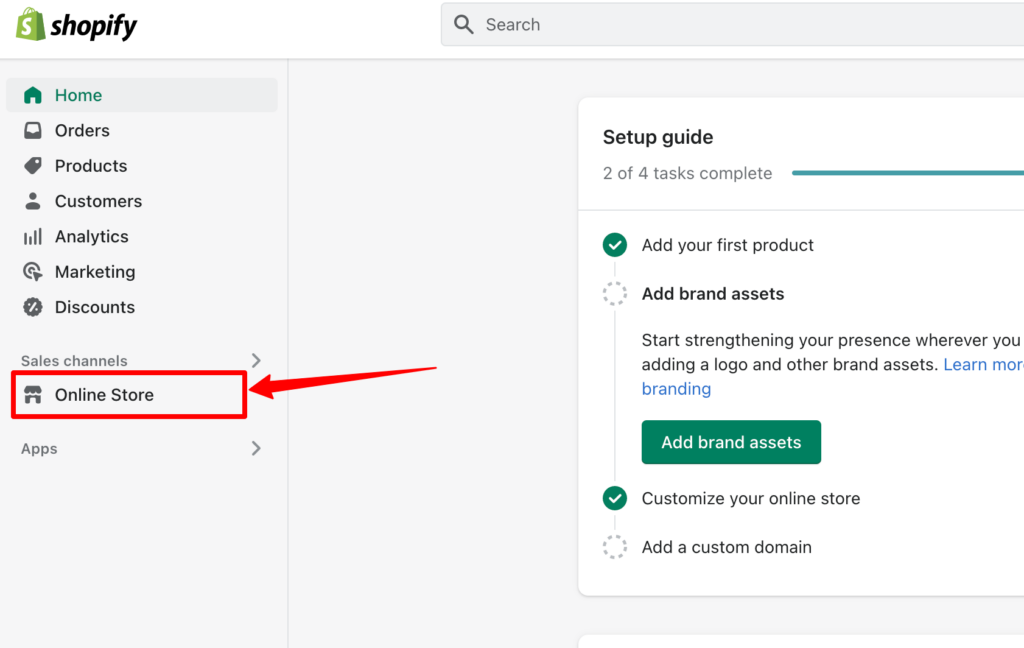
1. Click on “Online Store” in your Shopify account
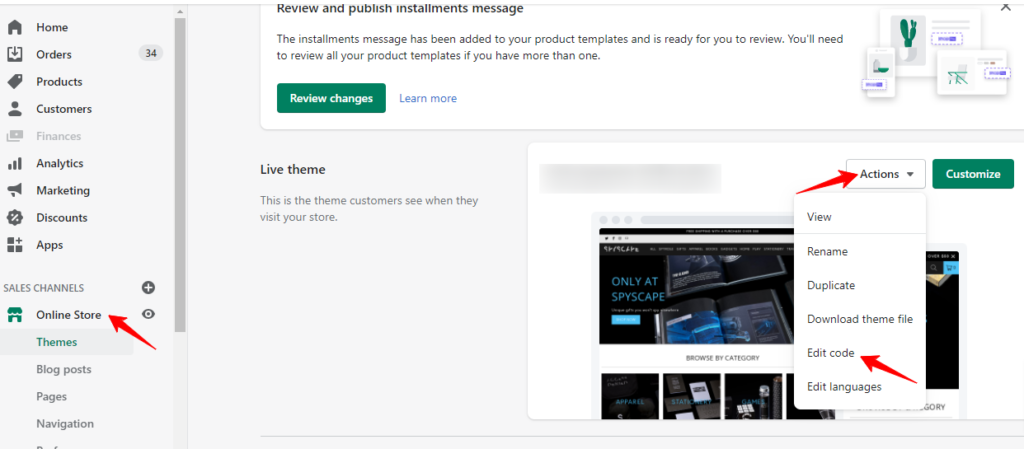
2.. Head over to the Themes section, click on Actions, and choose Edit code from the dropdown menu.
3. In the theme.liquid file, search for “</head>”, paste the code you have copied from the CustomerLabs App, right above the </head> tag, and click on Save.
With this, you have now integrated your Shopify Store. Next, you have to track customer events. And to do this, follow the steps below:
1. To set up a custom pixel in Shopify, navigate to Settings, click on Customer Events, then select “Add custom pixel.”
2. You have to name the pixel “CustomerLabs” and then click on “Add Pixel.”
With this, your Shopify website is connected, and all the first-party data from your online store, including anonymous website visitors, is flowing into CustomerLabs 1PD Ops.
Now, to track the purchase event accurately or for tracking custom events from the purchases (AOV-based, LTV, etc.), you need to pull in the purchase data from your Shopify store into CustomerLabs 1PD Ops using a webhook.
Purchase data flowing on the server-side into CustomerLabs 1PD Ops from your Shopify Store
There’s a catch when you are bringing in purchase data from the website, especially if you have any external plugins for checkout like GoKwik, Fastrr (from ShipRocket), etc. Because when checking out, it redirects your users to a different domain, and most probably, there might be issues in tracking the purchase data. So, when you use a webhook to bring in the purchase event data into 1PD Ops, there will be no data loss.
This happens as 1PD Ops stitches the user journey from both the website and server, and the unification coverage can be monitored. Therefore, the first-party data collected through 1PD Ops becomes more accurate and reliable.
Steps to get purchase data from your Shopify store
To get started with getting purchase data from your Shopify store, go to the Sources page, search for Custom source from the list.
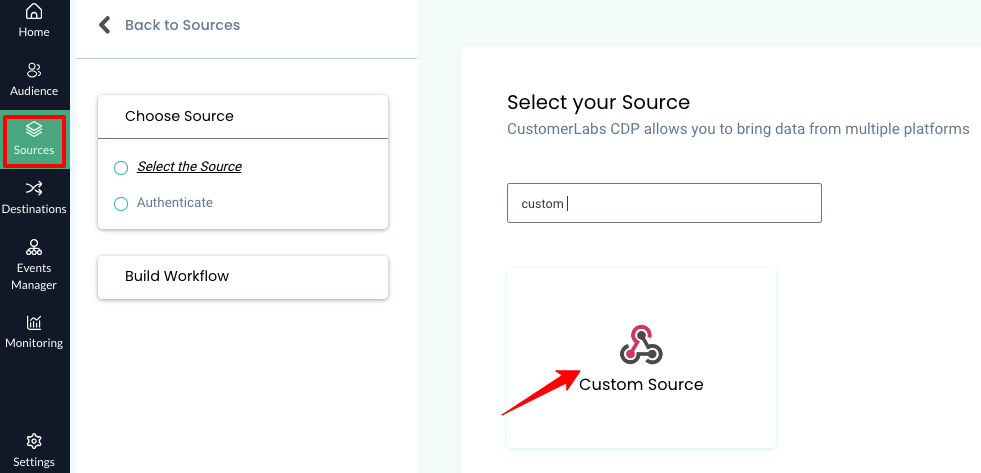
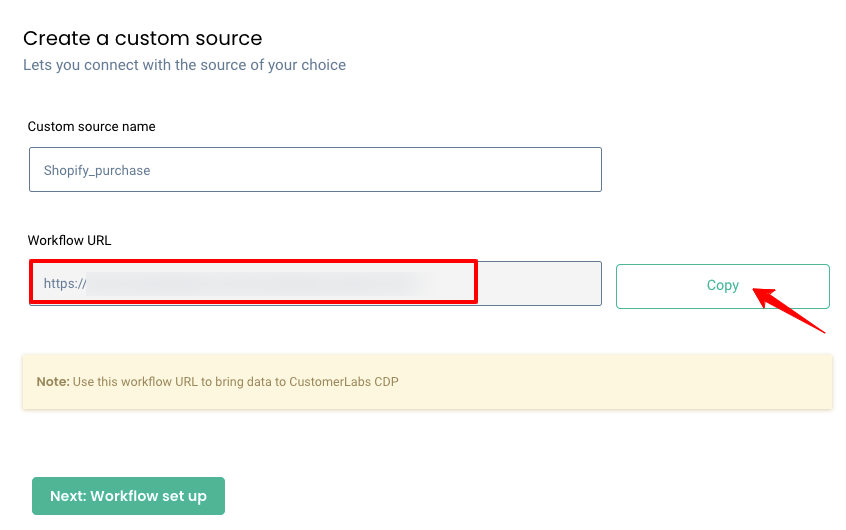
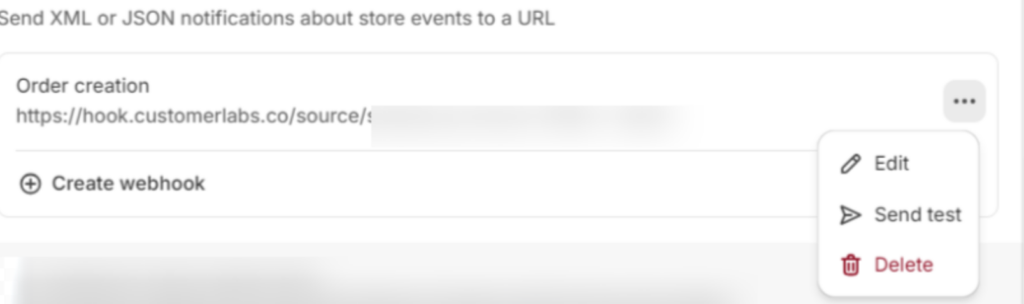
Click on it, and name the source as “shopify_purchase”, click ‘Save’. Then, copy the Workflow URL that’s generated (see the image below for reference).
Next, in your Shopify account, navigate to Settings > Notifications and create a webhook.
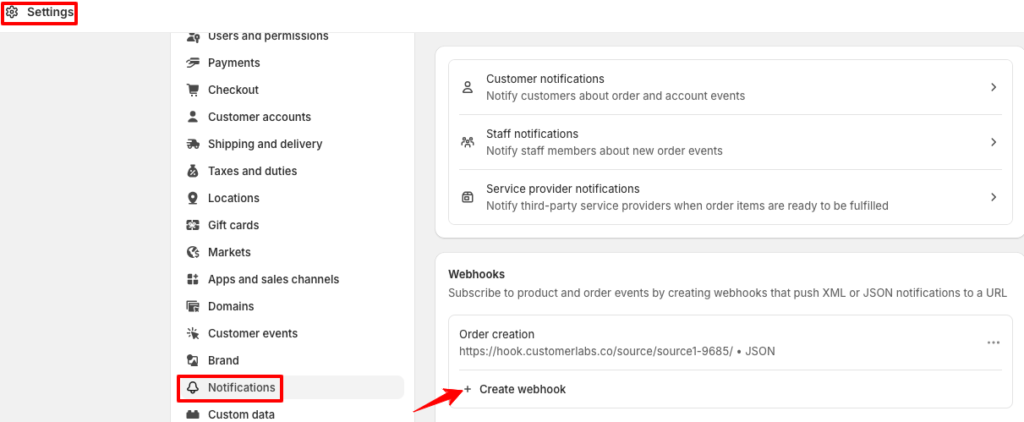
On the popup, enter the copied Workflow URL from CustomerLabs into the URL field of Shopify, and save (it looks something like the below).
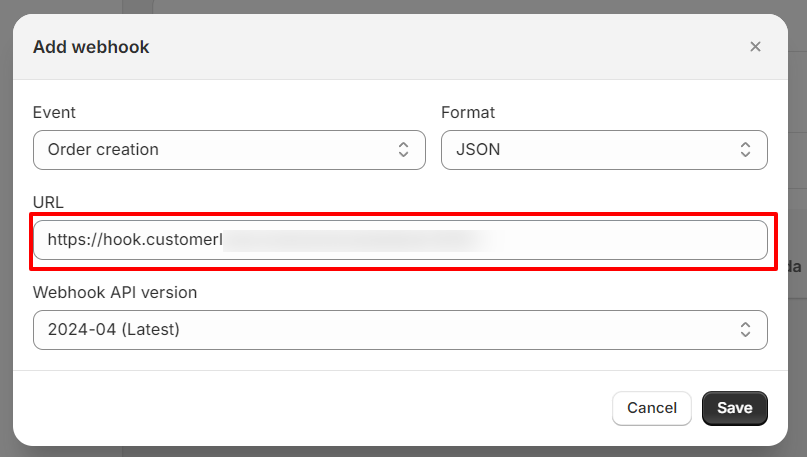
Once you save, click on the three dots on the top right corner and select “Send Test.” Check if the data you pushed is correctly reflecting inside 1PD Ops.
Now you can ensure that your purchase event data will be tracked without data loss.
After setting up a webhook, you need to bring in the cart token from Shopify. Cart token helps to unify the purchase event data with the existing data set, ensuring that all the purchase events are accurately sent to the ad platforms or the analytics platforms such as GA4.
If you want detailed steps to bring in the cart token, kindly refer to this documentation that covers how cart token is pushed into 1PD OPS.
With this, complete integration of your Shopify store with CustomerLabs is done, including the purchase event.
For a detailed analysis of this data, including the conversions and the conversion value, you need to push this event tracking data to GA4. This helps you with a better understanding of conversion goals, funnel, and attribution.
Connecting your Shopify Store with GA4
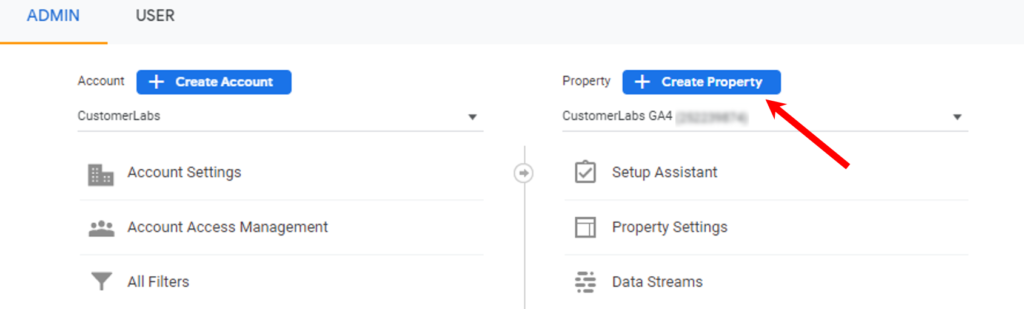
To get started with connecting Google Analytics (GA4) to your Shopify store, log in to your Google Analytics account.
Once you’re in, navigate to the Admin section and create a new Property.
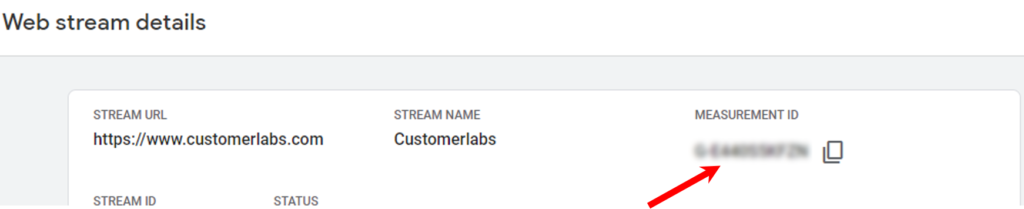
After the property is created, head to the Data Stream section and click on Add stream, then choose Web.

Once you enter your website URL, a new Measurement ID will be generated—copy that ID, and paste it in your Shopify Store just above the </head> section and the same ID must also be shared in the CustomerLabs 1PD Ops (shared the details below)
From the main menu of CustomerLabs 1PD Ops, go to Destinations, and choose Google Analytics gtag from the list.
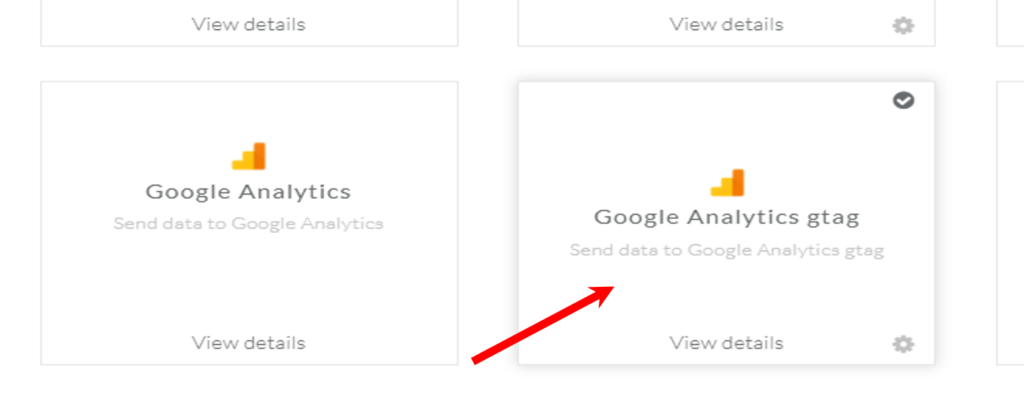
Connect to the Google Analytics gtag destination (search for it, if it’s not visible)Next, you’ll have to give it a name (by default a name is generated). Click ‘Save and Enable’.
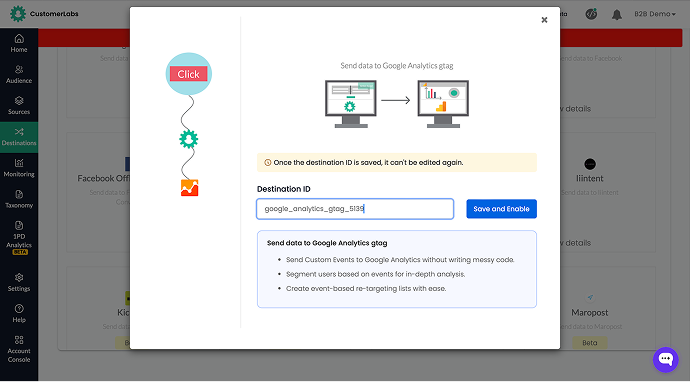
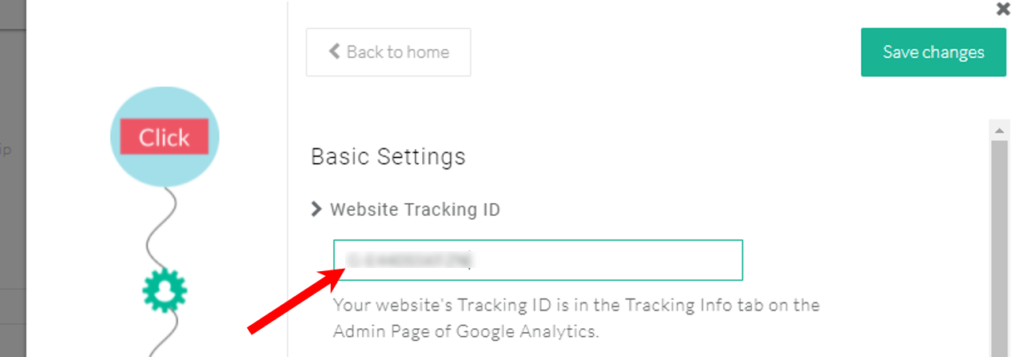
Once done, GA4 connection is enabled and configuration must be done. To do that, in the Website Tracking ID field, paste the Measurement ID you copied from GA4. Your integration setup for the browser-side tracking is now ready.
Sending the conversion tracking data via the Measurement Protocol to GA4 (server-side tracking):
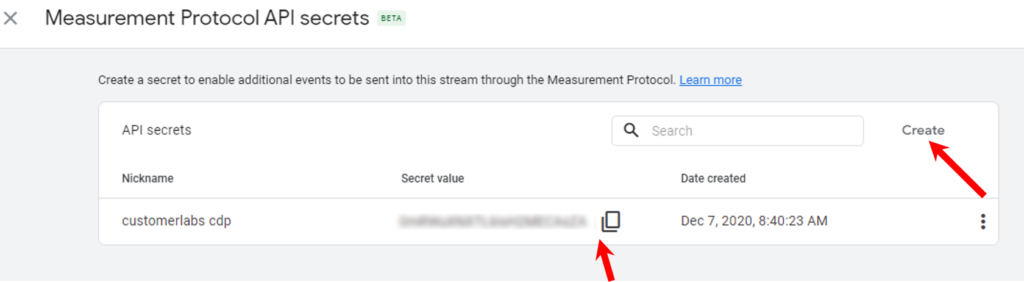
For the server-side setup with GA4, begin by selecting the newly created Data Stream in your Google Analytics account. Then, head to the Measurement Protocol API Secrets section.
Click on Create to generate a new secret and give it a recognizable nickname. Once the secret is created, copy the Secret value that appears.
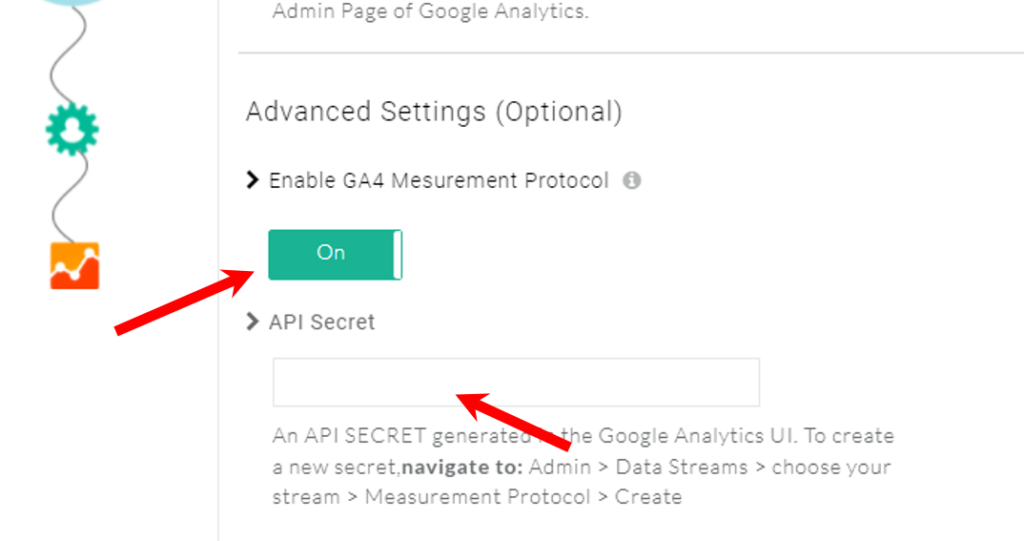
Now, in your CustomerLabs account, under the GA4 configuration settings, go to Advanced Settings and make sure to toggle on the option to Enable GA4 Measurement Protocol.
With this the server-side tracking is enabled but you have to paste the secret value you copied earlier into the API Secret field for a proper integration.
Your CustomerLabs account is now configured to work with GA4 both on the server-side and browser-side.
Steps to measure and send the custom conversion events on reporting
To start tracking custom metrics in GA4, log in to your account and go to the Admin section to manage your property settings.
Under Admin, look for the Data Display section and click on it. This will expand a menu—select Custom Definitions from the list.
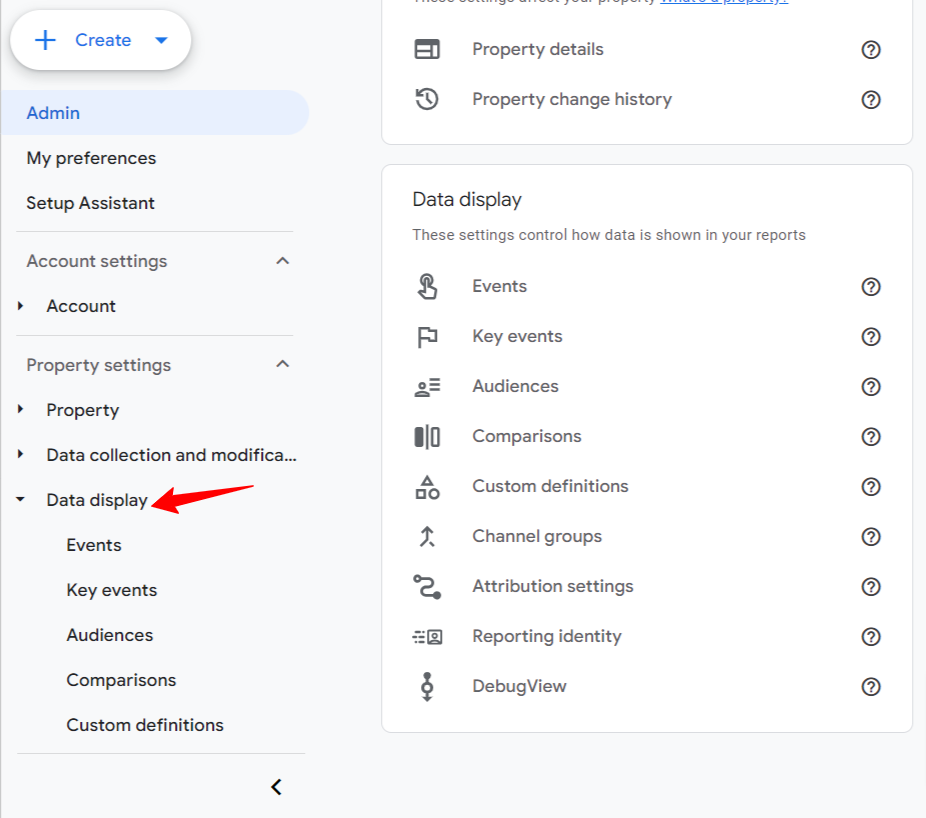
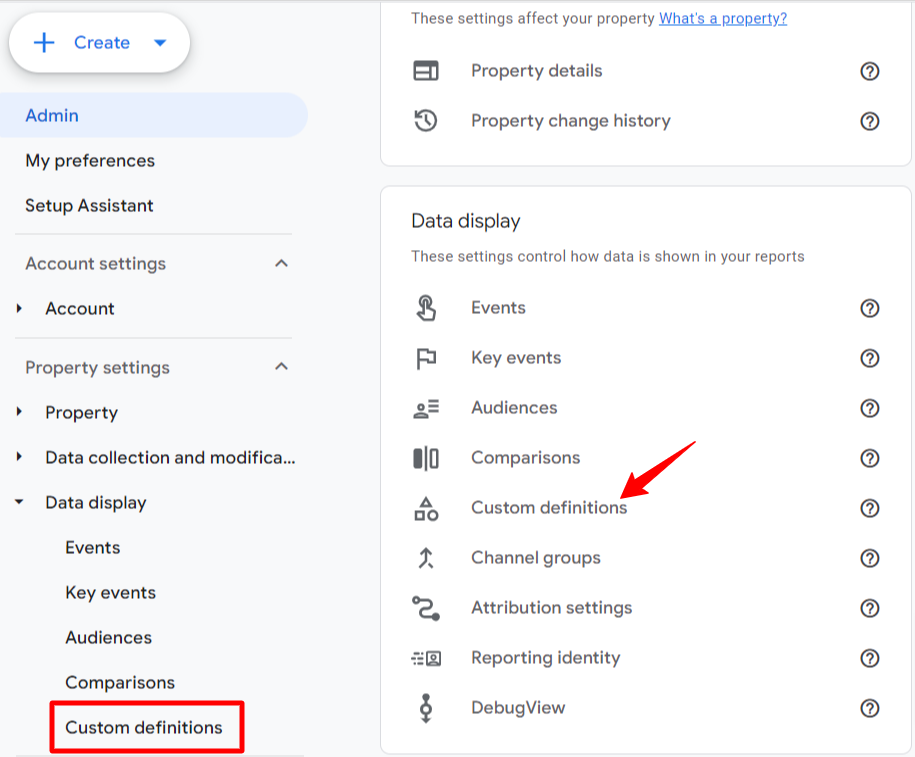
Once you’re inside the Custom Definitions area, click on Create Custom Metric to begin setting up a new metric for your event.

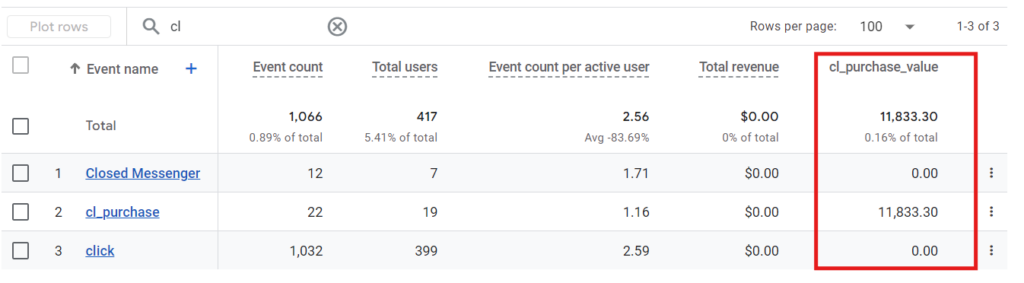
However, before you even get started to create a custom metric, ensure you are pushing the right parameter that corresponds to the total purchase value, and you are tracking the revenue data accurately.
The parameter should be either “ecomm_totalvalue” or “value,” and the unit of measurement must be set to “Currency.”
Double-check the data structure to confirm that the “ecomm_totalvalue” or “value” parameter is being passed correctly. Likewise, if you wish to measure lead price, assign a specific value to the event and send it to GA4.
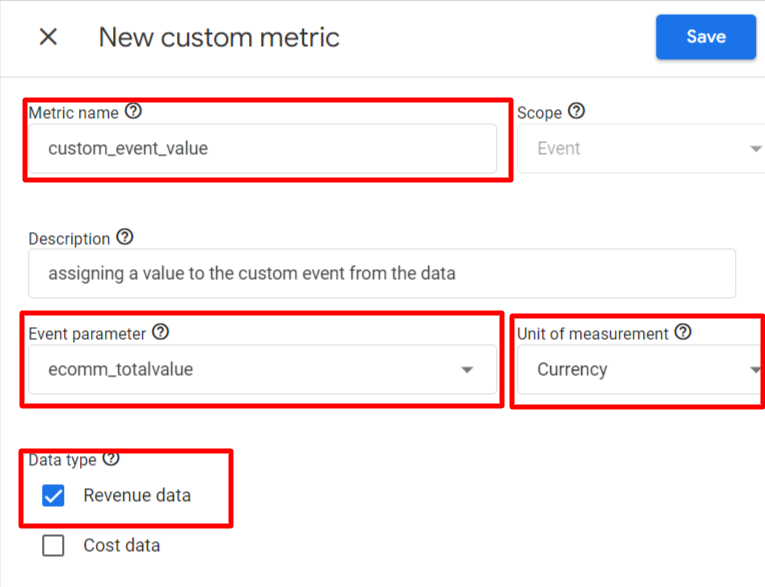
Save the settings entered, and you’re good to go!
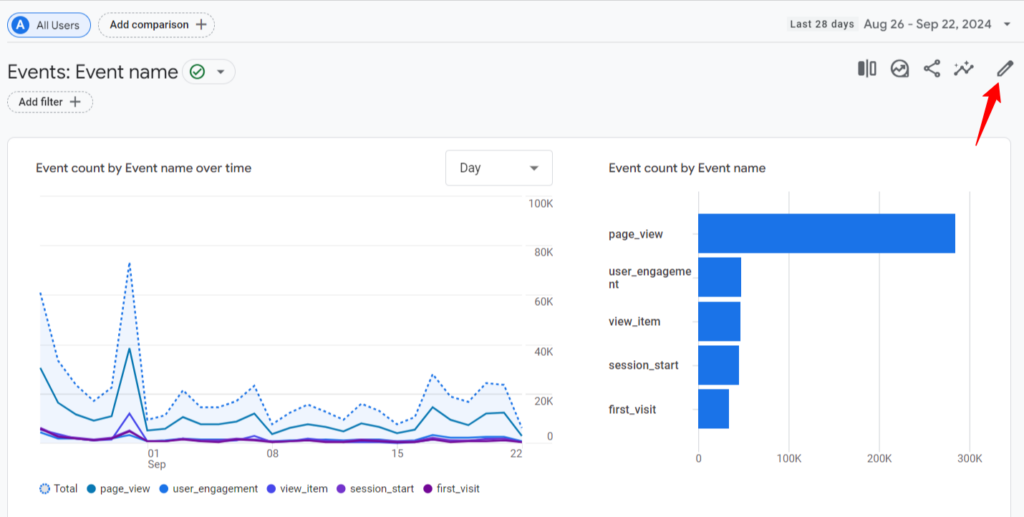
To analyze your custom metric or to even view if the events are flowing correctly, cross-verify it with your data., Head over to the “Reports” section in GA4 and click on “Engagement,” then choose “Events.”
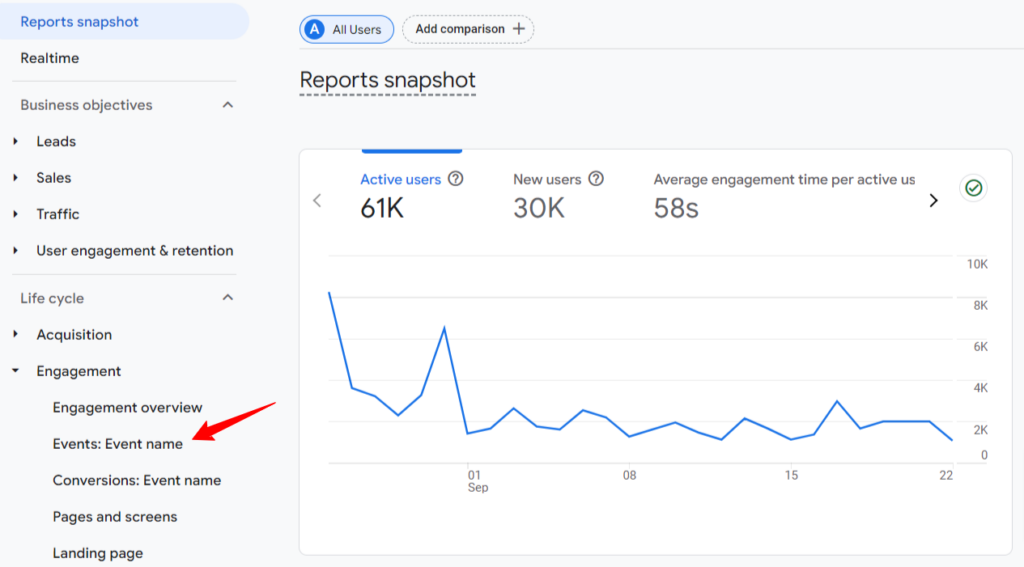
Click the edit pencil icon to begin editing.
Scroll to the “Customize Report” tab and click on the “Metrics” option.
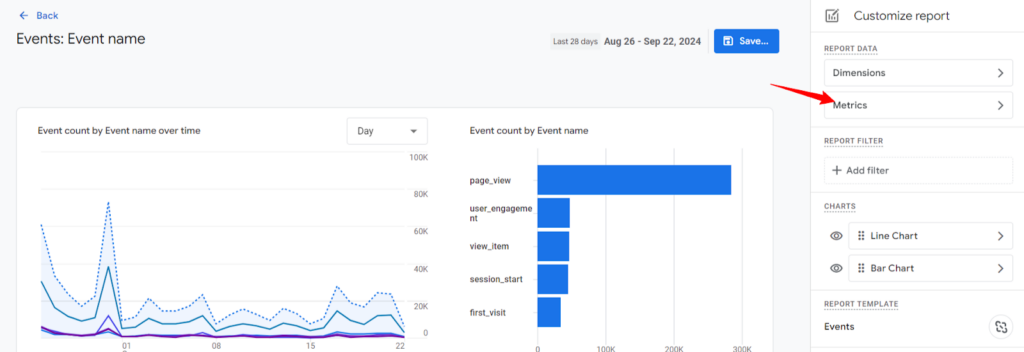
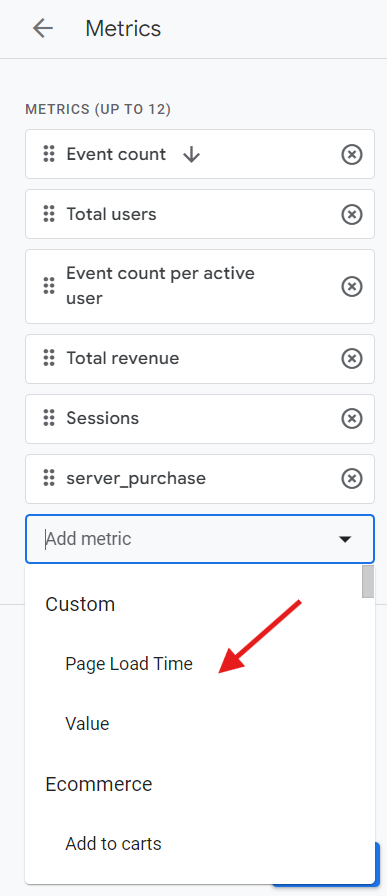
Click the “Add Metric” button to include your custom metric in the report.
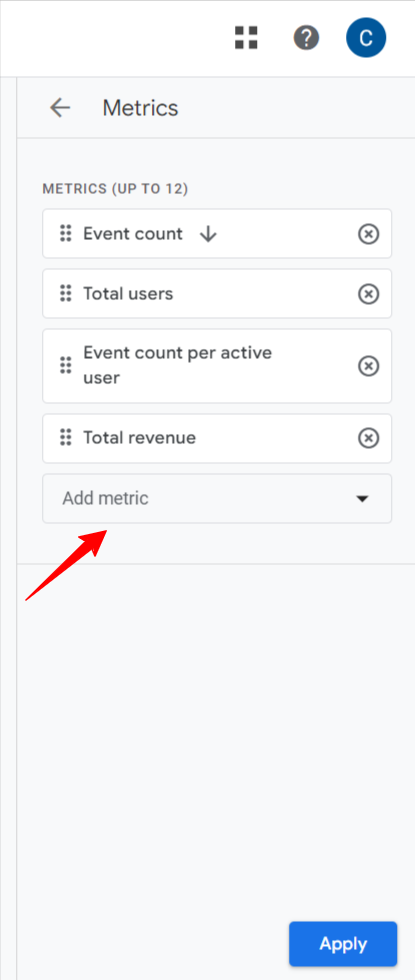
From the dropdown list, select the custom metric you created in 1PD Ops. You can either add it to the existing events report and save the changes, or create a new report using the metric.
After setting it up, the custom metric will begin displaying values. Just note—GA4 might take up to 24–48 hours to fully populate the value in the custom metric.
Now, after completing this process, you need to setup the consent mode v2 to comply with Google’s new privacy updates. When you are sending conversion data to Google, you must send it along with the consent parameters; if you fail to do so, the conversion data you send to Google will become ineligible for future marketing purposes as Google can’t use the data.
Let’s see how you can easily implement consent mode v2 with CustomerLabs.
Consent Mode V2 Setup With CustomerLabs
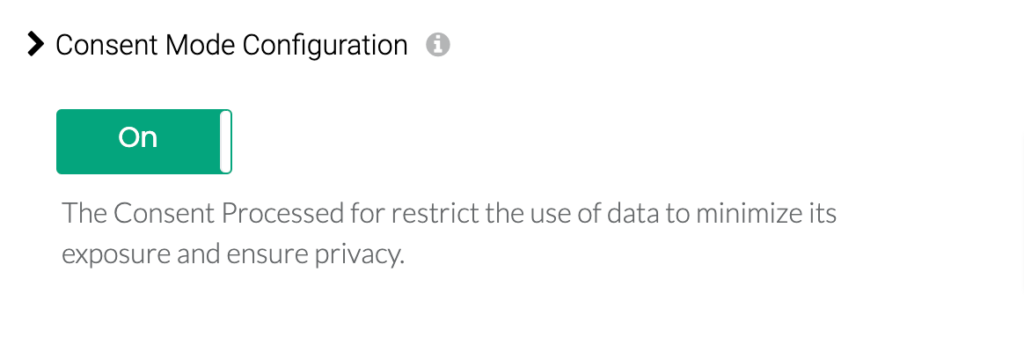
To configure Consent Mode v2 within CustomerLabs, go to the Configuration Settings in GA4 under the destinations (remember?, we configured it above). Scroll down to find Consent Mode Configuration.
All you have to do is enable the toggle to activate Consent Mode v2.
That’s it, you have successfully set up the consent mode v2, now the data you collect will be sent with consent parameters (such as the analytics_storage ; ad_personalization; etc.) to Google Analytics (GA4).
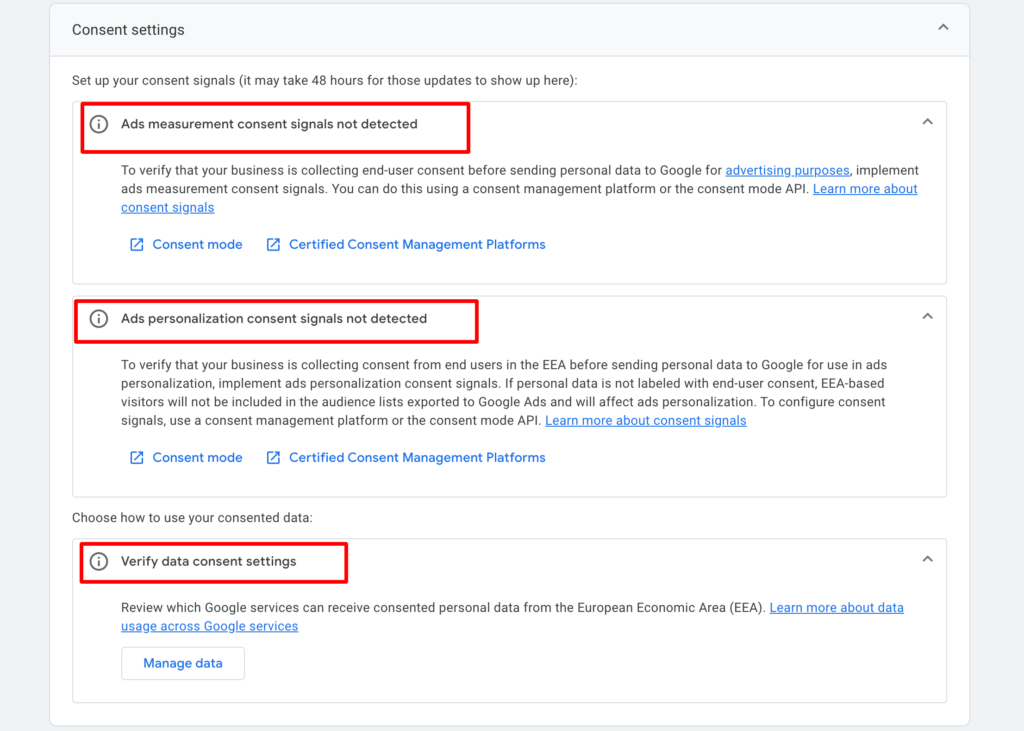
Now, if you want to verify if the setup is functioning properly, you need to navigate to the consent settings in GA4 and make sure it doesn’t look like the image below.
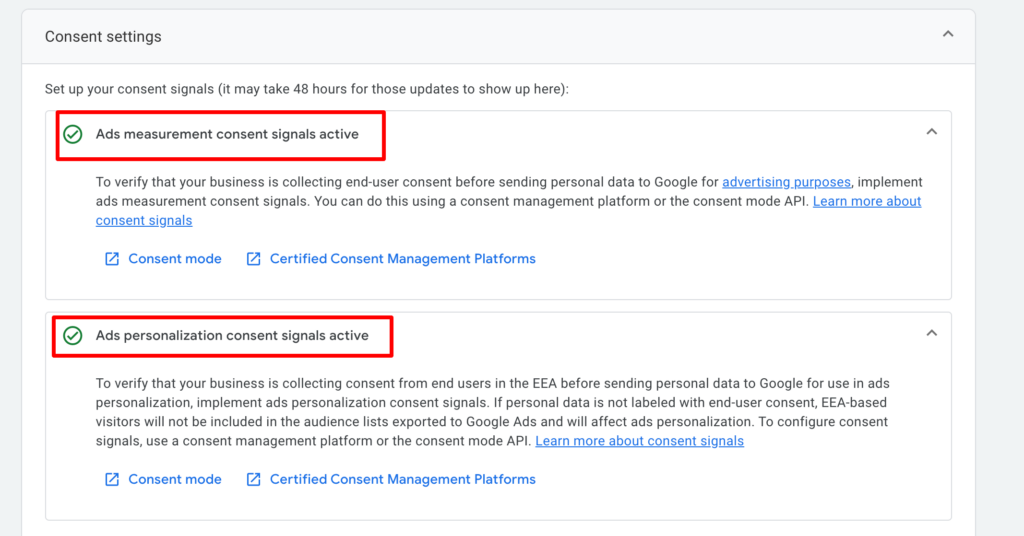
Instead, it should have a green tick as shown in the image below.
Note: With increasing privacy regulations across European regions, it’s essential to respect user consent. To stay compliant, you must pass users’ consent choices to Google. Based on these preferences, Google will dynamically determine how user data is used.
Conclusion
Setting up conversion tracking and GA4 for your Shopify store might seem technical at first. But with the right steps and tools in place, especially with 1PD Ops, it becomes an easy process. Once everything is configured, you’ll start getting deeper insights into how your visitors interact with your store, what drives conversions, and where potential drop-offs happen.
This kind of visibility is crucial—not just for optimizing ad campaigns, but for making smarter marketing decisions overall. Now that you’ve walked through the setup, you’re all set to make the most of your first-party data and take control of your tracking.