Customerlabs CDP Documentation
Shopify Implementation Guide
Shopify (or) Shopify Plus is an e-commerce platform that allows users to set up an online store. By connecting your Shopify store with CustomerLabs CDP, you can start tracking the events (user-behavioral activity) of your website visitors without writing any code.
Here is a detailed video that guides you through the step-by-step procedure to integrate your Shopify store with CustomerLabs
You can also go through the simple steps below to integrate your Shopify/Shopify plus store with CustomerLabs.
1.Based on your Shopify store setup, here are two different ways you can integrate your Shopify store with CustomerLabs
- Without Post-purchase page: One way is when you don’t have a post-purchase page (upsell, feedback forms, surveys, etc) after placing an order and you redirect them to an order status page (thank you page).
- With Post-purchase page: The other way is when you have a post-purchase page (upsell, feedback forms, surveys, etc) before redirecting them to the order status page (thank you page).
The post-purchase option should be configured mandatorily in Shopify settings if you’re using this method to integrate your Shopify store with CustomerLabs. The setting looks like the image given below. Check With post-purchase section for configuration steps.
2. Are you using a one-click checkout for your Shopify website? Before onboard to CustomerLabs follow the instructions given below:
Let’s say your website uses a click checkout like Razorpay, Gokwik, or Shiprocket, and the user journey breaks in the checkout page due to a pop-up of pre-filled user information. To track the user journey completely we recommend the bottom funnel events to the data layer. Once the scripts have been updated in the Google Tag Manager we can track the customer’s purchase journey in the CustomerLabs
Here is the sample payload for the data layer push you will need:
dataLayer.push({
event: ‘purchase’, //event name-purchase
transactionId: ‘12345’, //unique ID for transactions
transactionTotal: 500 //total amount of the purchase
products: [{ name: ‘T-shirt’, price: 250, quantity: 2 }] //product name //price //quantity
});
Please refer to the Official documentation for the Google tag manager’s tutorial.
Kindly ask your one-click checkout team to push payloads for the following events: order placed, payment_init, payment-screen, and checkout_initiated in the specified format.
Once the payloads are pushed to the data layer, CustomerLabs will update the required code for the one-click checkout events.
Kindly Share GTM access with [email protected]. To ensure the data layer is triggering correctly use Google Tag Manager’s preview mode before publishing the script.
After updating the code, verify the presence of the GTM option. Right-click in the browser, inspect the console, and type “google_tag_manager” to check if the GTM ID matches. If it does, paste the GTM tracking code above the CustomerLabs tracking code in Shopify. If it doesn’t match, reconfigure and update the changes in GTM, then verify again.

Then, proceed with the Shopify code implementation as per the document.
Initial setup
1. Log in to the CustomerLabs account
2. On the Home page → Under “Connect your domain” → Enter your website URL → Click Save.
(Note: Add additional domains and exclude misattributed referral domains using URL Management )

3. Copy the Tracking code
Before copying the tracking code, we recommend using 1P Domain Tracking. What is 1P Domain Tracking?
“In an era where third-party cookies are no longer effective and even first-party cookies expire after 7 days, maintaining accurate attribution is a significant challenge. However, Our 1P domain tracking solution emerges as the ultimate saviour.”
Click here to implement 1P Domain Tracking

4. Login to your Shopify account → Click Online store

5. Under Themes, go to Actions → Edit code

6. Under theme.liquid, search for “</head>” and paste the CustomerLabs code in the header section and Save.

7. Create a custom pixel in Shopify by navigating to Settings → Customer events → Add a custom pixel

8. Give the Pixel name as Customerlabs → Add pixel

Without Post-purchase page:
1. Go to the Home page of your CustomerLabs account and click on “Connect website”.

2. Click Shopify → Click Shopify without Post-purchase button
Note: Opted for 1P Domain tracking? Before clicking on Shopify make sure you have implemented the 1P domain tracking code.


3. Copy the code below the 3rd step as given in the image below.
Note: This code contains a pixel tracking script “https://cdn.js.customerlabs.co/shopify_v1_0_0.js” with version 1.0.0 which will undergo updates. In that case, it is essential to change the version number or redo Steps 3 & 4 with the new versioned JS file.

4. Paste this code in the new custom pixel (CustomerLabs) created in Shopify → Click Save

5. Kindly update the code in the customer events track_cart_token_on_addToCart value as true if you use any one-click checkout. If not retain it as false.
6. To Update the cart_token_key: “cart”, follow the steps below,
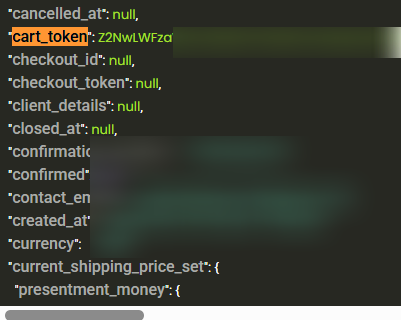
- Go to your Shopify Store website. Add a product to the Cart.
- Open “Inspect”. Navigate to the “Application” tab
- Click on “Cookies” on the left menu. Click on our website URL.
- Copy the field name that has the cart token value as “Z2tyxxxxxxxxx” and map it to cart_token_key.

Note: You can modify the CL variable configuration settings in the code to match your custom requirements as explained in the first few lines of the snippet. Make sure you don’t modify the entire code and modify only the initial settings explained.
You can modify only the below-given snippet in the entire code
var CL = {
debug: false,
fb_skip_contents: false,
default_currency: “USD”,
product_viewed: true,
collection_viewed: true,
product_added_to_cart: true,
search_submitted: true,
cart_viewed: true,
checkout_started: true,
checkout_address_info_submitted: true,
checkout_contact_info_submitted: true,
checkout_shipping_info_submitted: true,
payment_info_submitted: true,
checkout_completed: true,
default_address_selection: “”,
default_value: 0,
cart_token_key: “cart”,
track_cart_token_on_addToCart: false
};
You can also add a call-back function for each event. For example, we consider “product_viewed” event,
analytics.subscribe(“product_viewed”, event => {
_clShopify.trackShopifyEvents(event, function(customProperties, productProperties, userProperties){
//code here to compose the properties
var properties = {};
fbq(‘track’, ‘ViewContent’, properties) //to send properties to Meta
}
);
});
By changing the settings as given below:
| debug | Display event properties in console messages for debugging the incoming and outgoing data (true to show, false to hide). |
| fb_skip_contents | Enable skipping of Facebook contents (true to enable, false to disable). |
| default_currency | Send “USD” as the currency if the event does not provide a currency code. |
| product_viewed | Trigger a product viewed event when a specific product is viewed (true to trigger, false to suppress). |
| collection_viewed | Trigger a collection viewed event when a collection is viewed (true to trigger, false to suppress). |
| product_added_to_cart | Trigger a product added to cart event when a product is added to the cart (true to trigger, false to suppress). |
| search_submitted | Trigger a submitted search event when a search is submitted (true to trigger, false to suppress). |
| cart_viewed | Trigger a cart viewed event when the cart is viewed (true to trigger, false to suppress). |
| checkout_started | Trigger a checkout started event when the checkout process begins (true to trigger, false to suppress). |
| checkout_address_info_submitted | Trigger a submitted checkout address info event when address information is submitted (true to trigger, false to |
| checkout_contact_info_submitted | Trigger a submitted checkout contact info event when contact information is submitted (true to trigger, false to |
| checkout_shipping_info_submitted | Trigger a submitted checkout shipping info event when shipping information is submitted (true to trigger, false |
| payment_info_submitted | Trigger a submitted payment info event when payment information is submitted (true to trigger, false to suppress). |
| checkout_completed | Set to ‘false’ if the post-purchase feature is available |
| default_address_selection | Set to default address selection for checkout address info submitted event. It should be billingAddress or shippingAddress. |
| default_value | Set to default value for all the above events. The value should be a number. |
| cart_token_key | The default value is ‘cart’.Update the value if the cart token value is received in a different field. |
| track_cart_token_on_addToCart | The default value is false. Set it to true. |
7. After saving, click Connect. You have installed the code on your website.

With Post-Purchase page:
1. Go to the Home page of your CustomerLabs account and click on “Connect website”.

2. Click Shopify → Click Shopify with Post-purchase button
Note: Opted for 1P Domain tracking? Before clicking on Shopify make sure you have implemented the 1P domain tracking code.


3. Copy the pixel code below the 3rd step as given in the image below.
Note: This code contains a pixel tracking script “https://cdn.js.customerlabs.co/shopify_v1_0_0.js” with version 1.0.0 which will undergo updates. In that case, it is essential to change the version number or redo Steps 3 & 4 with the new versioned JS file.

4. Paste this code in the new custom pixel (CustomerLabs) created in Shopify.
- Kindly update the code in customer events as track_cart_token_on_addToCart value as true if you use any one-click checkout. If not retain it as false.
- To Update the cart_token_key: “cart”, follow the steps below,
- Go to your Shopify Store website. Add a product to the Cart.
- Open “Inspect”. Navigate to the “Application” tab
- Click on “Cookies” in the left Menu. Click on our website URL.
- Copy the field name that has the cart token value as “Z2tyxxxxxxxxx” and map it to cart_token_key.
For any modifications on the code, refer here.

5. Click ‘Save’ &, click ‘Connect’.

6. Go back to CustomerLabs account → Shopify with Post-purchase from the Home page → Copy the code below the 4th step

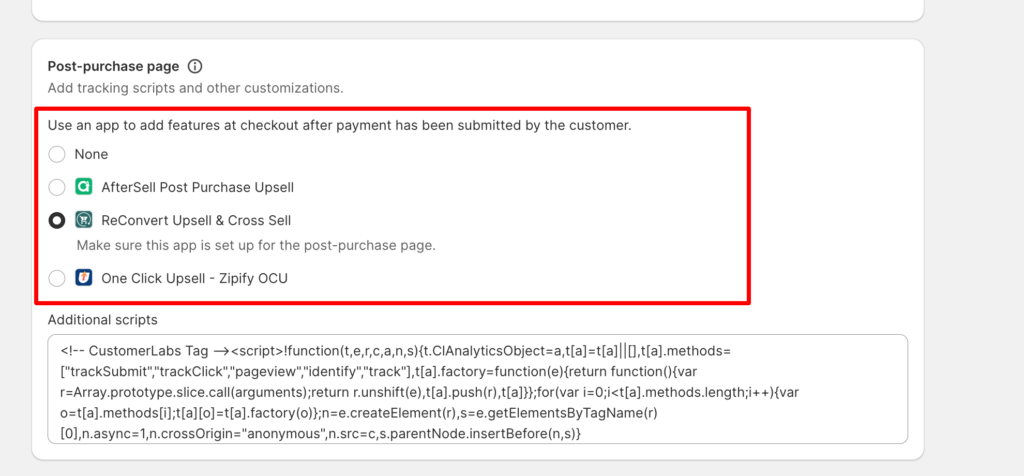
7. Go to Shopify admin account → Settings → Checkout and if you scroll down you will see the Additional scripts → Post-Purchase page

8. In the Post-Purchase section, you may have an option to choose an app for Post-purchase configuration. You need to select any one of the existing app and should not select the “None” option for Post-Purchase.
If you’re not using any apps for post-purchase, integrate using Without post-purchase method.

9. Paste the copied code in the box given below Post-purchase page under the Additional scripts box and click Save

Note: It’s mandatory to select an option from the list of apps listed for Post-Purchase before you paste the code.
Bring in Purchase event data using Webhook
Currently for the Purchase event data to be tracked correctly, we also suggest and recommend you bring the Purchase data from your Shopify store directly through Webhook.
The use of a webhook in bringing in the Purchase event data is to overcome this challenge and ensure comprehensive tracking of all purchase events.
1. Login to your CustomerLabs account
2. Navigate to the Sources page > Search and select the Custom source from the list.

3. Name the source as “shopify_purchase” for data standardization purposes. Copy the Workflow URL that you will require in the later step.

4. Head to your Shopify account, and create a webhook (Shopify > Settings > Notifications > Create webhook).

5. Paste the copied Workflow URL from CustomerLabs CDP in the URL section of Shopify as shown in the image below and click on Save.

6. Click on the “…“. and Click Send Test. This enables us to test whether data is being pushed through this URL.

7. Now, trigger a test purchase to check if you’re receiving the cart token in CustomerLabs.
8. After triggering a test purchase, go to CustomerLabs → Sources → shopify_purchase → Setup → Next: Workflow set up. Learn more about workflow

9. In Workflow setup, it is mandatory to update the delay. Refer here
10. Now click on Fetch new data

11. Click on View details to view the incoming data and choose the relevant sample data.

12. Note: In the sample data selection, check for the presence of cart_token or note_attributes_ cart_token as shown in the image.
If not, please reach out to [email protected].
Example of sample data with the note_attributes_cart_token

Example of sample data with the cart token
13. Select this sample and skip to Completing the workflow setup for further steps.
Completing the workflow setup
1. Select the sample with the cart token.

Note: While selecting the sample, ensure the data contains no parameters with null values as given in the image

The Customer Labs will not process parameters with null values. This is because null values are not considered valid data by the system. For example, if the parameter is “first_name”, you could pass the value “John Doe” or the empty string” “.
2. Filter incoming data – this step helps in filtering out irrelevant data and allows only the information you need, to enter the workflow in the future. This is an optional step in the workflow.
For example, If you want the purchase data to be entered into the database that has an email address. You can the filter the data as shown below.

3. Event configuration: Give the event name as cl_purchase by selecting a custom event from the dropdown.

4. Identity mapping: Choose identify_by_email or identify_by_phone as the field to map the incoming email ID and phone number from Shopify.
Along with those identifiers,
4.1If you have cart token in Shopify, you must map the cart token note attribute in identity mapping
This mapping is crucial for unifying purchase data, and serves as a unique identifier for a customer. Learn more about identity mapping.
5. Map Attributes: Post-user identity mapping, you can map incoming attributes under one major field – User traits

User traits
User traits refer to specific characteristics or attributes associated with an individual user. The user traits include first name, last name, city, state, company, zip code & other similar information that can be added under User traits.
To send users’ attributes to the ads platforms, you must map them as user traits under event configuration. The more user details you share with platforms like Facebook, the higher the Event Match Quality will be.

Product details:
Product attributes can be added for events related to E-commerce/other business categories such as Product viewed, Product clicked, Purchases, etc. Details such as product sku, product ID, product variant, and product size can be added under product details and choose line_items from the dropdown.

Event Properties:
Additional information pertaining to the event can be added under event properties. The Mandate fields are: value, currency, transaction id and order id. The transaction ID can be mapped to transaction number or order id.

6. After completing the configuration as required, click on Save Workflow.

7. Verify if the workflow is active by navigating to the Sources > Click on shopify_purchase > Check the ‘Workflow Status’ column

Refer to the documentation to learn more about workflow and other attributes mapping.
You have now connected your Shopify store with CustomerLabs!
You will start receiving the events on the Events Manager page in CustomerLabs.

Send events to ad platforms for better Event Match Quality (EMQ)
You can now start sending these events to ad platforms like Facebook & Google by connecting them to the Destinations page.
Before sending the events from CustomerLabs to Facebook or any other platforms, compare the events you’re receiving through CustomerLabs pixel with the events you’re receiving through Facebook pixel.
If the events on CustomerLabs are closer to accuracy, you can then start sending the events from CustomerLabs to Facebook or any other platforms.
Sending your website events directly from CustomerLabs to the ad platforms gives you a higher Event Match Quality (EMQ).
Disconnect Direct Integration of Facebook Pixel
After connecting Facebook as a destination in CustomerLabs, you can disconnect Facebook pixel direct integration with your Shopify store to avoid duplication of events. If you are sending only the audiences to Facebook, you can ignore this step.
1. Log into your Shopify account and go to Online store → Preferences → Facebook. Disconnect the pixel setup if you have connected it.

2. In your Shopify account, go to Facebook & Instagram app → Settings → Share data
3. Click on Change under the Share data section

4. Turn off the toggle as shown in the image below to disable data sharing.

5. Click Save

This will stop double firing of events from both CustomerLabs and Facebook pixel.
Note: This will not disable the Product Catalog sharing to Facebook.
Default events tracked when you integrate your Shopify store
Here is a list of default events tracked when you connect Shopify with CustomerLabs
- Page viewed
- Product viewed
- Added to cart
- Search made
- Checkout made
- Add Payment info
- Purchased
If you want to track any other events other than the ones mentioned above, use No-Code Event Tracker to track and set up the events. Refer to the documentation for help.
Other things to note: If you have other “Add to cart” selectors that are not captured in the default Shopify configuration, you will need to configure it differently with the help of a developer. Get in touch with us to guide you through it.
Handling Consent in Sandbox
Follow the below steps to handle consent with or without CMP(Consent Management Protocol)
With or Without CMP
- Go to your CustomerLabs account.
- If connected with Google Ads/Google Analytics, Navigate to its respective “Configuration Settings” in Destinations
- Presence of CMP, then the “Client Side Consent Initialization” toggle should be OFF.
The toggle should be made OFF as the consent initialisation is handled by the CMP.
- Absence of CMP, then the “Client Side Consent Initialization” toggle should be ON.
Update track consent parameters
Be Shopify accounts with CMP or without CMP, the consent parameters have to be updated in the _cl.trackConsent() function. This has to be updated to send the consent preferences to CustomerLabs.
Function Params
/**
*
*
* This function is available for end users to send consent params to update the consent
* @function trackConsent
* @param {object} params consent params
*/
“ad_user_data”: “granted/denied” //granted or denied consent based on specific needs
Function example
_cl.trackConsent({
“ad_user_data”: “granted”,
“ad_personalization”: “granted”,
“ad_storage”: “denied”
});
list //params that can be added for consent
{
“ad_user_data”: “granted”,
“analytics_storage”: “granted”,
“ad_personalization”: “granted”,
“ad_storage”: “granted”,
“functionality_storage”: “granted”,
“personalization_storage”: “granted”,
“security_storage”: “granted”
}
- Now Go to your Shopify account.
- Go to Shopify -> Settings -> Customer Events
- Paste the below line of code after “Shopify Specific Tracking Code Script”
_clShopify.extension=analytics;
The above implementation will ensure that user’s consent preferences are handled in the sandbox environment.
Optimise Campaigns with custom events
Refer to the mentioned playbooks to optimise your campaigns based on custom events,
- AOV based Optimisation
- Category/Product based Optimisation
- New and Returning Customers Purchase based Optimisation
Further, optimisation based on a user trait such as gender, country and other attributes like payment option can also be done.Need assisstance? Seek help from [email protected]


