Did you know that businesses that use Facebook Ads see an average return of $4 for every $1 spent? This data demonstrates Facebook Ads’ enormous potential to increase conversions—but only if the tracking is precise. If you don’t track properly, you can miss out on important information and money.
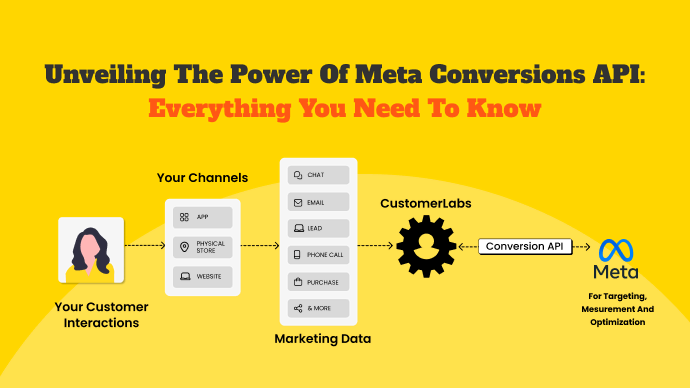
The Conversions API is among the most effective tools for optimizing Facebook Ads. The Conversions API transmits data straight from your server, in contrast to conventional Pixel tracking, which depends on browser data. This implies that even when ad blockers or privacy settings are used, you will still receive more accurate and trustworthy conversion tracking.
In today’s digital world, accurate data is key to success. According to HubSpot, businesses that routinely examine their data are actually five times more likely to make decisions more quickly. However, gathering data alone is insufficient; you also need to be able to track the appropriate events and link them to particular website actions.
The Facebook Website Conversions Objective and Conversions API are useful in this situation. In this guide, we’ll walk you through a simple, no-code way to set up Facebook Website Conversions using the CustomerLabs platform.
Setting Up Facebook Website Conversions with CustomerLabs and Conversions API
Without requiring any coding knowledge or developer assistance, we’ll show you how to set up Facebook Website Conversions utilizing the Conversions API with CustomerLabs in this tutorial. These steps make it simple to track events like Add to Cart and Purchase. You can also transmit data straight to Facebook for precise conversion tracking.
Step 1: Install the CustomerLabs Tracking Code
- Access CustomerLabs Account
- Log into your CustomerLabs account.
- Under “Connect your domain,” enter your website URL and click Save.
- Retrieve the Tracking Code.
- Paste Tracking Code in Shopify
- Log into your Shopify account.
- Navigate to Online Store → Themes → Actions → Edit Code.
- In the theme.liquid file, locate the </head> tag and paste the CustomerLabs tracking code above it.
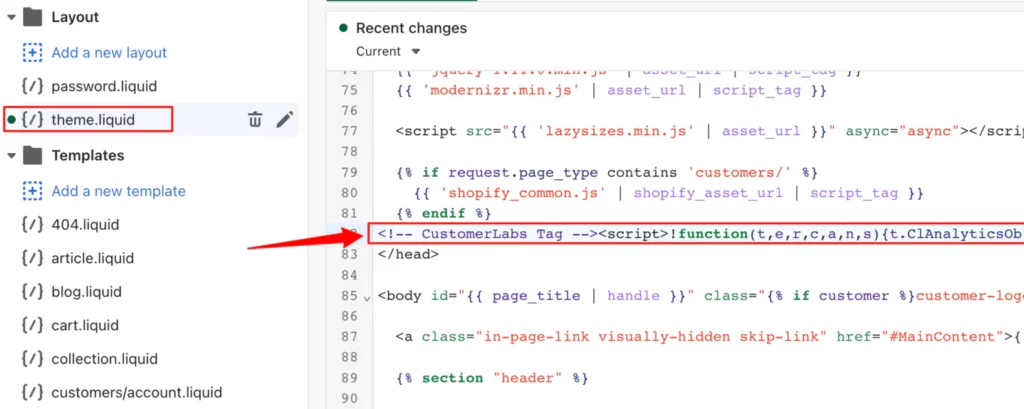
- Save your changes.
Step 2: Capture Events Using the CustomerLabs Widget
- Enable the Widget
- Once the tracking code is active, access the CustomerLabs widget on your website.
- The widget allows you to define and track key events.
- Configure “Add to Cart” Event
- Open the widget and select the Add to Cart event.
- Customize event parameters to capture details such as product name, price, and SKU.
- Save the configuration as a template to apply across all products.
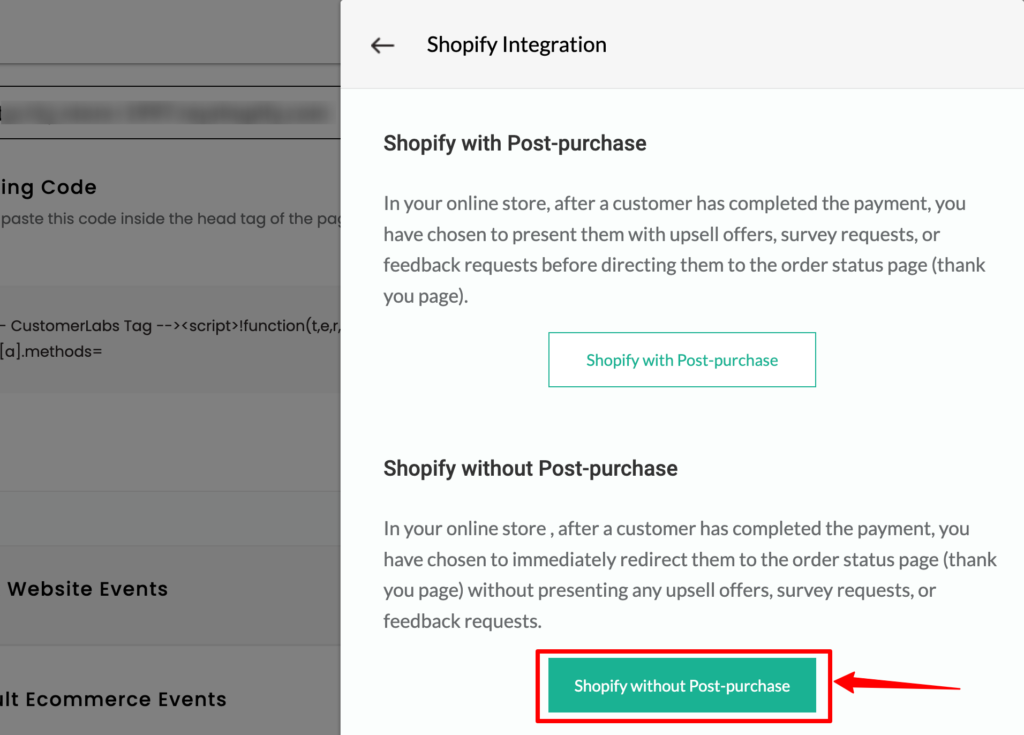
Step 3: Track the Purchase Event
- Set Up the “Thank You” Page
- Navigate to the Thank You page in Shopify, where customers land post-purchase.
- Configure the Purchase Event
- Use the CustomerLabs widget to set up the Purchase event.
- Track details like revenue, currency, and product names.
- Add URL parameters to trigger the event accurately.
- Save the configuration to apply the changes.
Step 4: Optimize Synthetic Events for Better Insights
- Create Synthetic Events
- Go to the Source tab in the CustomerLabs dashboard.
- Select “Custom Source” and name it (e.g., “Shopify_Purchase”).
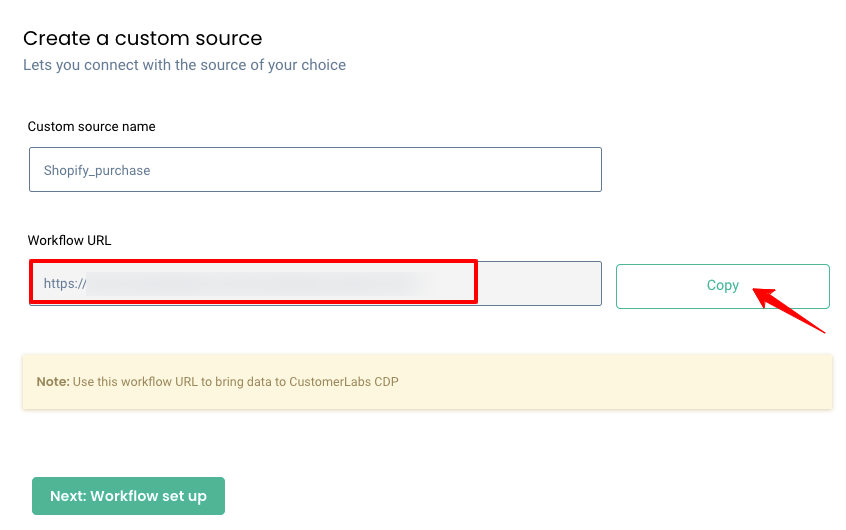
- Copy the Workflow URL for use in event tracking.
- Configure Workflow
- Map incoming data to specific event details such as user identifiers.
- Assign meaningful names to the events and validate the data.
- Connect to Facebook
- Under Destinations, choose Facebook and enable workflows to send data from Shopify.
- Toggle on events to ensure accurate reporting in Facebook Ads Manager.
Step 5: Verify Integration
- Check Workflow Status
- In CustomerLabs, navigate to Sources → Shopify_Purchase → Workflow Status.
- Confirm the active status to ensure your integration is functioning correctly.
This streamlined setup ensures seamless event tracking, allowing you to leverage CustomerLabs and the Conversions API for effective Facebook ad optimization.
Step 6: Integrate with Facebook
Now that your events are set up on your website, it’s time to integrate them with Facebook through CustomerLabs.
- Go to Integrations Screen: In your CustomerLabs dashboard, navigate to the Integrations section.
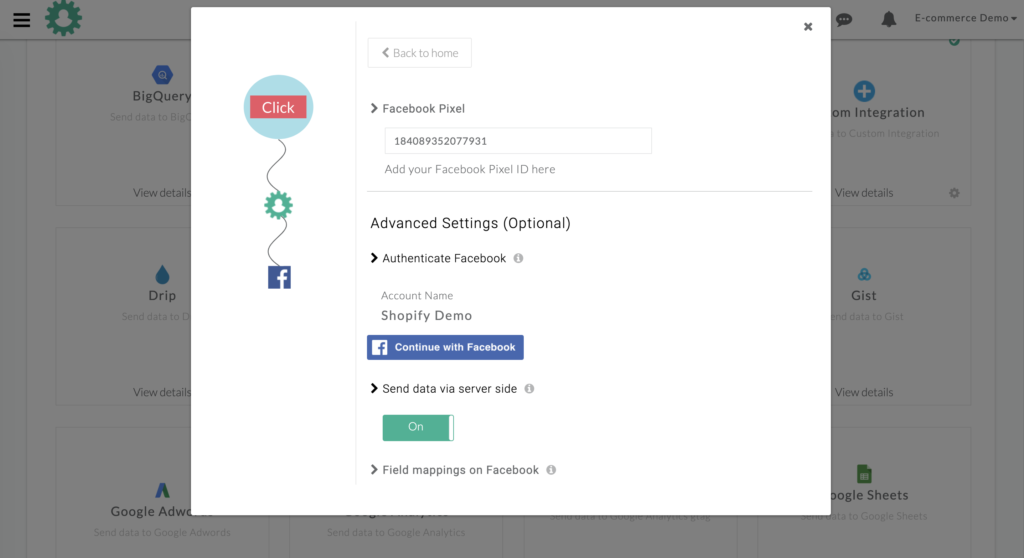
- Copy Your Facebook Pixel ID: Go to your Facebook Business Manager and copy your Facebook Pixel ID.
- Authenticate Facebook: Paste the Pixel ID into the CustomerLabs widget and authenticate with Facebook. This process requires only a few clicks.
Step 7: Enable Server-Side Data Sending
After linking CustomerLabs with your Facebook account, you’ll enable server-side data sending, which ensures accurate tracking and reduces data loss due to browser restrictions.


- Switch On Server-Side Data: In the integration settings, toggle the switch to send data via server-side. This ensures that all events captured on your website are sent directly to Facebook’s servers.
- Send Events from Both Client-Side and Server-Side:
- You can choose to send events both through the browser (client-side) and through the server (server-side). Enabling both ensures that you get the most reliable tracking data.
Step 8: Test the Events
Once everything is set up, it’s crucial to test the events to ensure that they’re firing correctly and showing up on Facebook.
- Use Facebook’s Test Event Tool:

- Go to Facebook’s Test Events Tool.
- Copy the Test Code provided by Facebook.
- Trigger Events on Your Site:
- Go to your website and perform actions such as adding an item to the cart or completing a purchase.
- Paste the Test Code into the tool and trigger these actions on your site. You should see these events show up in real-time on Facebook.
Tip: The Facebook Test Events Tool allows you to verify that the correct data (e.g., product name, revenue) is being sent to Facebook for both server-side and client-side events.
Step 9: Final Check and Go Live
Once you’ve set up and verified the tracking events through CustomerLabs and the Conversions API, you can proceed to launch your campaign on Meta Ads Manager. Here’s how to ensure everything is configured for optimal results.
Verify Event Data in Facebook Events Manager
- Access Events Manager:
- Log into Facebook Events Manager and navigate to the data source (pixel or Conversions API).
- Check Event Activity:
- Verify that tracked events such as “Add to Cart” and “Purchase” are firing correctly.
- Ensure data matches your setup in CustomerLabs, including product names, pricing, and user actions.
Set Up Website Conversions Objective in Meta Ads
- Choose the Right Campaign Objective:
- In Meta Ads Manager, click Create Campaign.
- Select Sales or Conversions as your campaign objective.
- Configure Conversion Events:
- Under Ad Set, scroll to the Conversion section.
- Select Website as the conversion destination.
- From the dropdown, choose the specific conversion event (e.g., “Purchase” or “Add to Cart”) that was created using CustomerLabs.
- Leverage CAPI Data for Optimization:
- Confirm that Meta recognizes the Conversions API data as the primary source for tracking and optimization.
Go Live with Confidence
- Launch Your Campaign:
- Review all campaign settings, including budget, audience targeting, and ad creatives.
- Once satisfied, click Publish to go live.
- Monitor Campaign Performance:
- After launching, continuously monitor campaign metrics like conversion rates and return on ad spend (ROAS).
- Use insights to adjust your strategy, ensuring optimal ad performance.
Conclusion
Businesses who want to increase tracking accuracy and maximize their ad effectiveness must set up Facebook Website Conversions utilizing the Conversions API. You can get around common problems like ad blockers and privacy limitations by using server-side tracking, which will guarantee that your conversion data is as accurate as possible. This leads to better decision-making and ultimately, a higher return on ad spend. CustomerLabs makes this process even easier with its intuitive platform, allowing you to set up and manage conversions without writing a single line of code. Ready to take your Facebook Ads to the next level? Sign up with CustomerLabs today and start optimizing your conversions with a few simple clicks!

