In this growing digital world, understanding how your customers interact with your store is far more valuable than keeping an eye on your competitors’ strategies. Every click, scroll, and purchase of your users holds valuable insights that can shape your marketing strategy, boost conversions, and maximize your return on ad spend (ROAS)
If you have been wondering why there is no proper conversions or sales through your campaigns, it is a signal to improve your event tracking on Shopify.
This blog will act as a guide that will leave you with in-depth knowledge about event tracking, including its past and future, implementation process, and best practices to improve event tracking for your Shopify Store.
Let’s wait no longer and start with the foundations
Understanding Event Tracking in Shopify
Events are nothing but the actions that the users perform on the website. These actions include page views, add-to-cart actions, and purchases.
Tracking events helps you understand user behavior, optimize ad targeting, and improve conversions.
What is event tracking?
Event tracking refers to the collection of user interactions with your Shopify store. These interactions (events) help analyze user behavior and optimize marketing campaigns.
I know you will be tracking the users actions; as I said before, the challenge is tracking them accurately. To understand where your tracking is going wrong, let’s understand how event tracking has evolved overtime.
The Evolution of Event Tracking in Shopify
Shopify is a store builder, and tracking wasn’t a part of the deal. In the early days, Shopify brought built-in analytics for simple metrics like page views and sales. Through which marketers were able to track and optimize the ads with the limited customer data.
After which ad platforms brought in third-party pixel-based tracking, which allowed marketers to track conversions and retarget customers (for a while). These pixels relied on the browser-side cookies for tracking. In order to enhance tracking, marketers implemented Google Tag Manager (GTM) to track custom events such as button clicks and form submissions of the Shopify stores.
This is when third-party (pixel-based tracking) tracking started to fall apart. To protect the privacy of the users, first, being hit by the ad blockers led to data loss; another hit came from the privacy laws and iOS14 restrictions. These restrictions and data loss created an impact on the ad tracking and led to poor attribution.
With the decline of third-party cookies, Meta released server-side tracking called the Meta conversions API, through which marketers are able to track events on the server-side for accurate user data and attribution.
This is the brief on the evolution of event tracking; let’s understand the default event tracking happens on Shopify.
How Shopify Tracks Events by Default ?
Shopify has an inbuilt default tracking system (native analytics) that automatically tracks the user interactions in the store or website. This data is logged by Shopify, stored on its server and presented within its analytics reports.
This event data is further integrated with other analytical platforms (GA4) and ad platforms (Meta and Google). Shopify sends the tracked event data to GA4 using a tracking script embedded in its store’s theme. And GA4 processes this event data and provides detailed insights on its dashboard.
Shopify’s integration with the ad platforms Google (Google pixel) and Meta (Meta pixel).
Shopify embeds the Meta Pixel code into the theme and checkout pages. When a user takes an action, the Pixel sends the event data to Meta’s servers. Meta uses this data for ad targeting, lookalike audiences, and conversion tracking. (Remember all this happens only on the browserside.)
And with Google, Shopify inserts a conversion tag into the checkout page. When a user completes a purchase after clicking an ad, the Google Ads conversion tag fires and records the event. The conversion event is then sent to Google Ads, allowing it to track which ad clicks led to sales. Google uses this data to optimize ad targeting, bidding strategies, and attribution models.
Key Events to Track in Shopify (Basic & Beyond Basics)
The tables down below highlight the events that are tracked by default shopify tracking and, on the other hand, highlight advanced event tracking.
Default Shopify Events
| Name of Events | Actions or Interactions |
| Page Views | Tracks when a visitor lands on any page |
| Product Views | Tracks when a visitor views a specific product |
| Add to Cart | Triggers when a user adds a product to their cart |
| Checkout Started | Fires when a user initiates the checkout process |
| Purchase (Conversion Event) | Fires when a transaction is completed |
If you are a marketer running ads with the default event tracking, then you should really go advanced. Down below is the list of key events.
Advanced Events to track
| Name of Events | Actions or Interactions |
| Product List Click | When a user clicks on a product from a collection or search results page |
| Search Events | When a user searches for a product using Shopify’s built-in search. |
| Scroll Depth | How far users scroll down a page (e.g., 25%, 50%, 75%, 100%). |
| Wishlist Additions | When a user adds an item to their wishlist or favorites. |
| Video Engagement (for product videos) | When a user plays, pauses, or completes a video. |
| Cart Abandonment | When users add items to their cart but leave before completing checkout. |
| Offline Events | Sales that occur offline but are attributed to online marketing campaigns. |
| Subscription Events | When a user subscribes to a product/service (e.g., Shopify Plus subscription businesses). |
Now you can do a self-evaluation in which you can see which table of events you are tracking. If you are just tracking basic events, you want to shift to advanced events. But it is not possible to track these advanced events with shopify’s default event tracking.
Let’s understand the limitations of the shopify event tracking system.
Limitations with Shopify’s Default Tracking
While Shopify’s built-in tracking provides a foundation for monitoring customer interactions, it has significant limitations that can lead to data gaps, misattribution, and loss of valuable insights. The limitations are as follows:
Doesn’t track all customer interactions:
Limitation of Shopify’s default event tracking is that it only focuses on tracking the basic events, such as “add to cart” and “initiate checkout,” missing out on the crucial touch points of the entire customer journey. With the inability to do advanced tracking, you lose valuable insights to take data-driven decisions.
Imagine you have users coming in to your websites, but they don’t take the conversion action (like purchases). This means the user churnout rate is high. You might be wondering that the audience targeting is not effective and make changes to your ad campaigns. But the actual would be a UX error with a button click on the website, which might go unnoticed because you are felt with the limited events tracked by Shopify.
Not just that, you will not effectively retarget the customers precisely with just the default events tracked on Shopify. This will impact the ad campaigns with lack of nourished data to feed the ad algorithms, inability to target audience precisely and overall ad performance (low ROAS & high CPC)
Event data loss due to ad blockers & privacy restrictions:
As I mentioned earlier, privacy restrictions (GDPR & CCPA) and ad blockers interrupt the data tracking on the browser side. Shopify’s default event tracking majorly relies on browser-side cookies.
Talking about the Meta pixel, ad blockers prevent tracking pixels from firing, causing missing data in ad platforms. Adding to this, Apple’s iOS 14+ ATT (App Tracking Transparency) framework forces apps to request permission before tracking user data. And most users opt out, leading to reduced visibility into the event data. Safari’s ITP (Intelligent Tracking Prevention) and Firefox’s ETP (Enhanced Tracking Protection) delete third-party cookies after just 24 hours, breaking attribution models.
Shopify’s client-side tracking (browser-based tracking) relies heavily on cookies, which can be blocked, deleted, or expire quickly. This negatively impacts the ad campaigns by increasing the waste ad spend.
Inaccurate attribution:
Even though Shopify captures events in real-time, it has limitations in tracking deeper insights like session durations or multi-touch attribution. By default, Shopify assigns last-click attribution for conversions. This means that the final touchpoint before purchase gets 100% credit, while earlier interactions are ignored.
And it is no secret that most customers interact with multiple touchpoints (Google Ads > Organic Search > Email > Purchase) before conversion. Shopify’s model ignores these initial touch points and only credits the last click. Let’s assume a scenario where many users click on the ad on Facebook and enter the website but do not make the purchase. Later, he clicks on another ad on Google ads.
Now what you would prioritize is the number of conversions rather than those clicks on Facebook. You would decide to pause the Facebook ad and increase the budget for the Google ads, believing that is the conversion driving channel.
Not just that, you can’t cross-device track with Shoify’s default event tracking. A user may browse on mobile but purchase on desktop. But Shopify will consider these two as separate events and users, failing to stitch these events together. The overall event data that you receive from Shopify’s default event tracking seems unreliable. Running ads simply based on these events will only mislead the campaigns.
Moving forward, let’s look into the methods to improve event tracking on Shopify and how to overcome the limitations of shopify’s default event tracking.
Overcome the Challenges: Methods to Improve Shopify Event Tracking
Manual Method: Using Google Tag Manager (GTM) for Custom Event Tracking
Create a new tag
- Login to Google Tag Manager (GTM), click on Default Workspace
- Select the + icon, name the workspace (e.g., Custom events for GA4) and hit Save
- Now, Click on the Tags, hit New, and select Google Analytics: GA4 event
- Enter the GA4 measurement ID, Name the event (this will be the name of the event that you will be seeing inside Google Analytics eg., click_demonow)
- Name the tag (eg; GA4-custom event – click demonow) and it hit Save
Create a trigger for the event
- Click on Triggers and create a new trigger
- Choose a trigger type as Click – All elements from the list
- And choose when this trigger should fired by selecting Some clicks
- Hover the dropdown to select “click element.” This acts as a condition to fire the trigger when the event occurs.
- Select the condition as “matches CSS selector”
- Open your webpage that you want to track the events
- Right-click and select inspect; open the element panel
- Perform the action on the webpage that you want to track (hover the button)
- Copy the div value (eg: button__primary) without any spacing and check whether the value has any duplication.
- To check duplication, click ctrl+F and add a dot and then paste the values without any spacing and search.
- If you find any similar values, copy the div value above, add a dot and paste it in the beginning.
- Once there is no duplication in the values.
- Enter this value in the Value section in the GTM without adding any additional spacing or values.
- Name the trigger (e.g., click demo now) and hit Save
Set the event Trigger
- Click on the triggering section. And choose a trigger by hovering down to select the created trigger, “click- demo now.”
- Hit Save
Remember to name the tag in case you missed out initially while creating the tag. Check whether the events is firing properly by checking the events under the preview mode.
Verify the events in the Preview mode
- Click on Preview and enter webpage or website url
- And press “connect.”
- Open the webpage and perform the action (click the demo now button) to check whether the events are firing properly upon the click.
- Go back to the preview window and you will be able to see the events firing.
By implementing GTM setup, you will be able to track custom events and improve event tracking for your Shopify store.
Using Shopify Pixels & Meta Conversions API (CAPI) for Better Ad Tracking
Another way to improve your tracking is by doing it both browser and server side using pixels and CAPI.
Here how you can setup Shopify Pixel and CAPI for better tracking
You need to create if you don’t have a pixel, so create a pixel.
Create a Pixel
- Login to your facebook account. Click on Ads manager
- Click the profile icon and under the business portfolio, press the settings symbol
- You will be redirected to business.facebook.com/settings
- In the menu bar, scroll down to Data sources > Datasets
- Click on “Add” and Name the pixel with the relevant name (this will be helpful when you are handling multiple ad accounts)
- And hit Create
Add assets
- Now that the dataset is created, select Connect assets, choose the ad account and hit Done
- Once you have added the assets, click on the” …” and select Open in Events Manager
- You will be redirected to Events manager and you will be able to view the pixel that you have created.
Enable Conversions API
- To send events from the server-side, Scroll down and click on the Setup conversions API with partner integration.
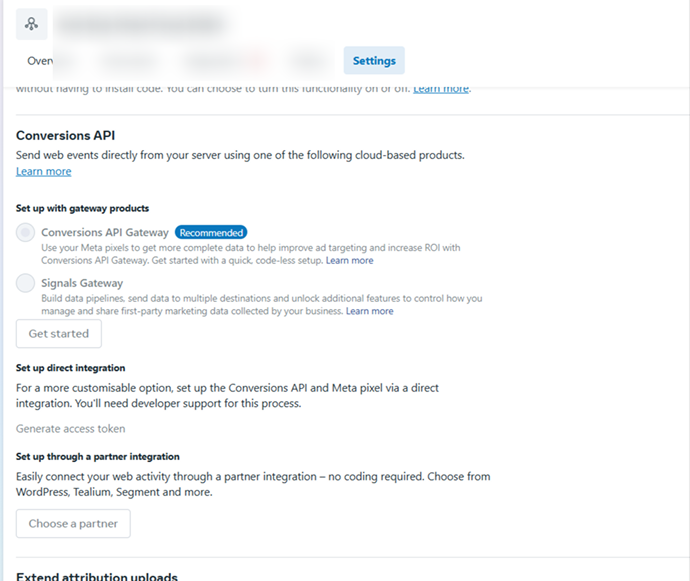
- A dialog box will appear, select “Set up with partner integration” and click next
- Choose “Shopify” as the partner
- To connect your shopify store with Meta
- Click on “ Go to Shopify”and you will be redirected to the shopify dashboard
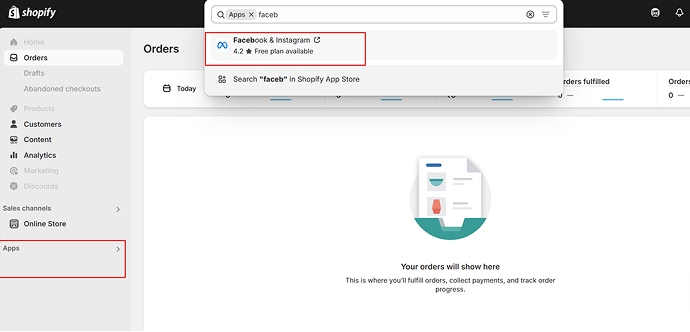
- And you will be prompted to install the “Facebook & Instagram” app. Click “Install” to proceed with the installation. (in case if you are not prompted, then just search the app in the search bar and install.)
- Then click on “Connect Account” to connect your Facebook account to Shopify and click on Continue
- Next, you need to connect the Business portfolio
- Click on Connect button, next to the business portfolio that you would like to connect with Shopify
- Once that’s done, scroll down to Data Sharing section, and click “Enable” to select “maximum” level of data sharing and click Save
- Next is to connect the dataset to track the customer behavior. Scroll down and choose the dataset and click on Connect
- To finish the setup, check the terms & conditions box
- And hit Submit for Review
Check and Verify the Pixel
- To check whether the setup is successful, click on the settings. You will be able to see the business portfolio that you have connected and the level of data sharing that you have provided.
- Now that you have connected the shopify successfully, head back to the Event manager, and click Next.
- To verify whether the pixel is working correctly, Enter the domain to verify and click on Send test traffic. You will be redirected to your domain.
- Now you will be able to see Active status on the screen, upon the successful verification
- Click Next and then Finish
- The setup is done to verify whether the events are tracked properly. Click on Test events.
- Scroll downand you will be able to see “confirm your website’s events are set up correctly.”
- Enter your domain url and click open website. Perform some actions on the website. And head over to event manager; you will be able to see successful events tracked on the browser side and do the same for the server side CAPI
And when using both Pixel and CAPI, Shopify automatically deduplicates duplicate events to prevent overcounting. By setting up event tracking from both the server and browser side, you can prevent data loss and improve event tracking.
First-Party Data Tracking (The Future of Shopify Event Tracking)
This is the recommended option out of the three. Because the manual method of integration requires technical knowledge and developers. And with pixel and CAPI tracking, you cannot rely on browser-side data, and there might be occurrences when the event dedupplication can go wrong.
That’s why you need to do first-party data tracking for your Shopify store. Since first-party data is becoming the future of marketing, let’s get into setting up event tracking with a no-code solution.
The Best No-Code Solution: First-Party Data Tracking with CustomerLabs
CustomerLabs is the world’s 1st 1PD Ops platform that helps collect, store, unify, segment, and activate first-party data. It also facilitates seamless integrations with multiple destinations and sources within a few clicks without the need for deep technical knowledge.
Without any delay, lets get into the setup event tracking for the “add to cart” event
- Signup for CustomerLabs and login into your account.
- Now, click on “connect your website.” Copy the Javascript tracking code and paste it in the head tag of your website.
- Click on Custom Events and press “Launch No Code Event tracker” to track the events on your website.
- Then, you will be redirected to your website with the No code event tracker panel open up at the top of the website.
- Select the “Record Action” to record the actions of the events.
- Under the action name, select “added to cart” (same goes to any event that you want to track)
- And choose “on-click” as the action type and click on “Element Picker”
- Once you do this, you will be redirected to your website. Now click on the add to cart button that you want to track.
- After performing the action, you will again be redirected to the no-code event tracker panel. Tick the “Pick a common detector” checkbox and select “add details”
- Add the details by selecting from the dropdown product_name, currency, product_price and click on Element Picker after setting up every detail.
- For product_name: Set the product attribute as “ product_name” and click the Element Picker, and click the product name on your website. (you can do this for any event that you want to track)
- For currency: Product attribute as “currency”, remember to keep the type as Javascript, select the currency from the dropdown and the format (USD).
- Click Verify and Save,
- For product_price: Set the product attribute as “ product_price” and click the Element Picker, and select the price on your website. (when you click on the price on your website, the no-code tracker will capture it.)
Track success Scenario
Since there is no separate thank you page, track the success scenario using a small note.
- Select Static Text and use the Element Picker to choose the text “Item added to cart” from the website.
- Click Save to confirm the selection.
- Alternatively, you can skip this step by clicking Next | Tracking Rule.
- Choose the pages where you want to track this action and click Save.
- Click the Save icon to finalize the event setup.
- Your eCommerce Add to Cart event is now successfully configured!
- Once done, hit Save.
The setup is done. You can also track multiple events, such as checkout, product category, product search, products clicked, products viewed, removed from cart tracking and Wishlist tracking. You don’t need any coding knowledge for this and it will not cost you more than 30 minutes to complete the entire event tracking setup. You can track as many custom events as you can.
With implementation in place, let’s learn some best practices to enhance event tracking on Shopify.
Best Practices for Shopify Event Tracking
Set up 1P Domain Tracking:
First-party domain (1PD) tracking ensures that event data is collected directly from your store’s domain rather than through third-party cookies, which is becoming increasingly restricted due to privacy regulations.
Server-side tracking with CAPI:
Server-side tracking with Meta Conversions API (CAPI) helps bypass browser limitations, sending event data directly from Shopify’s backend to Meta for accurate conversion tracking.
Monitor tracking accuracy:
Regular tracking audits ensure your event data remains accurate and aligned with your marketing goals. Use Meta Events Manager and Google Tag Assistants to verify the events firing and enable EMQ score to ensure data quality and consistency.
Track Events that align with your business goals:
Instead of just relying on the standard events, track custom events that align with your business objective. For instance, instead of tracking purchases, you track users based on category-based or AOV purchases; this will help increase the AOV purchases (business objective)
Measure the key events in Meta’s reporting:
To understand the performance of your Shopify store and ads, you need to track key events in Meta’s reporting tools. Set up custom conversions to track high-value actions beyond standard events. Analyze conversions by traffic source, device, or demographic, by which you can further enhance your event tracking.
Optimizing ad with tracked events:
With accurate standard and custom events, optimize ad campaigns with enhanced targeting or retargeting. Build custom audiences or create lookalike audiences based on the high-intent actions of the users.
Offline events tracking:
Tracking in-store purchases, phone orders, or other offline interactions by uploading the offline event data (customer details, transaction amounts, timestamps) to ensure all conversions are counted in Meta’s reporting. This will also help with attributing the offline purchases to the ad campaign, by which ad performance can be evaluated.
Implement consent mode in Shopify:
To stay compliant with data privacy laws like GDPR and CCPA, integrate Consent Mode for user data tracking for your shopify stores. Install the consent banner to let users opt in/out of tracking and modify the tracking by firing only for consented users.
By implementing these best practices, your event tracking will be heavily reliable and accurate, thereby enabling your marketing efforts.
But I wouldn’t advise you to stop here. With privacy laws changing from time to time, it is important to see things ahead and equip yourself with futuristic strategies and methods.
The Future of Shopify Event Tracking
It is evident that building privacy-centric tracking methods is the only way to future the event tracking for your Shopify. With third-party tracking becoming highly unpredictable, it is expected that Google will phase out third-party cookies in 2025. Therefore, it is important to look out for privacy-first tracking, which is nothing but first-party data tracking.
Using sever-side CAPI can improve your event tracking but it comes with certain limitations when it comes to tracking custom events. To seal your event tracking ready for the future privacy laws, it is essential to implement server-side tracking with 1P domain tracking.
As digital marketing shifts towards a privacy-first landscape, adopting server-side event tracking is no longer optional—it’s essential for staying competitive and maximizing return on ad spend (ROAS).
Book a Demo, to implement server-side tracking with 1P domain tracking within a few minutes to save years of efforts for later.