In eCommerce, knowing how your customers behave online is key to running successful ad campaigns. With the rising cost of ads and more privacy restrictions, every bit of customer data you can gather counts. That’s why setting up the Meta Pixel (formerly Facebook Pixel) on your Shopify store is a must. Meta Pixel is a tool that lets you track on the browser-side, important actions like adding items to a cart, starting checkout, and making a purchase, all of which show what your customers are interested in.
For marketers, Meta Pixel isn’t just about tracking clicks. It gives you a full picture of your audience, helping you improve ad targeting and make the most of your ad budget. Whether you want to use it to build custom audiences or boost your conversion tracking, this guide will walk you through every step—from getting set up to managing events and using the Conversions API to fill in data gaps because of the limitations of Meta pixel caused by the evolving privacy landscape.
We’ll also go through strategies like retargeting, so you can turn window shoppers into buyers. By the end, you’ll have the know-how to get more from your ad campaigns, improve your ROAS, and make data-driven decisions that support your marketing goals.
What is the Meta Pixel (aka Facebook Pixel)?
The Meta Pixel is a piece of tracking code from Facebook that enables you to monitor and analyze the actions visitors take on your website. It’s an essential tool because it delivers precise data on user interactions within your Shopify store, providing insights that are key for optimizing ad campaigns, measuring conversions, and driving overall business performance.
Once installed on your site, the Meta Pixel can track a variety of standard events, including:
- Page Views: See which pages users visit, allowing you to understand which products or content are drawing the most attention.
- Add to Cart: Monitor when visitors add items to their cart, giving you insights into buyer intent and helping you identify potential drop-off points.
- Initiate Checkout: Track when a customer begins the checkout process, an important indicator of purchase intent and a potential area to optimize for conversion.
- Purchases: Record completed transactions, giving you clear visibility into which ads and audiences are driving revenue.
- Lead Generation: Track form submissions or signups that signify customer interest and allow you to follow up effectively.
These events not only provide a high-level view of user behavior but also allow you to create custom audiences for retargeting based on specific user behavior such as ‘checked a specific category multiple times’, ‘viewed a product more than 3 times’, and other such events. The ability to track both standard and custom events—such as button clicks, video plays, or specific product interactions (product viewed more than 3 times, category viewed in the last 14 days, high add-to-cart value, high customer lifetime value, etc.)—gives you the flexibility to tailor your campaigns based on the most critical actions in your customer journey.
By leveraging this granular data, you can fine-tune your Shopify store’s marketing strategy, delivering ads to users who are more likely to convert and significantly boosting campaign effectiveness.
How Does Meta Pixel Work?
The Meta pixel works by tracking specific actions visitors take on your Shopify site, such as viewing a page, adding items to their cart, or completing a purchase. This data is then sent back to Facebook, allowing you to create custom audiences, retarget users, and improve ad targeting.
Let’s dive deeper into how tracking visitor behavior and interactions with the Meta Pixel can supercharge your advertising efforts.
Tracking Visitor Behavior and Interactions
By tracking user behavior like Initiate Checkout and View Content, you can gather detailed insights that allow for better optimization of ad spend and campaign effectiveness.
For example, if you see a high number of Add to Cart events but fewer purchases, it might indicate a problem in your checkout process. Knowing this can help you target users who abandoned their cart through retargeting campaigns. This data also helps with more granular audience segmentation, a critical part of performance marketing.
Collecting high-quality first-party data using Meta Conversions API, offers detailed insights into user behavior, allowing you to track actions like Add to Cart and Initiate Checkout with greater accuracy. By understanding these actions, you can pinpoint what’s working and what might need improvement.
To help you make the most of these insights, let’s explore the Meta Pixel’s core functionality and how different events are tracked, laying the groundwork for strategies that drive meaningful growth.
Functionality and Event Tracking
The Meta Pixel’s core strength is its ability to capture key actions, from standard events like Page Views, Add to Cart, and Purchases, to custom events tailored to your specific goals. These events provide a deeper look at how customers engage with your store and enable more precise targeting and optimization.
With custom events, you can go beyond basic tracking to capture specific interactions, such as video plays, downloads, or particular button clicks. This flexibility empowers you to focus on the actions most aligned with your marketing objectives, refining your campaigns for higher engagement and conversions.
The Need for setting up Meta Pixel perfectly
To make the most out of your Facebook ads investment, it’s essential to set up your Meta Pixel correctly. CustomerLabs makes this process easy, enabling you to implement the pixel in just a few clicks. Once your customers’ behavior data is inside Facebook, you can create custom audiences based on how they interact with your site. When you collect data using CustomerLabs 1PD Ops, you have full control over your data, to store beyond 28 days, segment the users and power Meta’s ad algorithms.
For example, you can segment your customers according to their actions—like those who frequently add items to their cart but don’t complete purchases—and retarget them with personalized ads using Facebook Ads. This targeted approach not only helps you reach your customers more effectively but also increases the likelihood of conversion.
By using CustomerLabs, you gain detailed insights into the segments that convert best, allowing you to create lookalike audiences to expand your reach. You can even show dynamic ads tailored to your customers based on their browsing history and behavior, maximizing your ad spend and driving more sales.
In summary, the Meta Pixel is a powerful tool for powering Meta’s ad algorithms to understand and improve how customers engage with your Shopify store. And with CustomerLabs, you can easily harness this data to refine your marketing strategies and boost your results.
If you’re looking to add Facebook Pixel to Shopify, the process is straightforward.
Steps to Create and Set Up Meta Pixel
Setting up the Meta pixel is a simple process, but it’s important to follow the right steps to ensure proper tracking. Here’s how you can create and set up your Meta pixel for your Shopify store:
- Step 1: Create your pixel in Facebook Events Manager
- Log in to Facebook Events Manager.
- Go to Data Sources.
- Click Add to create a new pixel for your Shopify store.
- Step 2: Name your pixel and check for partner integration
- Give your pixel a clear, relevant name (e.g., “Shopify Store Pixel”).
- Check for Shopify’s partner integration under Facebook’s Partner Integration section.
- This allows seamless data transfer between Shopify and Facebook.
- Step 3: Connect data sources and create the pixel
- Link the pixel to your Shopify store through the Partner Integration setup.
- Ensure the connection works properly for tracking key events like purchases and adding Facebook Pixel to Shopify.
Once the Facebook pixel is created, you have to add it to your Shopify. Let’s see how you can do it.
Adding Meta Pixel to Shopify
Adding the Meta pixel to Shopify is a straightforward process that can be done directly through Shopify’s built-in integration. Here’s how you can easily connect the Pixel to your Shopify store and start tracking key events:
- Using Shopify’s integration:
- Go to Shopify’s admin panel and navigate to Sales Channels.
- Select Facebook and Instagram as sales channels. This integration allows you to connect the Meta pixel to your store for seamless event tracking.
- Steps on Shopify:
- In your Shopify admin, go to Online Store, then click on Preferences.
- Scroll to the Facebook Pixel section, and add Facebook Pixel to Shopify.
- Follow the prompts to authenticate your Facebook account and choose the pixel you created in Facebook Events Manager.
This helps you track all the standard events directly.
While standard events are pre-configured, custom events allow you to measure actions unique to your store.
With tools like CustomerLabs 1PD Ops, you can track these custom events without needing extensive coding knowledge. Tracking these granular actions gives you a deeper understanding of customer behavior and allows for more targeted ad strategies.
Setting Up Conversion API
The Conversions API (CAPI) is a tool provided by Facebook that allows businesses to send customer actions directly to Facebook’s servers. Unlike the Meta pixel, which relies on browser-based tracking, the Conversions API sends data from the server.
This makes it a reliable solution for collecting data, especially as privacy regulations and browser limitations like iOS 14 make pixel-based tracking less effective.
How Does the Conversions API Complement the Meta Pixel?
While the Meta pixel tracks user actions through the browser, the Conversions API sends the same data from your server. When used together, they create a more robust tracking system.
The Meta pixel might miss some data due to browser restrictions, but the Conversions API can fill those gaps by sending the missing events from your server, ensuring higher data accuracy.
The combination of the Meta pixel and the Conversions API allows performance marketers to better measure conversions, track customer journeys, and get more complete data for optimization.
This approach is particularly important when managing eCommerce stores, where even small gaps in data can lead to underperforming campaigns.
Steps to Set Up Conversion API on Shopify
The easiest and most effective way to set up the Conversions API on Shopify is by using CustomerLabs. With CustomerLabs’ solution, you can connect your Meta Pixel and Conversions API seamlessly, ensuring that all key customer interactions are captured without needing complex coding.
Here’s how you can set up the Conversions API on Shopify with CustomerLabs:
- Use CustomerLabs’ Integration: Start by accessing CustomerLabs’ integration for Shopify. This approach bypasses the limitations of Shopify’s built-in Conversions API, enhancing data accuracy and improving ad performance. Learn more here.
- Configure Your Settings: Once set up in CustomerLabs, connect to Facebook Events Manager to ensure accurate tracking of server-side events.
- Test and Verify Events: Use Facebook’s Test Events tool to confirm that both the Meta Pixel and Conversions API are capturing all critical events, like purchases and add-to-cart actions.
By using CustomerLabs, performance marketers can easily setup Conversions API on Shopify in the best way possible. This setup provides superior tracking accuracy and makes it easier to optimize your ad performance without relying on Shopify’s native setup. For a detailed guide, check out CustomerLabs’ setup guide here.
Using the Event Setup Tool for Manual Events
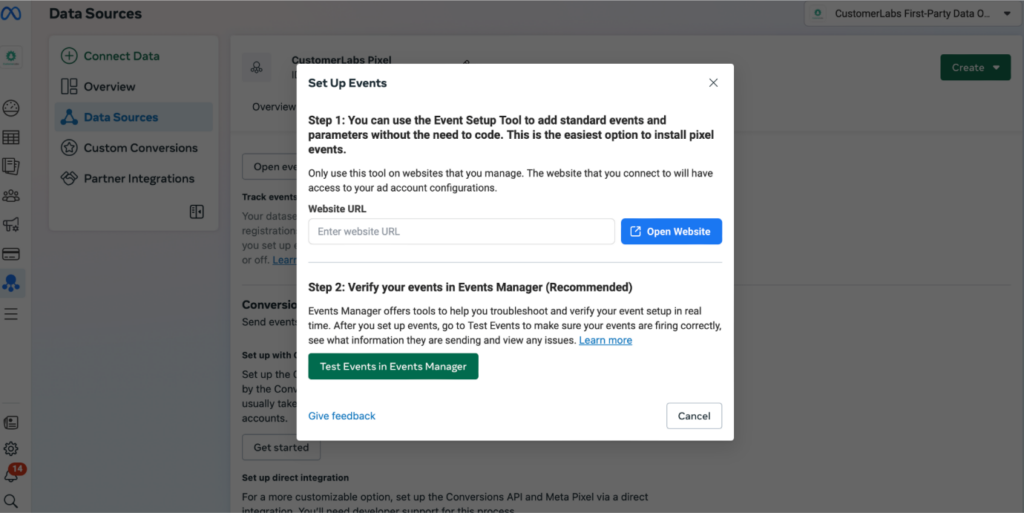
Meta pixel’s Event Setup Tool makes it easy to manage events without coding. You can use it to manually track events that aren’t automatically captured by the pixel. Here’s how you can set it up:
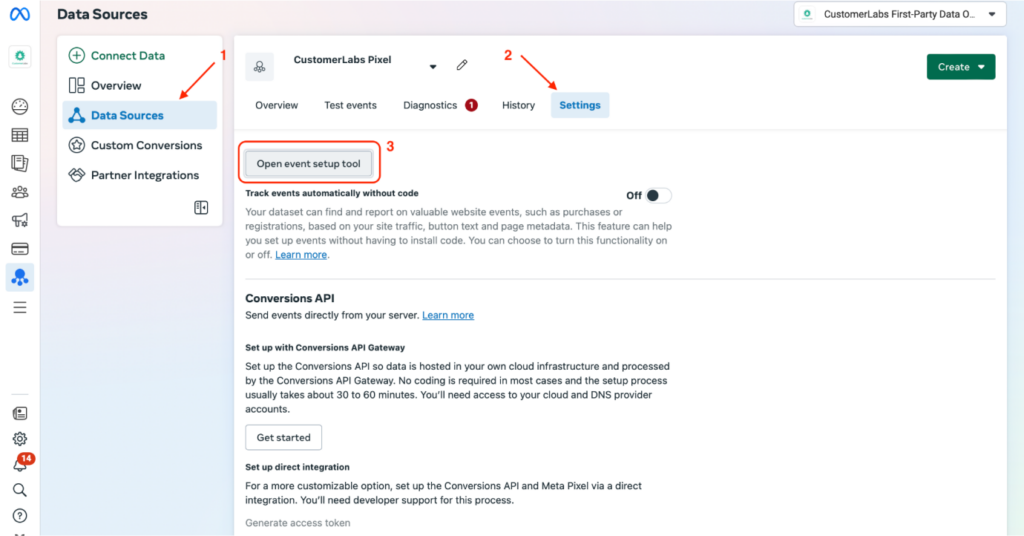
- Access the Event Setup Tool in Facebook Events Manage

- Navigate to data sources, and then your pixel in Facebook Events Manager.
- Click Settings and choose the Open event Setup Tool to begin configuring manual events.

- Select the actions to track
- Use the tool to select elements like buttons or specific pages you want to track.
- This allows you to capture custom interactions on your Shopify store and add Facebook Pixel to Shopify more effectively.
Retargeting Using Meta pixel
Retargeting with Meta pixel is one of the most effective strategies for performance marketers like you. It allows you to reconnect with users who have already interacted with your Shopify store but haven’t completed the desired action, such as making a purchase.
By setting up proper retargeting strategies, you can increase conversions and maximize your ad spend.
Creating Custom Audiences for Retargeting
Meta Pixel enables you to build custom audiences based on specific user actions, such as Add To Cart, View Content, or Initiate Checkout. These audiences consist of users who have already shown interest in your products, allowing you to run targeted retargeting campaigns.
Here’s a step-by-step guide to creating custom audiences for retargeting:
- Access Facebook Events Manager:
- Go to your Facebook Events Manager and select the Meta Pixel associated with your Shopify store.
- From the left-hand menu, select Audiences.
- Create a Custom Audience:
- Click on Create Audience and select Custom Audience from the dropdown.
- Choose Website as the source, which uses data captured by the Meta Pixel.
- Set Up Specific Retargeting Rules:
- Define the specific actions or events you want to target. For instance:
- Add to Cart: Target users who added products to their cart but didn’t complete a purchase.
- View Content: Engage users who visited specific product or category pages.
- Initiate Checkout: Retarget users who began the checkout process but abandoned it.
- Adjust the retention period, such as targeting users who performed these actions within the past 7, 14, or 30 days, depending on your campaign goals.
- Define the specific actions or events you want to target. For instance:
- Refine Your Audience with Additional Conditions (optional):
- To make audiences more precise, add additional filters based on time spent on the site, frequency of visits, or specific product interactions. This is where first-party data from CustomerLabs can enhance audience segmentation by adding more granular user actions.
- Name and Save Your Audience:
- Give your custom audience a clear name for easy identification and save it.
- Using CustomerLabs for Granular Segmentation (Optional):
- With CustomerLabs, you can go beyond standard events and segment users based on actions like viewing specific categories, revisiting the site multiple times, or spending extended time on certain product pages—all without needing to code.
- This enhanced segmentation helps you create highly focused retargeting campaigns for high-intent users, improving engagement and conversions.
- These audiences can be directly synced with Meta from inside CustomerLabs once you integrate Meta Ads with CustomerLabs.
By following these steps, you can create and refine custom audiences that align with user behavior, driving more effective retargeting and higher return on ad spend.
Using Dynamic Product Ads
Dynamic Product Ads (DPAs) automatically show users ads for products they’ve already viewed or added to their cart. With the help of Meta pixel, DPAs are automatically generated based on user behavior in your Shopify store, making it easier to serve personalized ads.
This type of retargeting is particularly useful for eCommerce stores, as it dynamically pulls products from your catalog and creates relevant ads tailored to each user’s interests.
DPAs are powered by first-party data and can result in an incremental revenue. We have witnessed around 11% incremental revenue for one of our eCommerce Client as a whole, where the Meta’s pixel is powered by CustomerLabs’ 1P data Ops.
Best Practices for Retargeting using Meta Pixel
Here are a few of the best practices you can follow:
- Segmentation: Break down your custom audiences into segments based on actions like cart abandonment or product page views. This allows for more personalized ad messaging.
- Exclusions: Exclude users who have already completed a purchase to avoid wasting ad spend on those who no longer need retargeting to push them to make a purchase. You can further go ahead and exclude the low AOV purchasers. This helps you retarget only high AOV purchasers, resulting in higher ROAS.
- Offering Incentives: Use discounts or free shipping offers in your retargeting ads to encourage hesitant customers to complete their purchases.
When you add Facebook Pixel to Shopify, setting up retargeting strategies becomes easy and can significantly improve your conversion rates.
Conclusion
With the installation of Meta pixel on Shopify, you will be able to crack the code on tracking down the customer journey effectively. By improving tracking, enhancing conversion rates, building targeted audiences, and gaining insights into customer behavior, you can maximize your ad performance and make data-driven decisions.
At CustomerLabs, we simplify the way you leverage your data to enhance your marketing efforts. Our platform empowers you to create custom audience segments, track user behavior, and seamlessly sync first-party data with the Meta pixel—no coding required thanks to our Facebook integration.
With our advanced retargeting capabilities, you can build campaigns that truly convert, utilizing deep segmentation and real-time event data. Whether you’re looking to track intricate customer journeys or sync data from your Shopify store for better targeting, we have the tools you need.
We take the complexity out of data management, allowing performance marketers to maximize their campaign effectiveness without needing technical expertise. With CustomerLabs, you can efficiently manage data integrations and optimize your campaigns, ensuring you get the most out of your advertising spend.
You can predict the next move of your customers and their needs without the limitations of Shopify CAPI. To know why you must DITCH Shopify CAPI today, click here.
Businesses have unique needs, let us understand your needs by scheduling a call, and we will help you strategize the solution.


