As digital marketing evolves, optimizing conversion tracking has never been more critical. Enhanced Conversions for Web is a powerful feature that ensures more accurate conversion reporting and enables you to leverage first-party data effectively—all while maintaining the highest privacy standards. By implementing this feature, you can refine your data-driven decisions and boost campaign performance like never before.
In this blog, we’ll walk you through the step-by-step process of setting up Enhanced Conversions for Web. Whether your goal is to improve conversion accuracy, sharpen ad targeting, or streamline your tracking process, this guide will equip you with everything you need to unlock the full potential of your data. Let’s dive in.
First, you need to create conversion actions in Google Ads, lets get into it.
Create a Conversion Action in Google Ads
Step 1: Create a Conversion Action
- Log in to your Google Ads account.
- Navigate to Tools & Settings > Measurement > Conversions.
- Click on the New Conversion Action button.
- Select your Website as the conversion source.

Step 2: Manually Set Up the Conversion Action
- Enter your website domain and select Manual Setup.
- Define and configure the required conversion action manually.
- Click Save and Continue, then click Done to complete the setup.

Enable Enhanced Conversions in Google Ads
Step 1: Enable Enhanced Conversions for Web
- Within Google Ads, click the Goals icon.
- Navigate to Conversions > Settings.
- Enable the Enhanced Conversions for Web option.
- Save your changes.

Step 2: Exclude Specific Conversion Actions
- Go to Conversion Action Settings.
- Disable the Use Enhanced Conversions for this Action checkbox for any actions you wish to exclude.
- Note: Excluding enhanced conversions applies only to the selected action. To exclude at the account level, adjust your conversion settings accordingly.
Proper setup requires technical knowledge and skilled resources. But with effective tools like the setup, it can be made feasible in just a few clicks.
Moving forward, let’s understand how to setup enhanced conversions for web with a robust platform, CustomerLabs 1PD Ops platform. Let’s get started with the implementation.
Setting Up Enhanced Conversions with CustomerLabs
Before setting up enhanced conversions, you need to authenticate Google Ads inside CustomerLabs and map conversion actions. Check out the CustomerLabs document to know the implementation process.
Step 1: Enable Enhanced Conversions in Google Ads
- Log in to your Google Ads account.
- Navigate to Tools and Settings > Conversions under the Measurement section.
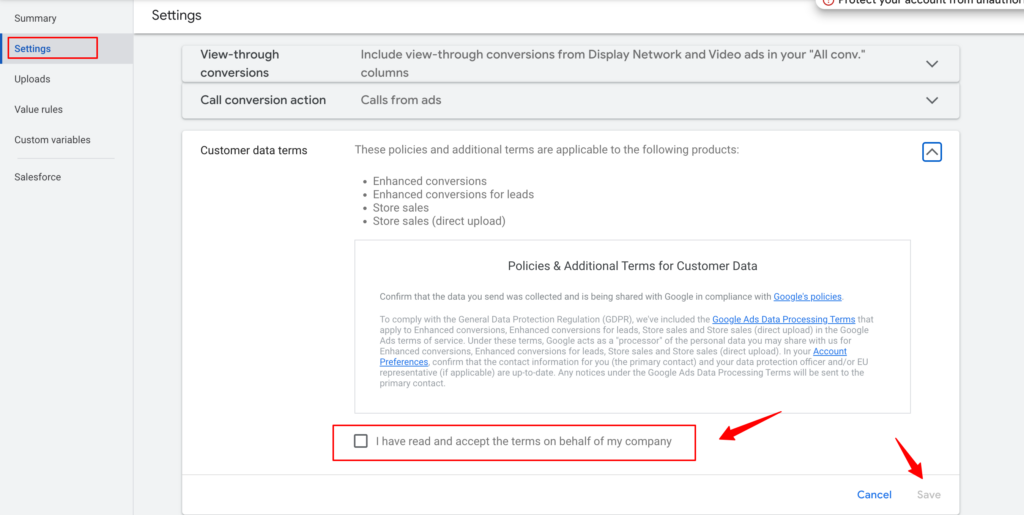
- In Settings, accept the Customer Data Terms by ticking the checkbox and saving.
- Under Enhanced Conversions for Leads, enable the feature by selecting Google Tag as the method. Save your changes.
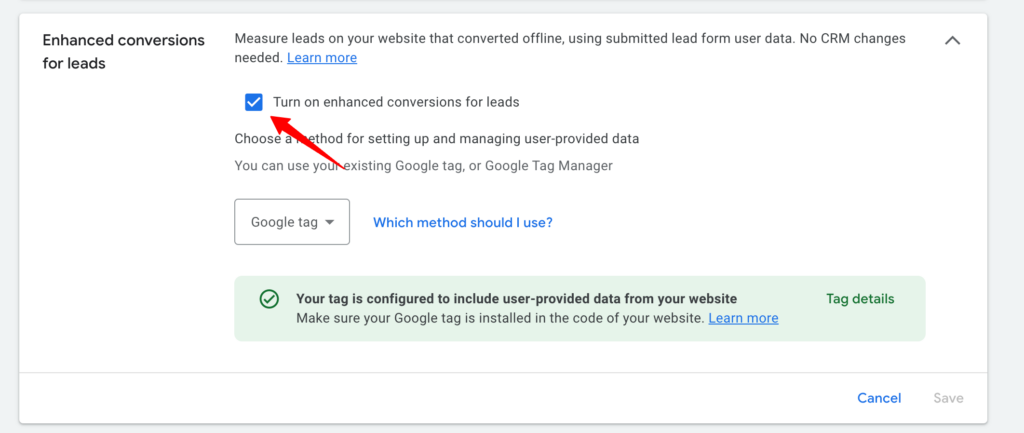
Step 2: Configure Enhanced Conversion Tracking in CustomerLabs
- Log in to your CustomerLabs account.
- Go to Destinations > Google Adwords > Configuration Settings.
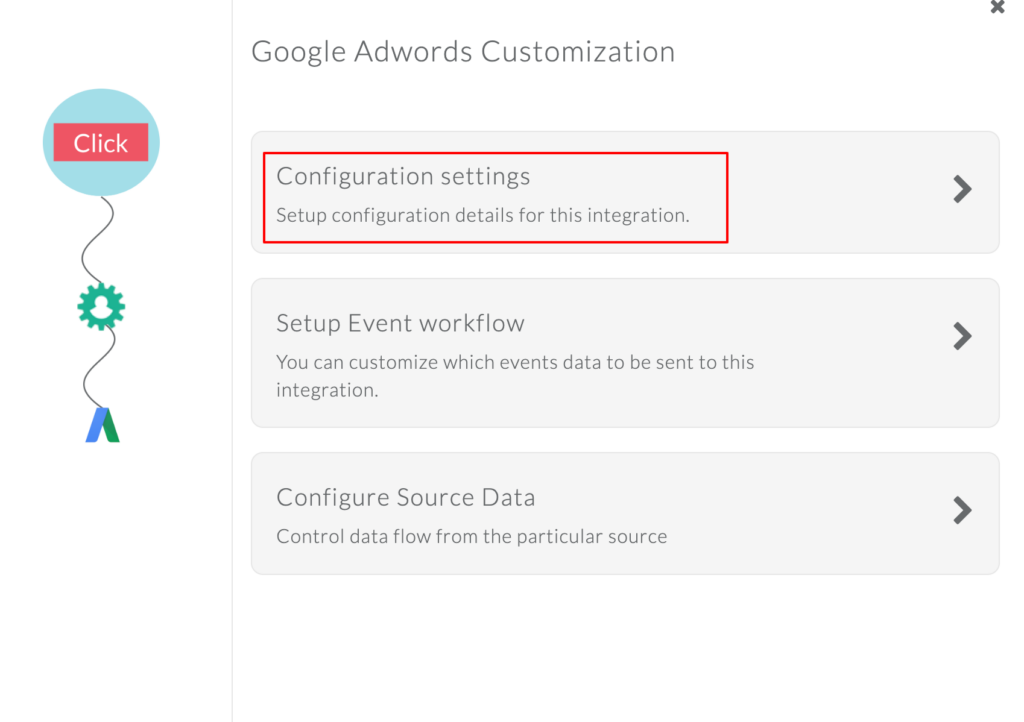
- In Advanced Settings, toggle on Enable Enhanced Conversion Tracking.
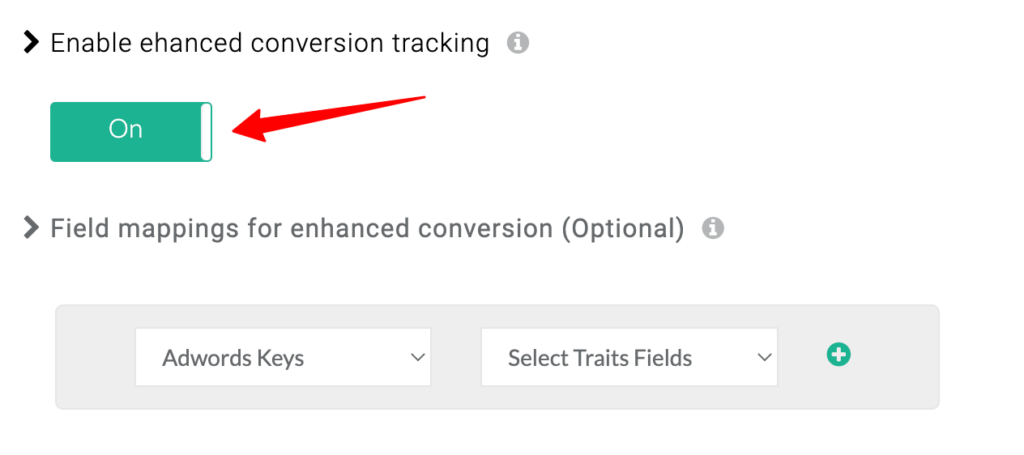
- Map the relevant fields (e.g., email, phone number) to include with your conversions. CustomerLabs auto-maps available fields, but you can make adjustments as needed.
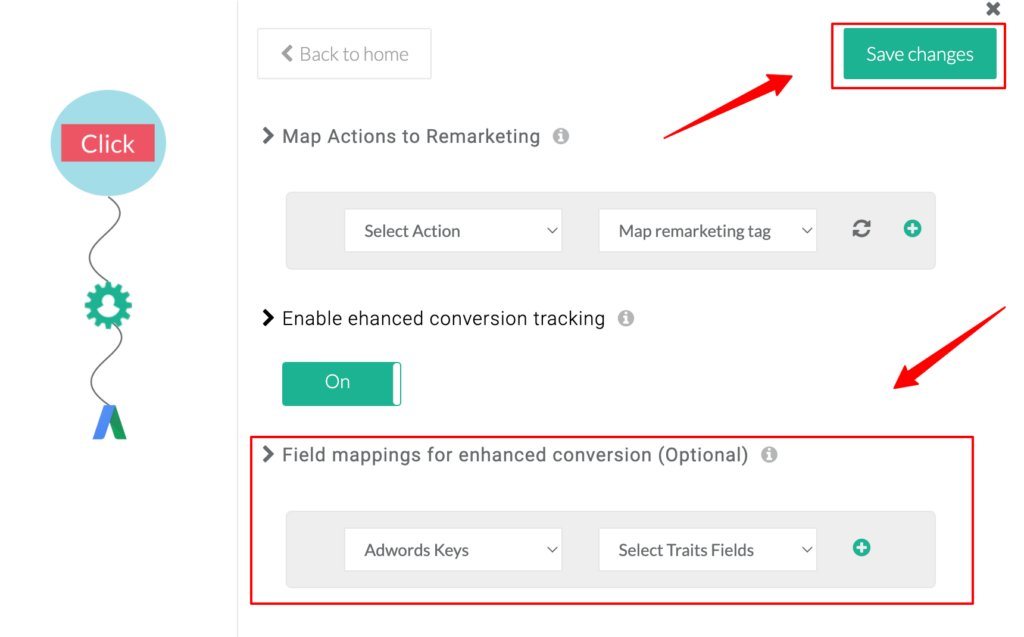
- Click Save Changes to finalize your setup.
By completing these steps, CustomerLabs ensures accurate transmission of enhanced conversion data to Google Ads, improving your tracking and reporting efficiency.
Once you have completed the implementation process, it is important to validate the setup process and verify whether conversions are tracked correctly.
Validation and Debugging the Setup
After completing the setup, it’s crucial to validate and debug to ensure the enhanced conversions are working as expected. Here’s how you can do it:
Step 1: Check Diagnostics for Enhanced Conversions
- Log in to your Google Ads account
- Click on Goals and Summary > Diagnostics
- You will be able to see the conversion score as excellent, which signifies the setup is optimized and active.

Along with this, you will also be able to see the active conversion actions, their associated data sources, and the last updated date.

You can also view information about offline data ingestion setup and reports on successful imports and errors for specific periods.


Step 2: Use Google Tag Assistant
- Install the Google Tag Assistant browser extension.
- Visit your website and trigger the conversion action (e.g., form submission, purchase).
- Check the extension’s output for your Google Ads tag and verify that enhanced conversion data is being captured and sent.
Step 3: Monitor Google Ads Conversion Tracking
- In Google Ads, navigate to Tools & Settings > Measurement > Conversions.
- Select the conversion action you set up and view the activity log to confirm conversions are being recorded accurately.
By validating and debugging your setup, you can ensure accurate data tracking, pinpoint any errors, and optimize your campaign performance.
Conclusion
Enhanced Conversions for Web represent a transformative leap in digital marketing analytics, offering unparalleled accuracy in conversion measurement. By integrating this feature, you can close attribution gaps, optimize ad targeting, and maximize your return on investment. Leveraging first-party data securely ensures that your campaigns are not only effective but also compliant with privacy standards.
If you’re ready to take your campaign performance to the next level, Enhanced Conversions for Web is your key to unlocking more precise insights and better-informed decisions. With tools like Google Ads and CustomerLabs, setting up enhanced conversions has never been easier. Don’t let your data potential go untapped—start harnessing the power of Enhanced Conversions today.
Schedule a demo with CustomerLabs to see how this feature can revolutionize your tracking process and propel your campaigns toward success.

