Performance marketers face a growing challenge: how to track accurate conversion data in a world of rising privacy regulations, ad blockers, and tracking limitations like iOS 14.5. When client-side tracking with cookies becomes unreliable, your campaign performance suffers. The solution? Setting up Meta Conversions API formerly Facebook Conversions API using Google Tag Manager for server-side tracking.
This guide will walk you through how to set up Facebook Conversions API with Google Tag Manager (GTM) on the server side, allowing you to regain control over your conversion data. You’ll no longer rely solely on cookies, which are becoming less effective due to browser restrictions and user opt-outs. Instead, you’ll send conversion data directly from your server to Facebook, ensuring better data accuracy for ad targeting and optimization.
By using Facebook Conversion API with Google Tag Manager, you can avoid data loss, improve attribution, and increase ad efficiency, all while staying compliant with privacy laws. This guide caters specifically to performance marketers, providing a step-by-step approach to setting up this powerful tracking method, ensuring you keep your campaigns optimized even in a data-restricted environment.
Overview of Facebook Conversions API (CAPI)
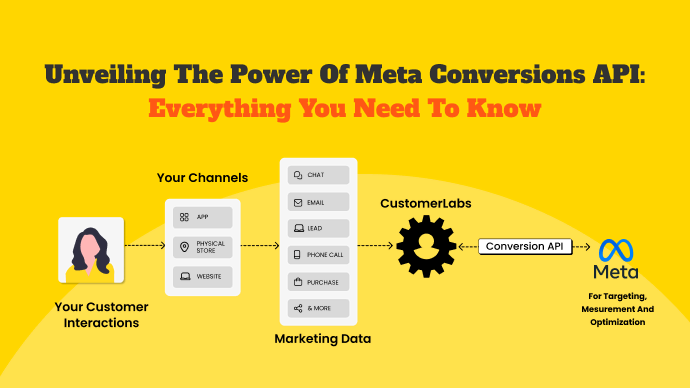
The Facebook Conversions API (CAPI) allows you to send web event data directly from your server to Facebook. It ensures more reliable data tracking than traditional client-side methods like the Facebook Pixel.
CAPI helps bridge data gaps caused by browser restrictions and ad blockers. By implementing CAPI, performance marketers can achieve better control over the data they share and improve the accuracy of their campaign reporting.
With CAPI in place, you’re not only filling the gaps in your data collection but also ensuring more reliable insights for your ad performance. Let’s take a closer look at how Facebook CAPI can directly benefit your campaigns.
- Data Control: You gain full control over what data is shared with Facebook, enabling you to share only the most relevant and accurate data.
- Bypass Browser Limitations: CAPI helps overcome issues like cookie restrictions, ITP, and ad blockers, which can hinder client-side tracking.
- Enhanced Attribution: With more accurate event tracking, you can improve your attribution models, helping you better understand which campaigns are driving conversions.
To truly harness the power of CAPI, it’s important to understand how it compares to traditional tracking methods. By recognizing the differences between client-side and server-side tracking, you can make more informed decisions about which method best supports your data accuracy and campaign performance.
Client-Side vs. Server-Side Tracking
Understanding the difference between client-side and server-side tracking is key when setting up CAPI. Here’s a comparison to help you see how server-side tracking improves performance:
| Feature | Client-Side Tracking | Server-Side Tracking |
|---|---|---|
| Data Collection Method | Data is collected via browser-side cookies (e.g., Facebook Pixel). | Data is sent directly from the server, bypassing browsers. |
| Accuracy | Susceptible to data loss due to ad blockers, cookie restrictions, and ITP. | More reliable as it avoids browser limitations. |
| Control Over Data | Limited control; depends on browsers and user settings. | Full control over which data is sent to Facebook. |
| Data Security | Exposed to potential privacy issues with third-party cookies. | More secure, as data is processed directly by your server. |
| Impact on Page Load Time | Can slow down page load time due to JavaScript running in the browser. | Reduces load time since data is handled server-side. |
Now that you see how server-side tracking provides more control and reliability, let’s dive into how Facebook CAPI specifically enhances your ad tracking and targeting efforts. These improvements can have a direct impact on your campaign results and overall marketing effectiveness.
How Facebook CAPI Enhances Ad Tracking and Targeting?
Facebook CAPI plays a crucial role in improving your ad campaign tracking and optimization. Here’s how it helps:
- Better Data Consistency: By sending data server-side, CAPI reduces data loss, ensuring Facebook receives more complete event data for tracking and analysis.
- Improved Event Deduplication: With CAPI, you can track both server-side and client-side events and remove duplicate event data to avoid inaccuracies.
- More Granular Targeting: Since the data sent via CAPI is more complete, Facebook can create more accurate audience segments, leading to better ad targeting and higher return on ad spend (ROAS).
By using the Facebook Conversion API Google Tag Manager, performance marketers can enhance their tracking strategy and ensure more accurate campaign insights.
With CustomerLabs CDP, you can seamlessly implement Facebook Conversions API in just a few clicks. Our platform collects and sends your website visitors’ event data directly to Facebook for accurate tracking and attribution. Thanks to our first-party data Ops platform, you’ll identify more customers, sync offline data, and achieve industry-leading 80% match rates. This setup ensures better targeting, reduced costs, and 4X better conversions—while staying fully compliant with privacy regulations.
Pre-Requisites for Setting Up Facebook CAPI with GTM Server-Side
Before diving into the technical setup of Facebook Conversions API (CAPI) with Google Tag Manager (GTM) server-side, you need to ensure you have all the necessary tools and accounts in place.
Performance marketers know that missing a key permission or tool can cause delays, so it’s essential to prepare everything upfront for a smooth configuration process.
- Necessary Accounts and Permissions
You’ll need admin access to both Facebook Business Manager and your website’s Google Tag Manager account.
In Facebook Business Manager, make sure you have access to the Pixel you’re working with and the Events Manager, where you’ll configure API settings. On the GTM side, ensure you have access to the server-side container as well as the web container.
Double-check that your Facebook Pixel is properly installed on the site before proceeding.
- Tools and Platforms Required
For the setup, you’ll require a few key tools. The most important are:
- Google Tag Manager for managing server-side tagging
- A cloud platform like Google Cloud or AWS for hosting your GTM server-side container. And,
- Facebook’s Event Manager for the Conversions API setup.
Having a testing tool like Facebook’s Test Events tool is also crucial to validate your configurations.
- GTM Server-Side Setup Overview
Setting up GTM server-side involves creating a new server container, which requires a cloud-hosted environment. For performance marketers, this means reduced load on the client-side and more reliable data transmission.
You’ll deploy the server-side container using Google Cloud or a similar platform, then configure it to handle your events. Ensure you’ve set up your tagging infrastructure to handle both client-side and server-side requests for data integrity and consistency.
By completing these steps, you’ll be well-positioned to move into the actual configuration of the Facebook Conversion API with Google Tag Manager setup, ensuring accurate data flows across platforms.
With the setup complete, the next step is configuring variables and constants in GTM. This ensures that key data points like browser IDs and cookies are accurately captured and sent to Facebook. Let’s break down how to set these up for smooth tracking.
Configuring Variables and Constants in GTM
When setting up Facebook Conversions API (CAPI) using Google Tag Manager (GTM) server-side, configuring variables and constants correctly is key to ensuring accurate data tracking.
As performance marketers, you need to make sure that data points like browser and click IDs, as well as first-party cookies, are tracked and passed accurately to Facebook for better attribution and optimization.
Meta Browser and Click IDs
Meta (Facebook) uses browser and click IDs to track users across sessions and attribute events correctly. Browser IDs (user-agent data) allow Facebook to identify the user’s device, while click IDs (_fbclid) help tie conversion events to specific Facebook ad clicks.
To capture these IDs in GTM, you’ll need to create custom variables that extract this data from the URL parameters or cookies.
For instance, you can set up a variable that captures the _fbclid from URL strings. Ensuring these IDs are properly tracked is critical for linking ad interactions with user actions on your site.
To make it easy, go with CustomerLabs and collect all the unique user IDs without much of a hassle.
Creating and Configuring 1st Party Cookies (_fbp, _fbc)
The Facebook Pixel uses first-party cookies like _fbp and _fbc to identify visitors and store information about the referrer. These cookies are essential for accurate event tracking and attribution in Facebook’s system.
- _fbp tracks users across domains, providing Facebook with the data needed for cross-domain measurement.
- _fbc stores the Facebook click ID (_fbclid), which is vital for attributing conversions back to ad interactions.
In GTM, you should create JavaScript variables to manage these cookies. You’ll need to configure triggers to fire when users land on the site, setting the cookies as variables for later use in the Facebook Conversions API. This ensures the cookie data is consistently passed server-side.
Utilizing Variables for Data Tracking
Once the browser, click IDs, and cookie variables are set up, you’ll use these variables to pass data to the Facebook Conversion API. GTM allows you to leverage these variables in both client-side and server-side tags.
For performance marketers, it’s crucial to pass rich, accurate data that can improve audience targeting and reporting.
With your variables and cookies configured in GTM, you’re now set to capture and pass essential data to Facebook. But to ensure that your tracking remains accurate across both client and server-side setups, it’s vital to address event deduplication. Let’s dive into how event deduplication helps avoid double counting and keeps your data clean.
Implementing Event Deduplication
Event deduplication is crucial in ensuring accurate tracking, especially when using both client-side and server-side tagging. Without it, you risk counting the same event multiple times, which can distort your ad performance data. In the context of Facebook Conversions API (CAPI), deduplication allows Facebook to recognize and ignore duplicate events, ensuring your reports remain accurate.
Here’s how to implement event deduplication in GTM server-side:
- Generate a Unique Event ID: Each event you track should include a unique Event ID. This ID helps identify and compare events sent from both client-side and server-side. Tools like GTM can dynamically generate these Event IDs, ensuring every event is properly tagged and ready for deduplication.
- Track and Pass Event IDs to Both Client-Side and Server-Side: Ensure that your Event ID is consistently passed in both your browser (client-side) and server-side tags. This way, Facebook’s systems can compare and eliminate duplicate entries.
- Set Up Deduplication in GTM: In GTM, you can configure your tags to include the Event ID when sending data to Facebook CAPI. Make sure both your Facebook Pixel tag and server-side tag use the same Event ID to align client and server-side tracking, avoiding double counting.
With event deduplication in place, you’re ensuring that your data remains clean and accurate by preventing double counting of events. Now that your events are properly tagged, the next step is to set up both client-side and server-side tags. This setup will enable seamless tracking across platforms like GA4 and Facebook CAPI, ensuring complete and reliable data collection.
Setting Up Client-Side and Server-Side Tags
When setting up client-side and server-side tags, you need to ensure that your tracking infrastructure is well-aligned to capture accurate event data. This step is crucial for leveraging both GA4 and Facebook CAPI effectively, allowing you to track conversions and optimize ad performance across multiple channels. Here’s how to get your tags configured correctly.
- Create GA4 web tags and set event parameters: Start by creating GA4 web tags in your client container. Define key event parameters such as purchase, page_view, or add_to_cart. These parameters will ensure that your events are tracked consistently across your website and sent to Google Analytics.
- Configure the Facebook Pixel ID and API Access Token: Next, for server-side tracking, configure your Facebook Pixel ID and API Access Token. This setup is essential for sending data to Facebook via the Conversions API. You’ll input the Pixel ID in the tag configuration and securely add your Access Token to ensure communication between your server and Facebook.
- Set up a GA4 client in the server container: In your GTM server container, add the GA4 Client tag. This will process incoming event data and forward it to your GA4 property. Ensuring that both client-side and server-side tags are working together will enhance the accuracy of your tracking setup when using Facebook Conversions API with Google Tag Manager.
Once your tags are configured, the next essential step is to thoroughly test and validate the setup. This ensures that both client-side and server-side events are captured accurately, providing reliable data for your campaigns.
Testing and Validating Configuration
To ensure that your Facebook Conversions API (CAPI) setup works smoothly, you need to carefully test and validate both client-side and server-side configurations. This step is crucial for performance marketers who rely on accurate data to optimize campaigns.
If the setup isn’t properly tested, it can result in inaccurate tracking, missed events, or duplicated data, which can throw off your analytics and affect ad targeting.
Here’s how you can test and validate the configuration:
- Use GTM Preview Mode: Start by enabling GTM’s Preview mode for both client-side and server-side containers. This allows you to monitor data flow, verify that events are triggering correctly, and see real-time debug information for both environments.
- Verify Event Data: Check the accuracy of your event data in both Facebook’s Events Manager and Google Analytics 4 (GA4). Make sure that key metrics like purchase events, page views, and custom conversions are being tracked properly. Double-check that the data matches across platforms for consistency.
- Ensure Event Deduplication: Event deduplication is critical to prevent double-counting. By using unique Event IDs across both the Facebook Pixel and server-side tracking, you can ensure that each event is recorded only once. Verify this in your deduplication logs and test for data consistency.
This process ensures your setup of the Facebook Conversion API Google Tag Manager delivers precise tracking.
After successful testing, it’s time to publish your configuration to make your changes live. A careful review before publishing will help you avoid any potential issues and ensure smooth tracking.
Publishing the Configuration
To finalize the setup, you need to publish both your client-side and server-side containers. This step is crucial for making sure that the changes you’ve made go live and start tracking events as intended.
Before you hit publish, though, it’s essential to conduct a thorough review to avoid any mistakes that could impact your tracking or data accuracy. Lastly, even after going live, you need to monitor the setup regularly to ensure it continues running smoothly.
Here’s what you need to do:
- Publish client-side and server-side containers: Go to your GTM dashboard and publish both containers. Make sure to deploy your server-side container correctly to the cloud environment (e.g., Google Cloud) after checking that all tags and triggers are functioning.
- Final checks and clean up: Double-check your configurations, including custom parameters, event deduplication, and correct use of the Facebook Pixel ID and Access Token. Remove any test codes or extra scripts that were used during the testing phase to avoid unnecessary data collection.
- Ongoing monitoring and maintenance: Set up automated reporting to track event data flow in Facebook Events Manager and GA4. Regularly review your server container’s logs to identify and fix any tracking issues. Update your setup whenever there are changes in Facebook’s API or GTM to keep your Facebook Conversion API Google Tag Manager integration running efficiently.
The Best way to implement Facebook Conversions API
CustomerLabs simplifies the Facebook Conversions API setup, enabling seamless server-side tracking in under 30 minutes. With CustomerLabs powered Meta Conversions API, you can mitigate data loss, achieve up to 80% match rates for custom audiences, and optimize ad campaigns with high-quality, privacy-compliant first-party data. This approach reduces costs, enhances ad efficiency, and helps marketers drive better conversions effortlessly.
Conclusion
Setting up Facebook Conversions API with Google Tag Manager server-side provides performance marketers with a powerful method for improving ad tracking and targeting. The setup involves configuring GTM to pass essential data like Meta Browser and Click IDs, creating first-party cookies, and ensuring event deduplication to prevent duplicate conversions.
By shifting tracking from client-side to server-side, you can capture more accurate data, especially as privacy regulations limit traditional methods. The facebook conversion api google tag manager setup helps ensure ad campaigns perform efficiently by minimizing data loss and ensuring consistency in your reports.
Some common challenges include event mismatches due to incorrect deduplication or issues with the configuration of tracking parameters like _fbp and _fbc. Verifying your setup in GTM’s Preview mode and Facebook’s Event Manager can resolve most issues.
Setting up Facebook’s Conversions API (CAPI) using Google Tag Manager (GTM) server-side can be complex and time-consuming, often requiring technical expertise and significant resources. An alternative is to use CustomerLabs’ no-code Customer Data Platform (CDP), which simplifies the process. With CustomerLabs, you can implement Facebook CAPI in under 30 minutes without any coding or server setup, streamlining data collection and enhancing ad performance.If you’re interested in exploring this further, you can start a free trial to learn more about how it works.


