Over time, businesses accumulate valuable customer data—whether it’s from previous purchases, website interactions, or sign-ups. What if you could leverage this data to reach your audience with highly relevant ads at the ideal moment and across platforms they frequent daily? Google Ads Customer Match enables businesses to do exactly that.
With Customer Match, you can upload customer lists, including email addresses, to create targeted campaigns that engage existing customers and attract new ones with similar characteristics. This feature also ensures that your ads reach the right people, whether they are browsing Google Search, watching videos on YouTube, or checking their Gmail inbox.
This blog explains how to use Google Ads’ Customer Match to upload your customer list and target the people who matter most to your business, with simple steps to help you get started. We’ll also cover best practices to ensure your ads reach the most relevant audience, delivering a higher return on investment.
Now let’s get into the details of building and managing your customer lists effectively.
Creating and Managing Customer Lists
Effectively managing your customer lists in Google Ads Customer Match can majorly enhance your advertising efforts.
Here’s a step-by-step guide to help you through the process:
How to Use Google Ads Customer Match: A Step-by-Step Guide
- Step 1: Log into Your Google Ads Account
- Go to Google Ads and log into your account.
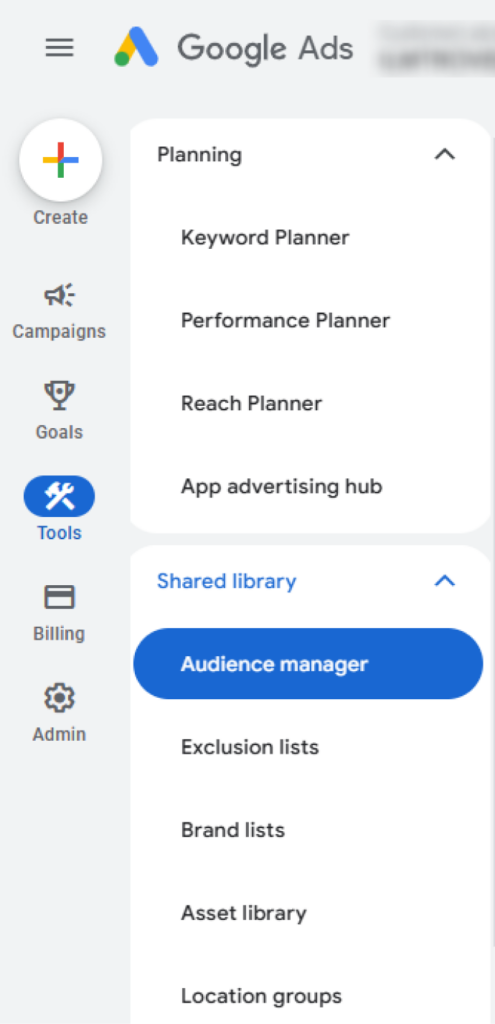
- Step 2: Access Audience Manager
- On the Google Ads home page, click on ‘Tools & Settings’.
- Under the ‘Shared Library’ section on the left, select ‘Audience Manager’.

- Step 3: Select Customer Match
- Inside Audience Manager, click the ‘+’ button.
- Choose ‘Customer List from the options provided.

Once you’re on the customer list screen, you can begin setting up your new list. Start by naming your customer list, then choose the data you want to upload, such as customer emails, phone numbers, and/or mailing addresses.
- Step 4: Prepare Your Data File
- Prepare your customer data file (e.g., email addresses or phone numbers) in CSV format.
- You can either upload the file manually or use the Google Ads API for integration.

- Click “Use a template” to create a new list, or simply drag and drop your pre-existing CSV file.
- Step 5: Upload Your Data List
- After naming your audience, click the ‘+ Upload my data’ button.
- Review and accept Google’s terms and conditions to comply with their privacy policies.
- Step 6: Utilize Your Customer Match List
- Once your data is uploaded and processed, your audience is ready for use.
- Apply this audience to your campaigns (e.g., Google Search, YouTube, Gmail, etc.) to start targeting relevant users.
Creating Lists from Customer-Provided Emails and Mailing Lists
After following the first three steps of the previous section, once you’re on the customer list screen, you can begin setting up your new list. Start by naming your customer list, then choose the data you want to upload, such as customer emails, phone numbers, and/or mailing addresses.

Creating lists from customer provided emails:
1: Create a Plain Text File
- Create a simple text file containing a list of customer email addresses.
- The file should have one column, with the heading labeled “email.”
2: Prepare Your CSV File
- The file can be basic—just a list of emails in plain text, like this:

3: Upload Your Email List
- Once your file is ready, upload it to Google Ads under the Customer Match section.
4: Review Format Compatibility
- Google will check if the emails are in the correct format. You’ll receive feedback letting you know if the list is properly formatted.

5: Wait for the Matching Process
- After uploading, Google will attempt to match your customer emails with its targeting data.
- This process typically takes less than 24 hours to complete.
Creating lists from mailing addresses:
6: Prepare Your Data
- Include the following fields for each customer:
- First Name
- Last Name
- Country
- Zip Code
7: Format Your Country Column
- Ensure that the country column contains the correct two-letter country code for each customer.
8: Upload the List
- Once your data is formatted, you can upload it to Google Ads. Note that this process may take longer than uploading an email list due to the additional fields.

9: Minimize False Positives
- Be cautious with the simple fields (name, country, zip), as they may increase the risk of false positives in matching.
Uploading a phone number list follows a similar process to uploading email or mailing address lists. You’ll need to ensure the phone numbers are formatted correctly, typically with country codes included, and then upload the list in the same way via the Customer Match interface.
Now that you know how to upload your lists, let’s take a look at how Google handles and protects your data throughout the process.
How Google Handles and Protects Uploaded Lists
Google takes several measures to ensure the privacy of your uploaded customer lists:
- Secure Storage: The hashed data is transmitted and stored securely within Google’s systems.
- Limited Data Use: Google uses your data files solely to create your Customer Match audiences and to ensure compliance with their policies.
- Data Deletion: After the matching process and policy compliance checks are complete, your data file is marked for deletion.
Adding More Email Addresses
To expand your existing customer list with additional email addresses:
- Prepare the New Data: Compile the new email addresses in a CSV file formatted similarly to your original list.
- Access Audience Manager:
- Log in to your Google Ads account.
- Navigate to the Audience Manager under the Tools icon.
- Select Your Existing List: Find and select the customer list you wish to update.
- Edit the List:
- Click on the list name to open its details.
- Upload the New CSV File: Choose the option to Add more customers and upload your new CSV file.

- Review and Save: Ensure the new data complies with Google’s policies, then save your updated list.
Removing Email Addresses
To remove specific email addresses from your customer list:
- Access Audience Manager:
- Log in to your Google Ads account.
- Navigate to Audience Manager under the Tools icon.
- Select Your Existing List: Locate and select the customer list you want to modify.
- Edit the List: In the Customer List section, click the three-dot menu and select Edit.
- Choose the Removal Option: Select Remove specific customers from the options provided.
- Upload the Data for Removal
- Decide whether to upload a plain text data file or a hashed data file.
- If uploading plain text, Google will automatically hash the data (e.g., Email, Phone) using the SHA256 algorithm.
- For pre-hashed data, ensure it meets Google’s data file requirements.
- Decide whether to upload a plain text data file or a hashed data file.
- Upload the File: Select the file containing the customer data you want to remove.
- Confirm Compliance: Check the box confirming that the data complies with Google’s policies.
- Set Membership Duration (Optional): Choose how long you want the remaining customers to stay on the list. The default is unlimited, but you can set a specific duration.
- Save Changes: Click Save to complete the process.
By following these steps, you can effectively create, manage, and update your customer email lists within Google Ads, ensuring your campaigns reach the right audience while abiding by privacy and security standards.
While uploading CSV is a way to upload customer lists, it is very mediocre. The right way to upload customer lists is in real-time. And only real-time uploading to Google Ads will help in accurate targeting by using audience signals.
For real-time sync of your customer list, here’s an advanced 1PD Ops strategy.
Targeting Customer Lists with Google Ads and How CustomerLabs Can Help
Success in targeting customer lists through Google Ads largely hinges on the quality and organization of your customer data. With fragmented or outdated information, campaigns can struggle to achieve desired results. CustomerLabs 1PD Ops simplifies this process by acting as a centralized hub for managing customer data. It cleans, enriches, and segments the data in real-time, ensuring the lists are ready for precise targeting through Google Ads’ Customer Match feature.
- Simplified Audience List Creation in Google Ads
Creating audience lists in Google Ads is straightforward with CustomerLabs. By following these steps:
A: Create a Segment
- Go to CustomerLabs and create a segment with the desired events or user traits.
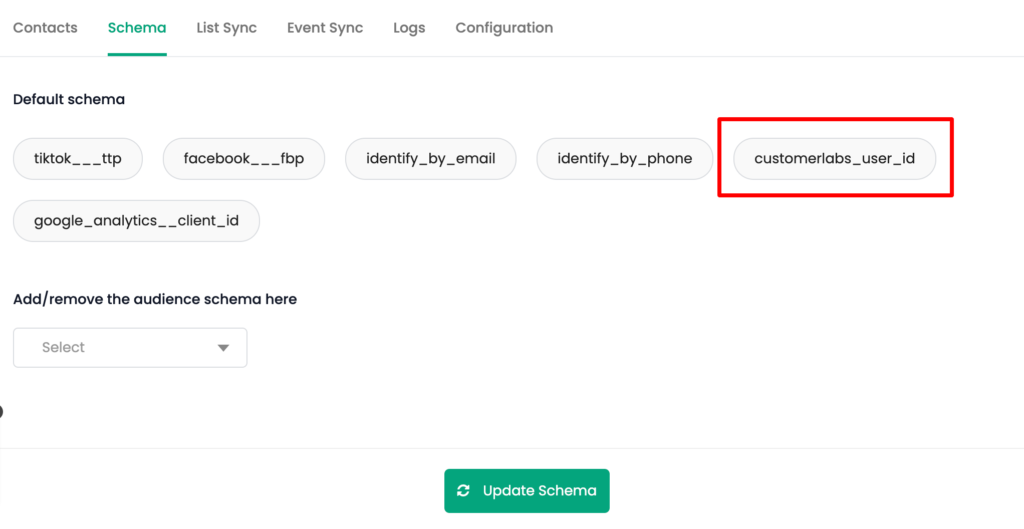
- Navigate to the “Schema” tab of the segment you’ve created.
B: Configure Segment Schema
- Customize the Segment Schema based on the audience list you want to create or sync with Google Ads.
- Add customerlabs_user_id in the schema to enable syncing of anonymous users.
C: Map the Schema for Google Ads
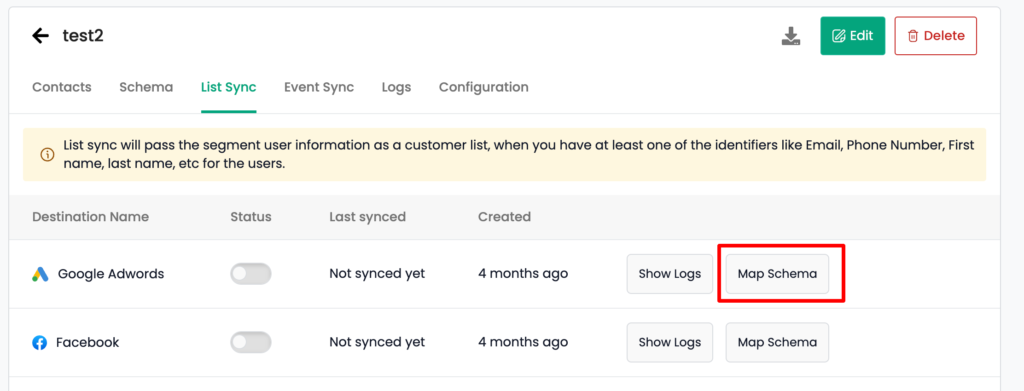
- Open the “List Sync” tab and click on “Map Schema” for Google Ads.
- In the “List to Sync” section:
- Choose an existing audience list from Google Ads.
- Or, select “Create New List” to upload a fresh list with unique user IDs (e.g., customerlabs_user_id).
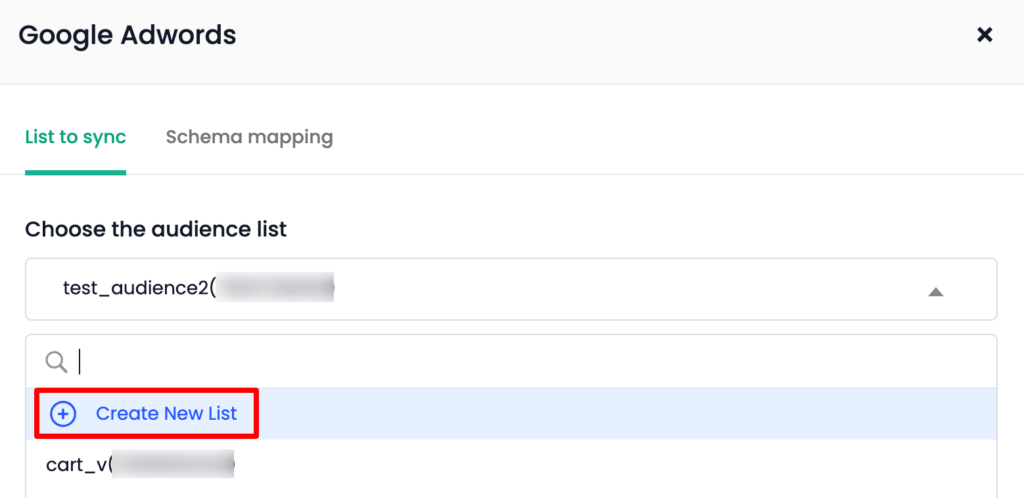
Note: If syncing both anonymous and known users, choose “Create New List” to include unique user IDs.
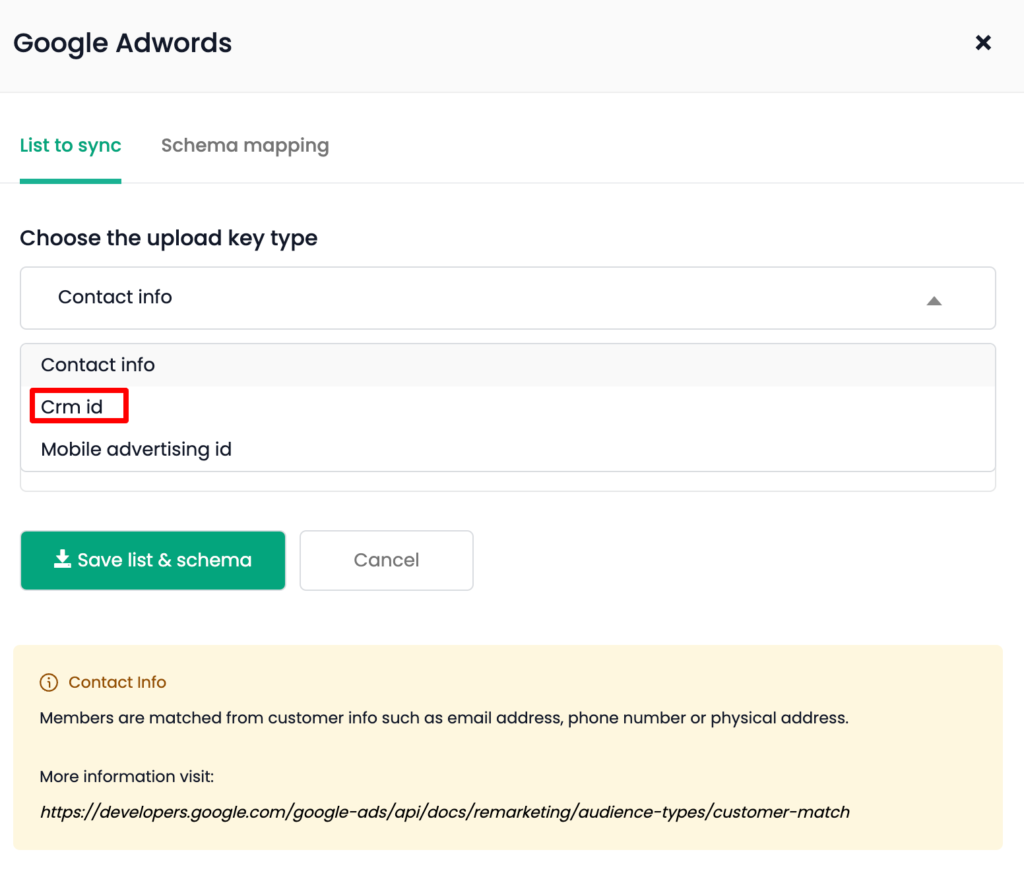
D: Select the Upload Key Type
- If creating a new list, specify the Upload Key Type:
- Crm id: Use this for syncing anonymous users.
- Contact info: Use this for syncing known users.
E: Name the Audience List
- Assign a name to the new audience list if you’ve created one.
F: Verify Custom Audience Info
- Once the audience list is selected or created, review the Custom Audience Info section.
Troubleshooting Tip: If you encounter “Error Fetching Data,” re-authenticate your Google Ads account by going to Menu → Destinations → Google Ads.
G: Map Schema in Detail
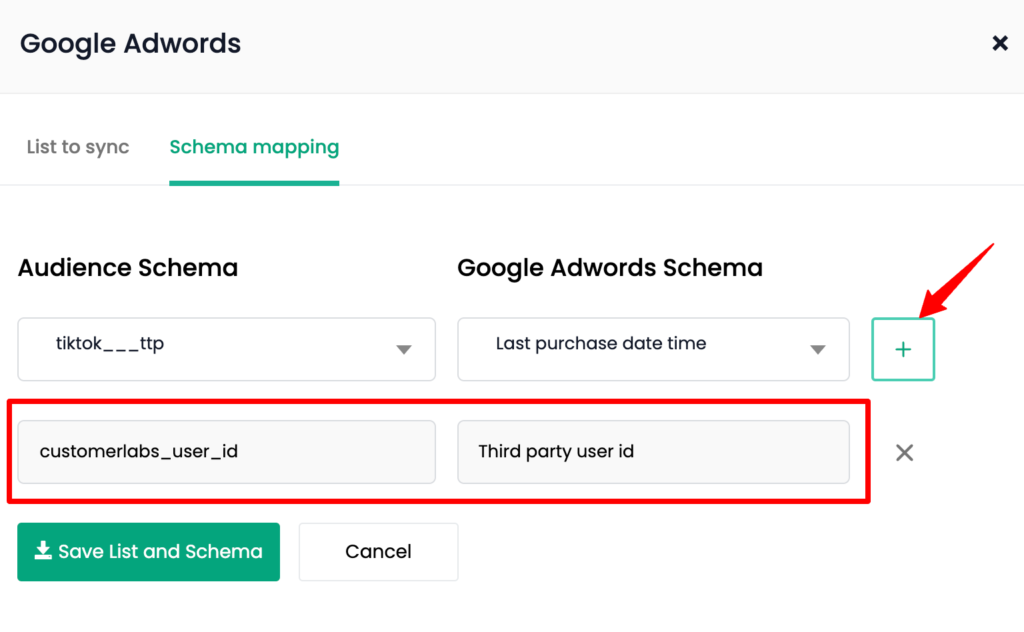
- Open the “Schema Mapping” tab:
- For anonymous users: Map customerlabs_user_id to Google Ads Third Party User ID, then click “+”.
- For known users: Map the schema added in Step 2 (e.g., email, phone) to the corresponding Google Ads schema, then click “+”.
Note: For anonymous users (key: Crm id), only customerlabs_user_id can be added; including additional schemas like email or phone will result in an error.
H: Save and Sync the List
- Click “Save List and Schema” once the mapping is done.
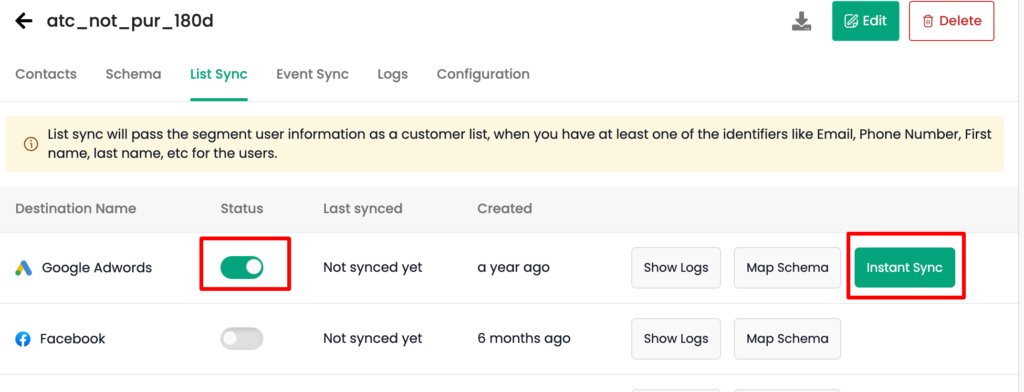
- Turn on the toggle under “Status” for Google Ads.
I: Perform Instant Sync
- Select “Instant Sync” to initiate the syncing process immediately.
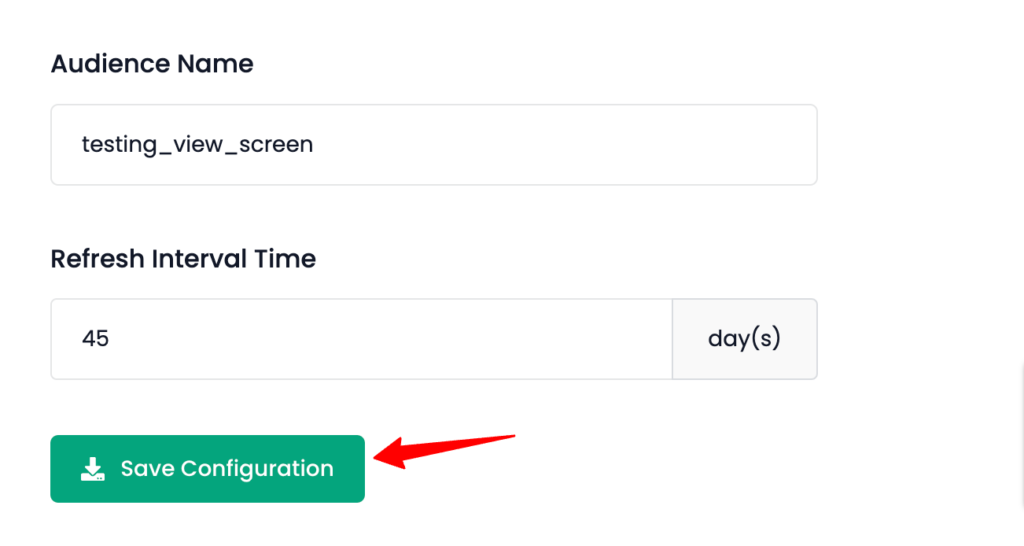
J: Configure Refresh Intervals
- Go to the “Configuration” tab.
- Set the Refresh Interval based on how frequently the list should be updated.
- Save your configuration.
K: Monitor Sync Logs
- To view the segment logs:
- Open the “Logs” tab for the specific segment.
- For Google Ads logs, navigate to List Sync → Google Ads → Show Logs to check the latest updates.

Refer to the CustomerLabs Google Ads integration guide for an overview of the process.
- Real-Time Synchronization and Consent Management
One of the standout features of CustomerLabs is its real-time synchronization capability. Unlike the traditional manual upload of customer lists, which poses challenges in maintaining up-to-date records and managing consent, CustomerLabs automates the process. The platform dynamically adjusts customer lists to account for opt-ins and opt-outs, ensuring compliance with privacy regulations such as GDPR and CCPA.
- Benefits of CustomerLabs Consent Mode Integration:
- Automated Consent Handling: CustomerLabs tracks customer consent in real-time, ensuring only users with valid permissions are included in the lists.
- Dynamic Updates: Audience lists are automatically updated as users opt in or opt out, eliminating the risk of outdated or non-compliant data being used in ad campaigns.
- Regulatory Compliance: By storing and syncing consented data seamlessly, CustomerLabs reduces manual intervention and enhances compliance with global privacy laws.
- Why This Matters for Your Campaigns
By leveraging CustomerLabs’ ability to centralize and automate customer data management, businesses can:
- Achieve better engagement and conversions through hyper-targeted ads.
- Minimize the risk of compliance issues with accurate consent tracking.
- Save time and effort with automated audience list updates and integrations.
The integration of CustomerLabs into your Google Ads strategy ensures precision, compliance, and improved ROI, all while making the process easy and efficient.
Functionality of Google Ads for Customer Lists
Google Ads offers powerful tools for businesses to leverage customer lists effectively, enabling tailored ad campaigns across multiple platforms. By combining secure data handling with advanced targeting features, businesses can connect with their audience while maintaining privacy and compliance standards.
- Secure and Privacy-Safe Matching with Signed-In Google Users
When uploading a customer list to Google Ads, sensitive information like email addresses or phone numbers is securely hashed. This hashing process scrambles data into code, ensuring it remains private. Google matches the hashed data with signed-in users on its platforms, allowing precise targeting without exposing personal details.
This privacy-focused approach ensures your campaigns reach the right audience—customers who already have a relationship with your brand—without compromising their trust. By maintaining secure data practices, businesses can confidently deliver relevant ads while adhering to privacy standards.
- Creating Targeted Campaigns and Ads
Once your customer list is matched with Google users, you can create campaigns designed to resonate with their needs. Whether you’re promoting repeat purchases, special offers, or simply aiming to stay relevant, tailored campaigns drive better engagement.
Your audience can be targeted across platforms such as Google Search, YouTube, Gmail, and Display, increasing visibility where your audience spends the most time. Personalized messaging for these already-engaged users enhances the likelihood of interaction and conversion.
Next, let’s go over the policies Google has in place to ensure customer lists are used ethically and responsibly.
Ethical Use and Privacy Controls
Google Ads places a strong emphasis on user privacy and ethical use of customer data. You have full control over your customer lists, including the ability to upload, update, and remove lists as needed.
Google also ensures that the ads served through Customer Match are compliant with their advertising policies, which include respecting the privacy of individuals. Here are two key features that prioritize user choice:
Opt-Out Options for Personalized Ads
Not every user wants ads tailored to their specific interests, and Google provides the option to opt out of personalized ads. If a user decides to turn off ad personalization, they can do so via Google Ad Settings.
When this option is enabled, users will stop seeing ads based on their activity, such as searches or visits to websites. Instead, ads will be shown based on broader factors like IP location or inferred interests rather than detailed browsing history.
Enhanced Consent Management with CustomerLabs
Managing consent for customer lists manually can be challenging, especially when dealing with opt-in and opt-out preferences in compliance with global privacy regulations. CustomerLabs simplifies this process by:
- Automating Consent Tracking: CustomerLabs automatically updates lists in real-time to reflect user opt-ins or opt-outs, ensuring accurate targeting and compliance without manual intervention.
- Dynamic List Adjustments: As customer preferences change, CustomerLabs dynamically syncs the updated lists with Google Ads, reducing the risk of outdated or non-compliant data.
- Streamlined Compliance: With built-in consent management features, CustomerLabs ensures that businesses can focus on campaign performance while meeting regulatory requirements effortlessly.
By integrating consent management seamlessly into the ad workflow, CustomerLabs provides a scalable and privacy-compliant solution that saves time and enhances targeting efficiency.
Muting or Blocking Ads
To improve the user experience, Google allows users to mute or block ads they find repetitive or irrelevant. By clicking the “X” in the corner of an ad or through Google’s Ad Settings page, users can stop seeing specific ads. Additionally, users can block ads from particular advertisers altogether, giving them greater control over the type of ads they encounter online.
Now, let us take a closer look at the rules and guidelines regarding the use of customer lists.
A More Streamlined Advertising Experience
Google Ads’ robust functionality for customer lists, coupled with tools like CustomerLabs, offers a secure, efficient, and privacy-safe way to connect with your audience. The automation and consent handling features simplify campaign management while maximizing results through tailored, ethical targeting strategies.
Policies and Procedures for Using Customer Lists
Using customer lists in Google Ads is effective, but there are clear guidelines to ensure ethical and privacy-compliant advertising. Here’s what you need to know:
- Collection Only from First-Party Data
Google requires that customer data used in ads be collected directly from your audience—such as through website sign-ups, purchases, or newsletter subscriptions. Buying third-party email lists or scraping data is strictly prohibited. This ensures trust and responsible data usage.
- Privacy Policy Disclosure
You must clearly inform your customers about how their data will be used, including for advertising purposes. Your privacy policy should specify that their information could be used for targeted ads on platforms like Google Ads. This transparency is both a Google requirement and a best practice for maintaining customer trust.
- Prohibition on Collecting Personally Identifiable Information (PII)
Ads cannot directly ask users for personal details, such as their name, email, or phone number. Google strictly prohibits this practice to protect user privacy.
Sticking to these policies is a win-win for your brand and your customers, as it ensures your campaigns stay compliant while building trust with your audience.
Up next, let’s explore the restrictions imposed by Google ads while managing sensitive information.
Restrictions on Sensitive Information
Google Ads draws a line when it comes to sensitive information in ad targeting. Here’s what you absolutely can’t use in your campaigns:
- Health information: No targeting based on medical conditions, treatments, or personal health records. Ads for healthcare services are allowed, but they can’t be personalized using sensitive health data.
- Financial data: Information about someone’s financial status, like credit scores or income levels, is off-limits for targeting.
- Personal identity factors: Google prohibits targeting based on race, religion, sexual orientation, or political beliefs. It’s about ensuring fairness and avoiding discrimination.
- Criminal records: Data related to arrests or criminal history is also restricted.
Google takes these restrictions seriously, so when in doubt, stick to non-sensitive data points and always respect your audience’s privacy.
Conclusion
By leveraging customer lists in Google Ads, you can refine your campaigns and drive more relevant interactions with your audience. CustomerLabs 1PD Ops empowers you to turn raw data into actionable insights, enhancing your targeting strategy and maximizing the potential of Google Ads. This combination helps businesses re-engage valuable customers and attract new leads with greater efficiency.
With tools that help you automate and personalize your campaigns, CustomerLabs takes the hassle out of data management so you can focus on what matters—reaching the right people!

