If you’ve been struggling to figure out how to install Meta Pixel on your website without messing with complicated code, you’re not alone. However, with Google Tag Manager, you can easily add Meta Pixel, track your website’s performance, and optimize your ad campaigns—all without needing to be a coding expert.
In this post, we’ll walk you through the steps to install Meta Pixel using Google Tag Manager so you can start gathering valuable insights to improve your marketing. Let’s get started!
Introduction
Meta Pixel (formerly Facebook Pixel) is a small piece of code that you add to your website to track user interactions, such as page views, purchases, or sign-ups. It helps you measure the effectiveness of your Facebook and Instagram ads by gathering data on how users behave after interacting with your ads.
Meta Pixel and Google Tag Manager (GTM) work hand-in-hand to simplify the process of adding tracking codes to your website. Meta Pixel collects valuable data about user behavior on your site, such as conversions, page views, and more. By using GTM, you can easily deploy and manage the Meta Pixel without having to manually edit your website’s code.
In short, while Meta Pixel tracks user actions, GTM ensures that the Pixel is implemented correctly and efficiently, all without the hassle of manual code editing. Let’s walk through how to set it up.
Setting Up GTM With CustomerLabs
Follow these step-by-step instructions to integrate Google Tag Manager (GTM) with CustomerLabs and start tracking website events:
- Login to Your CustomerLabs Account
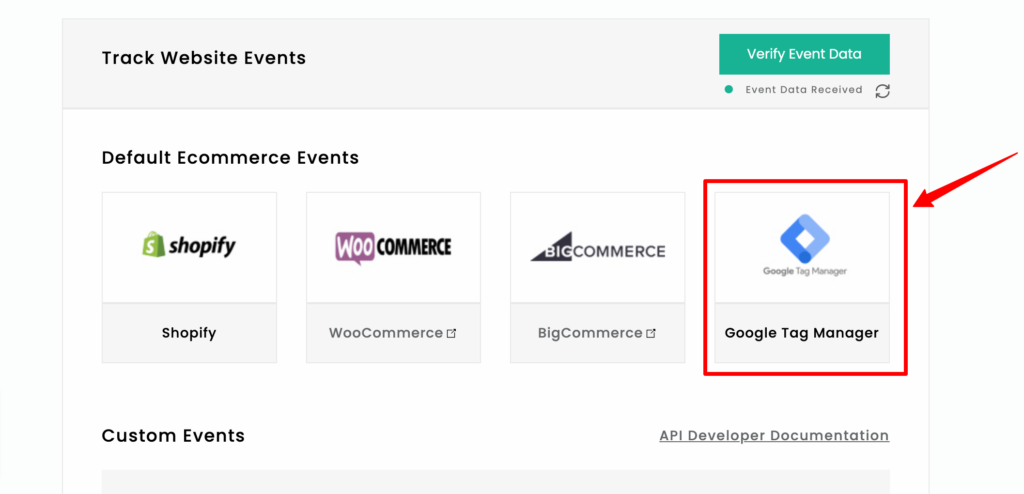
Log in to your CustomerLabs account to begin the integration process. - Navigate to Google Tag Manager Integration
On the Home page, under Track Website Events, click on Google Tag Manager. This will redirect you to authenticate your Tag Manager account.
- Authenticate Your Google Tag Manager Account
Follow the prompts to authenticate your Google Tag Manager account. You’ll need to grant permissions to allow CustomerLabs to connect with your Tag Manager. - Choose the Tag Manager Account and Container
Once authenticated, select the Tag Manager account and container where you want to install the CustomerLabs tracking code.
- Install the Tracking Code
After connecting your GTM container to CustomerLabs, the tracking code will automatically be installed within the selected container.
Note: Ensure the GTag container is already installed on your website. - Check the Tag in Google Tag Manager
Verify that the CustomerLabs tracking code is now visible in your Tag Manager account under the created tag.
Google Tag Manager Tag Configuration to Insert CustomerLabs Code
- Tag Sequencing
- Go to the Tags menu in Google Tag Manager.
- Select your Google Tag and then go to Advanced Settings > Tag Sequencing.
- Choose Fire a tag before event fires and select the CustomerLabs tag from the dropdown.
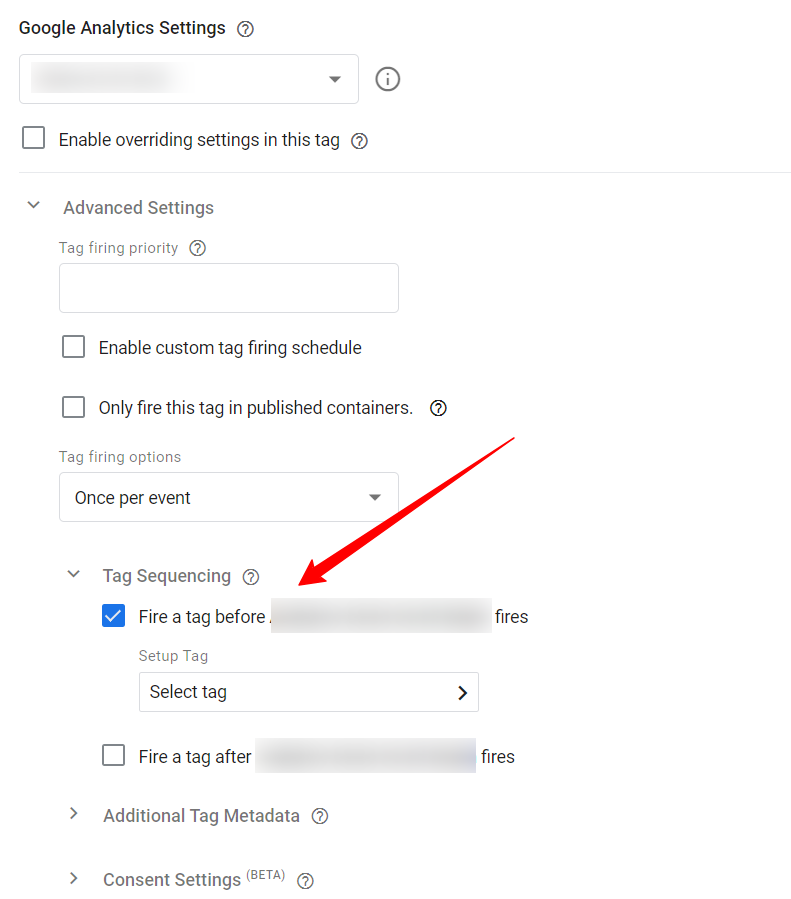
- Note: This step is mandatory to ensure the default tracking code is installed before the pixel script. It’s essential for tracking events like Purchases, Product Viewed, Checkout, and more.
- Triggers & Tags
- If you’ve already set up triggers for e-commerce events, you can reuse them to create new tags with Custom HTML.
- Use the provided code snippets to track default e-commerce events from the data layer.
- If no triggers are set up yet, create new triggers based on the events you want to track (e.g., view_item, add_to_cart).
This will help you set up GTM with CustomerLabs quickly and ensure your website events are tracked effectively.
Since CustomerLabs simplifies the GTM setup process, you don’t have to worry about the manual configuration. But if you prefer to set up Google Tag Manager on your own, here’s how to do it manually.
Setting Up Google Tag Manager Manually
Before you can add Meta Pixel, you’ll need to make sure you’ve set up Google Tag Manager on your website. To get started with Google Tag Manager, follow these simple steps:
- Sign in to Google Tag Manager
Go to https://tagmanager.google.com and sign in with your Google Account. - Create an Account and Container
- Account: Enter an account name and select your country location. You can also choose to share data anonymously with Google.
- Container: Give your container a name (usually your website’s main URL) and select the container type (Web, iOS, Android, or AMP).
- Set Up the Google Tag
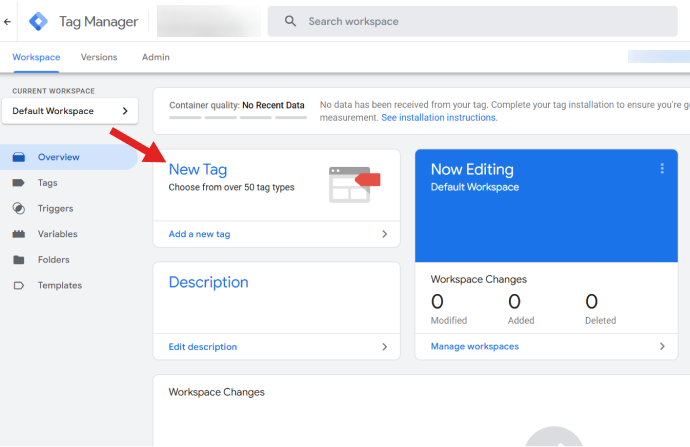
- In the Workspaces tab, navigate to Tags, then click New.
- Replace Untitled Tag with your chosen tag name.
- In the Tag Configuration section, select Google tag as the tag type.
- Enter your Tag ID.
- Add Google Tag Manager Snippets to Your Website
- Follow the on-screen instructions to copy and paste the Google Tag Manager snippets into your website’s code.
- Enter your website’s URL and click Test to ensure everything is working correctly.
By following these steps, you’ll have Google Tag Manager set up and ready to go for tracking and managing your tags.
Before you can go ahead and add your Meta Pixel to Google Tag Manager, it’s important to know how to find your Facebook Pixel ID.
How to Find Your Facebook Pixel ID
Finding your Facebook Pixel ID is easier than you might think. Just follow these simple steps:
- Log into Facebook Business Manager
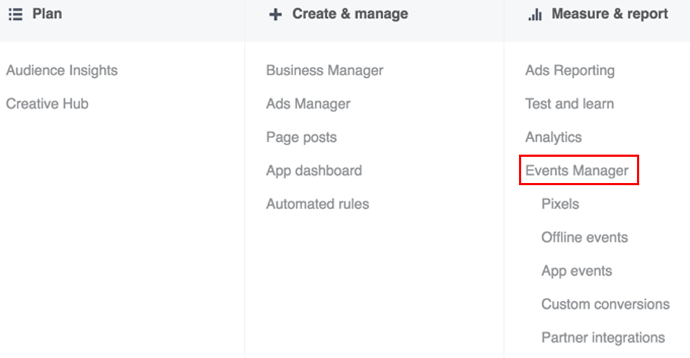
First, go to your Facebook Business Manager and log in. Once you’re in, click on “All tools” from the left-hand menu. - Navigate to Events Manager
In the pop-up menu, scroll down to find “Events Manager.” Click it, and a new page will open. This is the hub where you can manage all your events.
- Find Your Pixel ID
In the Events Manager, you’ll see a list of your data sources and Pixels. Under your Pixel’s name, you’ll find the Facebook Pixel ID—this is the number you need!
Now, it’s time to install Meta Pixel through GTM.
How to Install Meta Pixel Through Google Tag Manager: Step by Step
If you’re using Google Tag Manager to manage your website tags, adding the Meta Pixel is a straightforward process.
1. Log into Google Tag Manager
Start by logging into your Google Tag Manager account.
2. Select Your Website’s Container
Once you’re logged in, find and select the container for the website you want to install the Meta Pixel on. This is where all your tags and triggers are managed.
3. Add a New Tag
Click on Add a new tag to create a fresh tag for the Meta Pixel.
4. Choose Custom HTML Tag
When prompted, choose the Custom HTML tag option. This allows you to add custom code (in this case, the Meta Pixel code) to your website.
5. Name Your Tag
Give your new tag a descriptive name like “Meta Pixel” so you can easily identify it later.
6. Go to Meta Events Manager
Open your Meta Events Manager (previously Facebook Events Manager) and select Add Event. This is where you’ll get the pixel code for your website.
7. Select “From a New Website”
Choose From a new website to start the process of installing a new pixel.
8. Select “Install Code Manually”
You’ll then be asked how you want to install the pixel. Choose Install code manually to copy the pixel code.
9. Copy the Pixel Base Code
Click on Copy code to copy the entire Meta Pixel base code. This is the snippet you’ll need to paste into Google Tag Manager.
10. Paste the Code in Google Tag Manager
Go back to Google Tag Manager, and in the HTML container, paste the pixel code you just copied from Meta Events Manager.
Now that you’ve added the Pixel code, you need to set up triggers to tell Google Tag Manager when to fire the pixel.
Setting Up Triggers for Meta Pixel
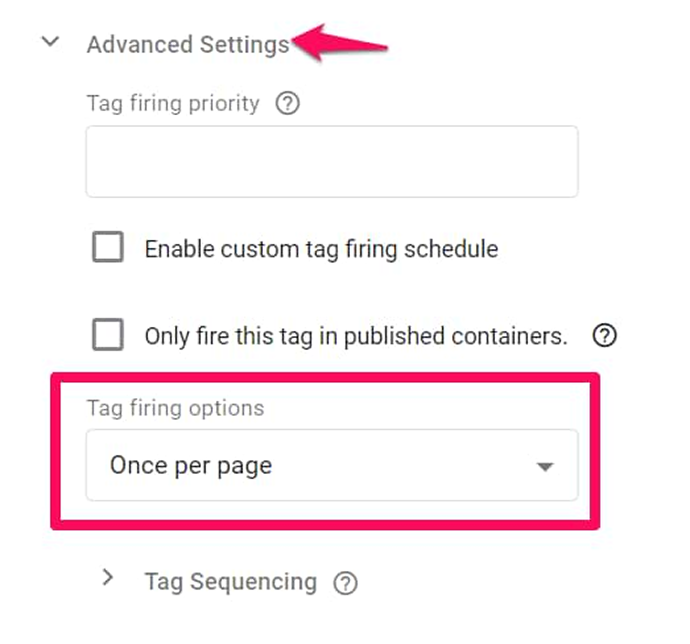
1. Set Tag Firing Options
Click on the Advanced settings drop-down menu and select Once per page under Tag firing options. This ensures that the pixel is only fired once per page load.
12. Choose Triggering for the Tag
Under Fire on, select All Pages so that the pixel will track visits on every page of your website.
13. Create the Tag
Once everything is set up, click Create tag to save your new Meta Pixel tag in Google Tag Manager.
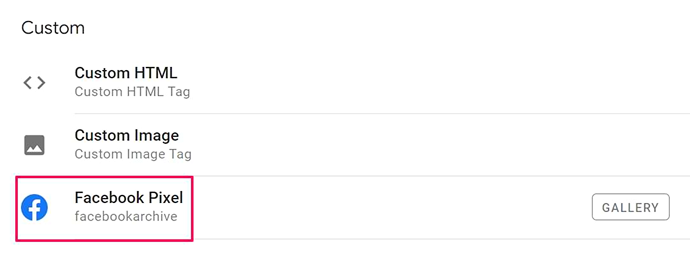
Adding Meta Pixel to your website via Google Tag Manager is also easy with a GTM Community Template. Here’s how you can do that.
Adding Facebook Pixel Using a GTM Community Template
This simple and efficient method lets you set up the pixel using GTM’s point-and-click interface without touching any code. A GTM community member created it because GTM doesn’t have an official Facebook Pixel tag, so the template handles all the setup for you.
Before adding the pixel, it’s necessary to create a Constant variable in GTM for your Facebook Pixel ID. This keeps things organized and makes it easy to reuse the ID in future tags.
Here’s how to create the Constant variable:
- Log into your GTM workspace.
- Go to Variables in the left-hand menu.
- Click New to create a new variable.
- Choose Constant as the variable type.
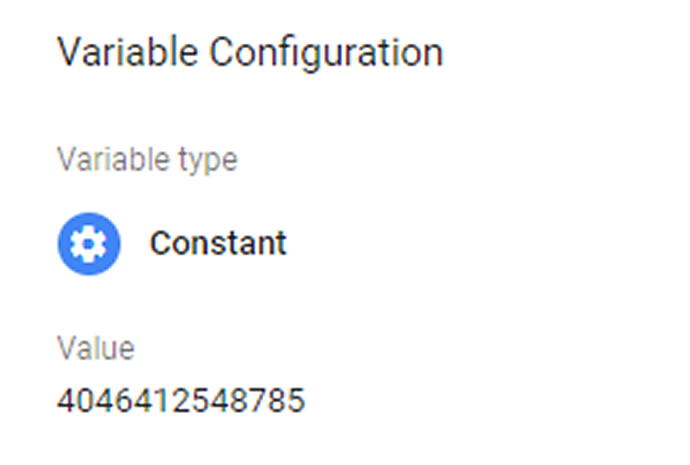
- Enter your Facebook Pixel ID in the value field.
- Save the variable, and you’re all set to use it across your tags.
This way, you’ve got your Pixel ID stored in one place, and adding it to any new tags down the line will be super easy.
If you’re already familiar with using Google Tag Manager for installing Meta Pixel, you might be wondering if there’s an easier, more direct way to handle data collection and lead tracking — especially if you’re using tools like CustomerLabs.
CustomerLabs makes it simple to integrate the Meta CRM Pixel and send lead data directly to Meta, without needing to manually set up tags or triggers in GTM. Let’s walk through how you can do it.
Installing Meta CRM Pixel Through CustomerLabs
If you’re using CustomerLabs to manage your data, integrating the Meta CRM Pixel is a straightforward process. This method allows you to send lead data from your CRM to Meta, optimizing your ads for high-quality leads.
Here’s how to set it up:
Step 1: Create a Meta CRM Pixel
- Go to Meta Events Manager.
- Select Connect a New Data Source → dcddf
- Follow the prompts to create a new CRM Pixel.
Tip: Meta recommends creating a separate pixel for CRM data to avoid overlap with your existing website pixel.
Step 2: Authenticate Your Meta Account in CustomerLabs
- Log in to your CustomerLabs account.
- Navigate to Menu → Destinations → Meta CRM Pixel.
- Click on Enable.
- Go to Configuration Settings.
- Click on Authenticate Facebook Account.
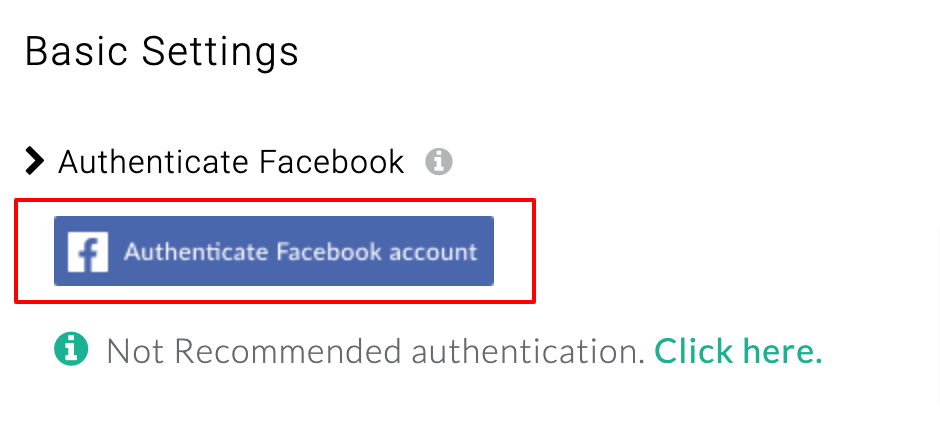
- You’ll be redirected to choose your Meta Business Manager account and assets.
Step 3: Select Your Business Manager and Assets
- Choose the Business Manager account you want to connect.
- Select the Business Asset Group (if you don’t have one, create it).
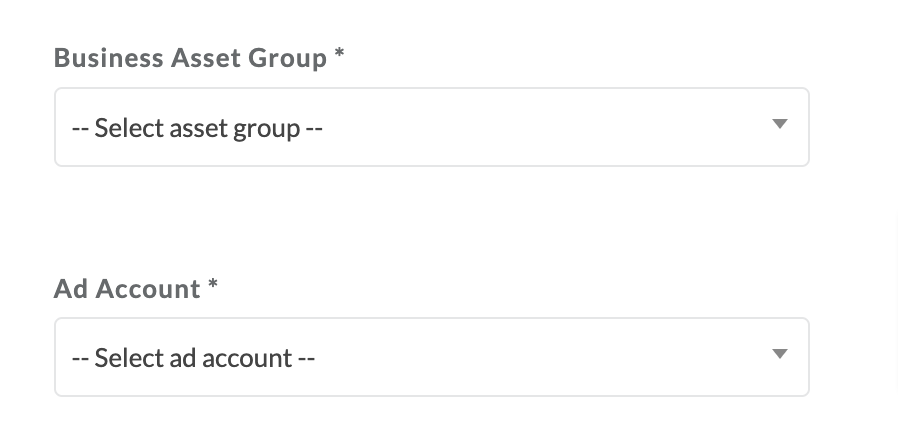
- Choose the Ad Account and Pixel from the drop-down menu.
- Click Submit and then Save Changes.
Step 4: Configure Field Mappings
- While configuring your source (like your CRM), ensure that you map the lead_id to fb_lead_id.
Example: If your system calls it “lead_data_id,” map that to “fb_lead_id” in CustomerLabs. - Click Save Changes once done.
Step 5: Set Up Event Workflow
- In CustomerLabs, go to Destinations → Meta CRM Pixel → Setup Event Workflow.
- Turn on the toggle for the Lead Events you want to send to Meta (e.g., from a CRM or Facebook Lead Form).
- Click Save Changes.
Step 6: Verify the Data in Meta Events Manager
- Once the setup is complete, check your Meta Events Manager to ensure that lead data is being sent through the Meta CRM Pixel.
This data can now be used to optimize your Facebook Lead Ads.
Now that your Facebook Pixel is set up, let’s move on to events and setting those up. Events are key to tracking specific actions on your site, like purchases or sign-ups. Here’s how to get them up and running.
Understanding Standard and Custom Events
It’s important to understand the two main types of events you’ll encounter: Standard Events and Custom Events. Let’s break down the difference so you can decide which one suits your needs best.
Standard and Custom Events
When working with Facebook Pixel, you’ll come across two types of events: Standard Events and Custom Events.
- Standard Events
Standard Events are predefined actions that Facebook has set up, like “ViewContent,” “AddToCart,” and “Purchase.” These events are easy to implement because Facebook already knows what they mean and how to track them. So, if your goal is to track common actions like a purchase or someone visiting a specific page, Standard Events are the way to go. - Custom Events
On the other hand, Custom Events are, as the name suggests, events that you define yourself. These are great for tracking more specific actions that aren’t covered by the Standard Events. For example, if you want to track a user clicking a special button or watching a specific video, you’d create a Custom Event to do that.
In short, Standard Events are quick and easy, while Custom Events give you more flexibility to track exactly what matters to your business.
Setting Up Events in Google Tag Manager
Once you’ve decided on the type of event you want to track, it’s time to set it up.
Here’s how to create a Google Analytics: GA4 Event tag to track user actions like clicking a button:
- Go to Google Tag Manager and sign in with your Google Account.
- Once logged in, click the Accounts tab (top left), and choose your container.
- In the Workspaces tab, click on Tags, then hit the New button (top right).
- Give your new tag a name, like “GA4 Event – Signup Newsletter.”
- Under Tag Configuration, select Google Analytics: GA4 Event.
- In the Measurement ID field, enter your GA4 property ID. This links the tag to your GA4 property, so the event data gets sent to the right place.
You’ve now set up the basic structure for your GA4 Event tag. It is now time to move on to testing and validating your Meta Pixel setup to make sure everything’s working as it should.
Additional Options for Meta Pixel Setup
When you’re setting up Meta Pixel on your site, there are a few other options that can help you get the most out of your tracking. Let’s take a look at some of these features that you might find useful.
1. Advanced Matching Setup
Advanced Matching is a feature that helps you capture more data by sending additional information, like email addresses or phone numbers, to Meta Pixel.
To set up Advanced Matching with Meta Pixel, follow these simple steps to format your visitor’s data and include it in the pixel base code. Here’s how you do it:
- Format Your Visitor Data
First, you need to collect your visitor’s data and format it as a JSON object. This object will include the data you want to send to Meta Pixel, like email, first name, and last name. - Add Data to the Pixel Code
Inside your pixel base code, use the fbq(‘init’) function call and add the formatted JSON data as a third parameter. Make sure the advanced matching parameters are placed directly in the pixel base code, or Meta won’t recognize them as advanced matching data.
For example, if your pixel ID is 283859598862258, it should look like this:
fbq(‘init’, ‘283859598862258’, {
em: ’[email protected]’, // Pixel will automatically hash this data using SHA-256
fn: ‘first_name’,
ln: ‘last_name’
// Add any other data here
});
- Sending More Hashed Values
If you want to send additional visitor data (like emails, names, etc.), you can use an <img> tag. This tag will pass the hashed user data to Meta Pixel using the SHA-256 hashing algorithm.
Here’s an example of how to pass the hashed user email, first name, and last name:
<img height=”1″ width=”1″ style=”display:none”
src=”https://www.facebook.com/tr/?id=PIXEL_ID&ev=Purchase
&ud=hashed_email&fn=hashed_first_name&ln=hashed_last_name”>
- Just make sure to replace PIXEL_ID with your actual Pixel ID and format the data accordingly.
By following these steps, you’ll be able to use advanced matching in Meta Pixel to get more accurate data and improve your ad targeting.
2. Sending Data to Multiple Facebook Pixels on the Same Page
If you need to send data to multiple Facebook Pixels—like one for your department and another for the entire company—Facebook Pixel makes it simple. Here’s how to do it:
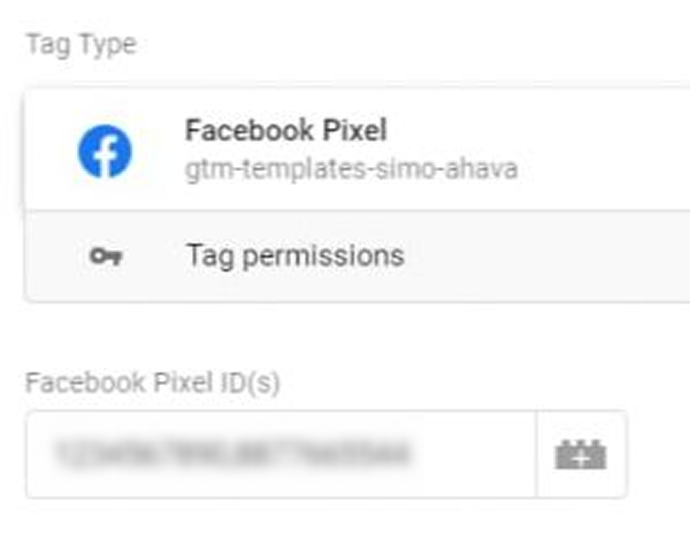
- Create a Custom Facebook Pixel Tag Template
First, you’ll need to use a Custom Facebook Pixel tag template in Google Tag Manager. - Enter Pixel IDs in the Field
In the Facebook Pixel ID(s) field, add the Pixel IDs you want to send data to, separated by commas. This will allow the tag to trigger multiple Pixels at once.
- Use Constant Variables (Optional)
Alternatively, you can use a Constant Variable for each Pixel ID. If you want to manage the IDs more efficiently, you can create a separate Constant Variable for each Pixel.
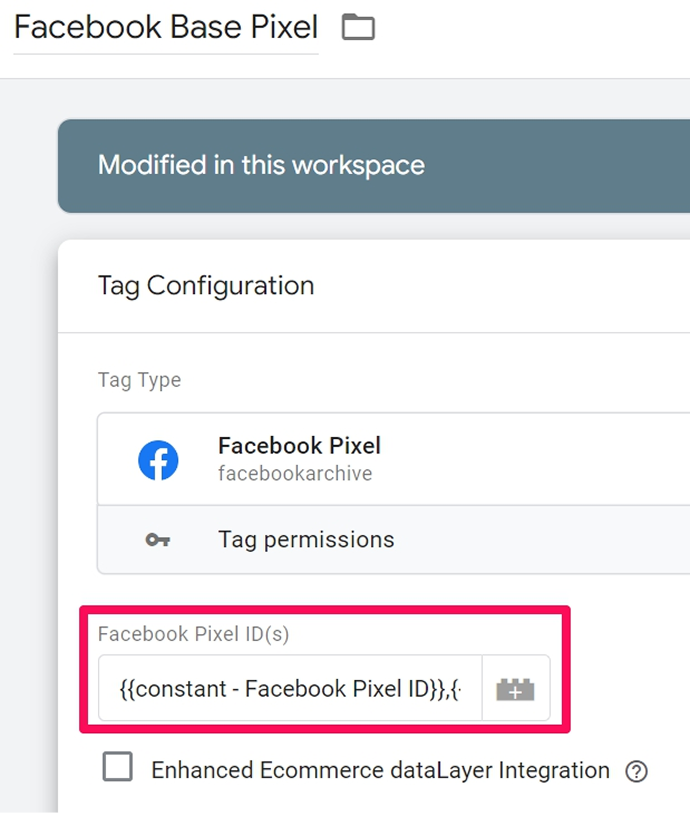
- Multiple Constant Variables
If you’re using multiple Constant Variables, make sure each one contains a single Facebook Pixel ID. This way, the tag can send data to each Pixel independently.
All of these options will successfully send data to multiple Facebook Pixels on the same page.
3. Importance of Consent (GDPR Compliance)
When setting up Meta Pixel through Google Tag Manager, getting user consent is crucial. With GDPR in place, you must ensure that users agree to data tracking before Meta Pixel starts collecting any information.
In addition to GDPR, various US states like California, Colorado, and Connecticut have privacy regulations that require businesses to handle user data carefully. Meta offers a Limited Data Use (LDU) policy to comply with these state-specific laws. Based on user consent, particularly from users in these states, businesses must flag them for LDU, ensuring Facebook processes their data in a restricted manner.
To remain fully compliant, it’s essential to use a consent management platform (CMP) that allows users to opt in or out of tracking. Google Tag Manager makes it easy to set up triggers that activate Meta Pixel only after consent is granted. This, combined with Meta’s LDU settings, ensures your business stays on the right side of both European and US privacy laws.
Testing and Validation Tools
When setting up tracking tools like Meta Pixel or Google Tag Manager, testing and validation are essential to ensure everything works as expected.
1. Use of GTM Preview Tool for Setup Testing
Google Tag Manager’s Preview mode (also called Preview and Debug mode, or P&D) lets you analyze a site with your GTM container code in action. It shows you which tags are firing, what data they’re sending to analytics and marketing platforms, and more—all in real time.
- Open Google Tag Manager
In your Google Tag Manager interface, click the Preview button at the top right corner, near the Submit button. - Enter URL to Test
Once you click Preview, a new browser tab should open at tagassistant.google.com. If it doesn’t, follow the guide provided to troubleshoot. A popup will appear, asking you to enter the URL of the page you want to test. This could be your homepage or any specific page you want to check. After entering the URL, click Start. - Confirm the Preview Mode is Active
A new browser tab or window will open, showing the page you entered in the previous popup. If the page doesn’t load correctly, try enabling the preview mode again and ensure the checkbox in the popup is disabled. - Check the Preview Badge
At the bottom of the page or tab, you should see a Preview Badge confirming that the Debug mode is active. - Verify Success Message
Return to the tagassistant.google.com tab and look for a success message confirming the connection is live. If you don’t see the success message or the badge indicates that the debugger isn’t connected, follow the troubleshooting steps provided.
By following these steps, you can ensure that Google Tag Manager’s Preview and Debug mode is working properly for your testing. Now let’s understand the role and functionality of a Facebook Pixel Helper in ensuring your pixel is firing correctly.
2. How to Install And Use the Facebook Pixel Helper To Test Your Pixel Setup
The Facebook Pixel Helper is a handy Chrome extension that helps verify if your Facebook Pixel is correctly installed and firing events on your website. Follow these steps to install and use it effectively:
1. Download Google Chrome
- The Facebook Pixel Helper works exclusively on Google Chrome.
- If you don’t already have Chrome installed, visit Google’s website to download and install the browser.
2. Install the Facebook Pixel Helper
- Open the Chrome Web Store and search for “Facebook Pixel Helper.”
- Click the “Add to Chrome” button next to the extension.

- A pop-up will appear asking for confirmation. Click “Add Extension” to complete the installation.
- The extension icon (</>) will appear in the top-right corner of your browser near the URL bar.
3. Verify Your Website Has the Facebook Pixel Installed
- Open your website in Google Chrome.
- Check the Facebook Pixel Helper icon at the top of your browser:
- Grey Icon: No pixel detected on the page.
- Blue Icon: The pixel is installed and active.
- Click the icon to view details about the detected pixel, including any errors or issues.
4. Test Your Conversion Events
After setting up Conversion Events, use the Pixel Helper to ensure they are firing correctly:
- Navigate to the page where the event should occur (e.g., a “Thank You” page or “Add to Cart” action).
- Perform the event action (e.g., add an item to the cart or submit a form).
- Click the Facebook Pixel Helper icon and check the drop-down menu for details:
- Look for the specific event (e.g., “AddToCart”) and ensure it shows as fired successfully.
- If the event isn’t listed, reconfigure your setup and test again.
5. Use the Facebook Pixel Helper to Optimize Tracking
- The Pixel Helper not only verifies installation but also highlights errors in the setup.
- Use the tool to identify issues like missing parameters or events not firing, ensuring all Conversion Events are accurately tracked.
By following these steps, you can install, test, and optimize your Facebook Pixel setup, ensuring it works seamlessly with your marketing campaigns. Let me know if you’d like additional details!
Now you’re all set to use the Facebook Pixel Helper for tracking and debugging your Facebook Pixel.
Conclusion
Installing Meta Pixel through Google Tag Manager makes it easier than ever to track user behavior and optimize your ad campaigns. By following the steps outlined, you can start collecting valuable insights right away, helping you measure the effectiveness of your Facebook and Instagram ads.
If you want to take things a step further and enhance your data tracking even more, tools like CustomerLabs 1PD Ops can help you integrate and manage your first-party data seamlessly across your marketing platforms.
Ready to optimize your campaigns? Click here to get started!


