Tired of basic connection, limited optimisation and low match rates?
It’s high time for Shopify marketers who run Facebook ads to switch from Shopify’s default Conversions API to CAPI offered by a more advanced solution like CustomerLabs 1PD Ops.
Shopify offers a basic tool called CAPI to connect your store to Meta (Facebook/Instagram) for advertising. However, this default setup is quite limited and can hinder your marketing efforts. By transitioning to an advanced solution like CustomerLabs’ CAPI, you gain access to enhanced features, optimize your ad performance, and boost your revenue.
Meta has more flexibility to offer such as letting marketers optimize their ad campaigns for synthetic events, but with Shopify’s default CAPI connection, you can’t leverage those features. If you can’t make full use of Meta CAPI then you are stuck with a low EMQ score, low audience match rates, low conversions, and a ton of other lows. No sane marketer would want that, right?
In this blog, I am gonna shed light on how you can succeed in your Meta ad campaigns for the Shopify store by sending data to Meta through advanced Conversions API.
What marketers are losing out by settling for Shopify CAPI?
1. Basic connectivity, nothing more
Shopify’s default CAPI merely acts as a connection between Shopify and Meta which is just used for data exchange. It won’t help you in any of your marketing strategies as it does not have any advanced capabilities.
2. No audience segmentation
If you stay with Shopify’s default CAPI, you can’t do any smart audience segmentation. Because of this, you lose the chance to target a specific set of audiences with personalized ad campaigns
3. Stuck with optimizing for standard events
Shopify’s CAPI lets you optimize your ad campaigns for the same standard conversion events like Add to Cart, Buy Now, Initiate Checkout, etc. This means you can never optimize your ad campaigns for high-AOV or specific product categories to make your revenue grow.
4. Low EMQ score
Y’all know how important a good EMQ score is for ad campaign performance, right? Then, you should also know that your EMQ score will not improve if you send inaccurate data using Shopify CAPI.
5. Low custom audience match rate
Because of inaccurate audience data sent through Shopify’s CAPI, marketers often struggle with low custom audience match rates. This also means less targeting and poor ad performance, which will ultimately lead to a dip in revenue.
| Feature | Shopify Default CAPI | CustomerLabs CAPI |
|---|---|---|
| Data Connectivity | Basic data exchange | Advanced event tracking |
| Audience Segmentation | Not supported | Enabled |
| Event Optimisation | Standard events only | Synthetic and custom events |
| EMQ Score | Low | High |
| Custom Audience Match Rate | Low | High |
| Cookie Duration | Short | 1 year+ |
| Integration Complexity | Simple | Simple (10 minutes setup) |
How to escape the shortcomings of Shopify CAPI?
The solution to all the faulty things you’ve been going through with Shopify CAPI is a simple transition to an advanced solution like CustomerLabs. This way, you can go beyond just connectivity with CustomerLabs’ advanced features to make the marketers’ lives easier and the marketing process more efficient. If you wish to know the exact benefits of using CustomerLabs CAPI, move on to the benefits section.
How to implement CustomerLabs CAPI?
Don’t worry, implementing CustomerLabs CAPI for Meta Ads doesn’t involve extensive coding. It’s the simplest and fastest way to integrate CAPI which can be done in under 10 minutes!
Connecting CustomerLabs with Shopify
Before starting, make sure you have access to both your CustomerLabs and Shopify accounts.
Now, log in to your CustomerLabs account, enter your website URL under “Connect your domain”, and click Save. Then, retrieve the code under the “Tracking Code.”
Next, log in to your Shopify account and click “Online store”.
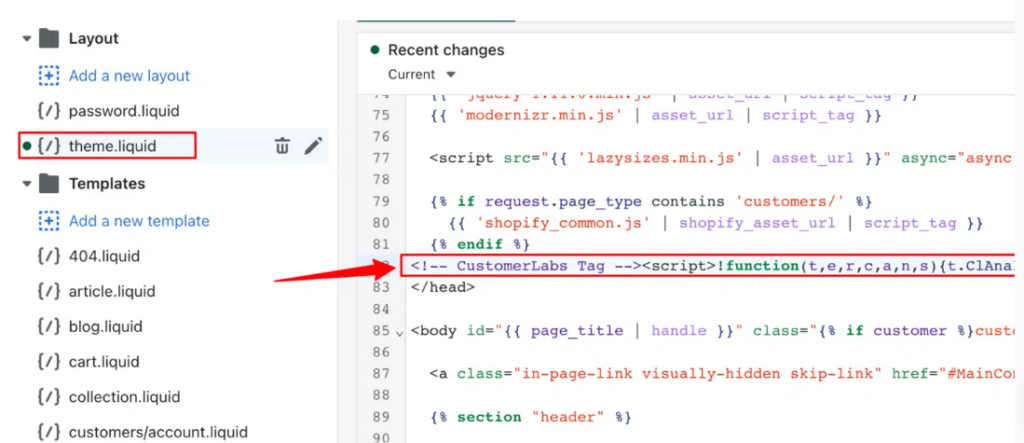
Under “Themes”, go to “Actions” and select “Edit code”.
In the “theme.liquid” file, search for </head>, paste the CustomerLabs tracking code you retrieved above this line, and save.
To create a custom pixel in Shopify, navigate to “Settings” → “Customer events” → “Add custom pixel”. Name the pixel “CustomerLabs” and add the pixel.
Some Shopify stores have a post-purchase page and some don’t. To set up CAPI smoothly for either type, go to the Home page of your CustomerLabs account, click “Shopify,” then click on “Shopify with Post-purchase” or “Shopify without Post-purchase” as per the nature of your Shopify store, and copy the pixel tracking code.
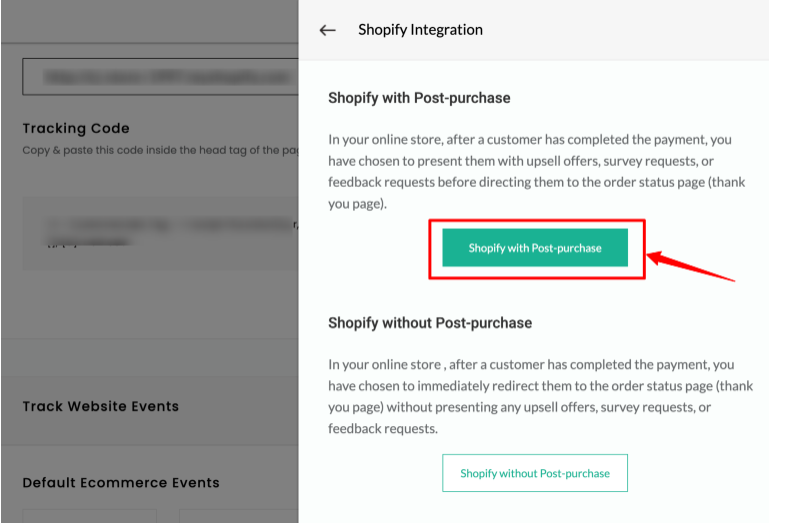
Next, in your Shopify store go to customer events, create a custom event pixel, name it CustomerLabs, paste the tracking code into this new custom pixel, and save it.
For Shopify with post-purchase, you have to follow an additional step. In CustomerLabs, go to Settings → Checkout →Shopify with Post-purchase and copy the additional code. Paste the code in the Post-purchase section, save it, and Click Connect to complete the integration.
Also read- How to Set Up Facebook Conversions API on Shopify?
Set up to optimize for synthetic events
With CustomerLabs you can create synthetic events like high-AOV purchases or purchases of a specific product to optimize your ad campaigns better.
To do that, go to Source on the CustomerLabs app dashboard and choose the source as “Custom source,” Now, name the source as “Shopify_purchase and copy the Workflow URL.”
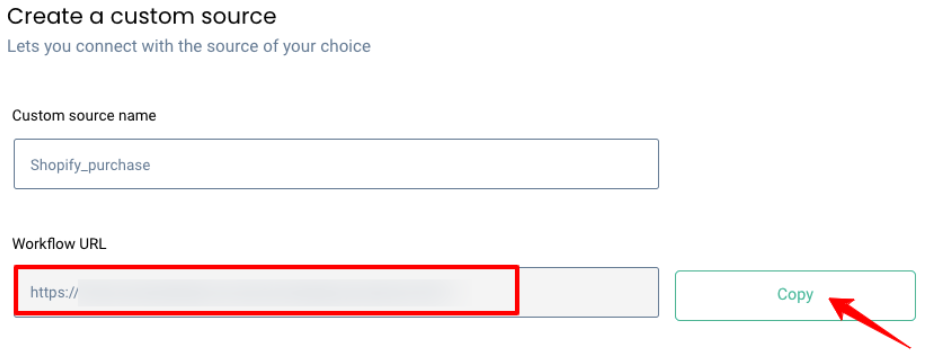
To complete the workflow, choose sample data, click on view data, and check if the code is correct. Then, you can click on filter incoming data and control the data that you want to send to Facebook or you can skip this step.
Next, go to Event configuration; assign a name to the incoming data and fill in other details like user identifiers. Finally, save the workflow.
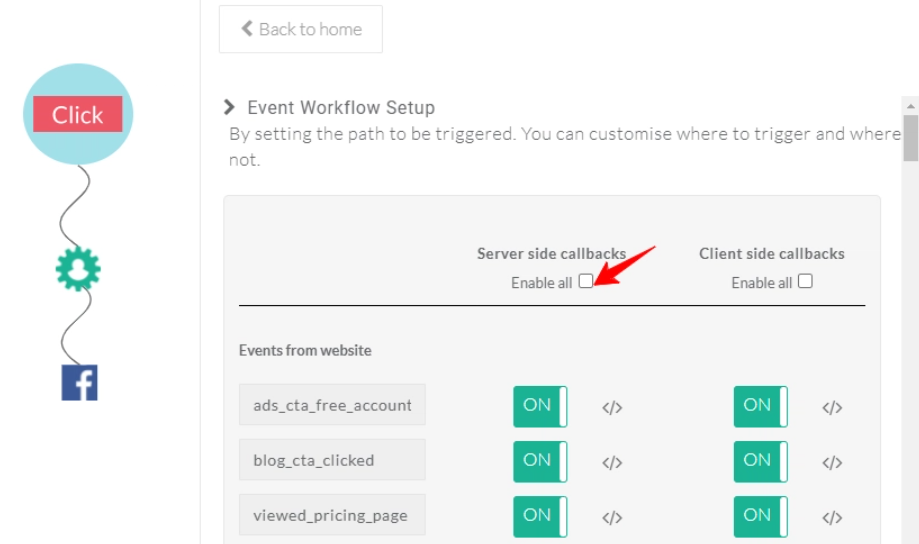
Then go to Destinations, click on Facebook, click on Event Workflow setup, and toggle on the events from other sources that you need to send to Facebook.
To confirm everything is functioning correctly, verify the active status under Sources > Shopify_purchase > Workflow Status. This assures that your Shopify store is successfully integrated with CustomerLabs, ready to track and manage events effectively.
Connect your Shopify store to Meta Ads through Conversions API
From the CustomerLabs app dashboard navigate to Facebook under Menu → Destinations, enable it, and go to Configuration Settings.
There, authenticate your Facebook account by clicking on the respective button. After authentication, your Facebook accounts manager will be displayed on the CustomerLabs page where you can choose your Business Manager account, Business Asset Group, Ad account, and pixel. At last, to complete authentication, submit the information and save the changes.
Now, enable the toggle for sending data via server-side to establish a robust CAPI connection.
Once you establish the connection, click on the event workflow to decide what events you want to send through the server side, client side, or both.
When you send via both client-side and server-side Facebook will be able to deduplicate the events. Plus, directly sending your website events from CustomerLabs to Facebook through conversions API enhances your Event Match Quality (EMQ).
Notes:
- Turn on the Audience type URL parameters for Advantage+ Shopping Campaigns.
- For compliance with privacy regulations in California, Colorado, and Connecticut, you have to obtain user consent for data usage on your website and send it to Facebook. For that, all you have to do is simply turn on the LDU configuration toggle in the configuration settings.
For the detailed document of Shopify and CustomerLabs integration, click here.
Note: To navigate Shopify’s latest consent update, please refer to this blog.
Upsides of integrating Meta CAPI through CustomerLabs
Higher EMQ score seen with CustomerLabs
CustomerLabs CAPI for Meta Ads boosts your EMQ score by helping you gather and sync more event parameters. By integrating various data sources like websites, offline stores, and CRM systems into CustomerLabs, you can send comprehensive event data directly to Meta. The more data you provide, the higher your EMQ score.
Keep your cookies fresh and forever
One of the best benefits of using CustomerLabs CAPI for Meta Ads is the server-side cookies set through 1P domain tracking. These cookies last over a year, ensuring that customer data, including that of anonymous users, is retained for targeted marketing via email, WhatsApp, and Facebook Ads.
Extended cookie storage allows businesses to identify and email visitors who have abandoned their carts. You can even reach out to cart abandoners directly through WhatsApp to send reminders and exclusive offers. This personalized outreach can significantly increase the chances of conversion by reminding customers of their unfinished purchases.
Accurately measure new customer acquisition cost
CustomerLabs helps you to track key metrics such as:
- New customer purchase
- new customer acquisition cost (NCAC)
- new customer revenue contribution
- Repeat Purchase
- Cost per Repeat Purchase
- Repeat Customer Revenue Contribution
Ready to maximise your Shopify store’s potential? Switch to CustomerLabs CAPI today and start driving better ad performance, higher conversions, and unmatched revenue growth.
This detailed tracking allows marketers to refine their strategies based on actual performance data, improving overall marketing efficiency and effectiveness.
Optimize for synthetic events
Optimization for high-AOV purchases:
Decile or quantile analysis enables businesses to segment purchases based on various categories, such as high average order value (AOV) purchases (> $1000) and lower AOV purchases (< $1000).
Using CustomerLabs you can optimize campaigns to focus on higher-AOV purchases. This allows Meta to train its ad algorithms to bring more high-AOV conversions. By wisely leveraging this feature businesses can maximize their return on advertising spend (ROAS) effectively.
Optimization for a specific product category:
Similar to the above concept, you can create a synthetic event of a specific product and sync it with Meta to optimize the ad campaign for that specific product. For instance, if you want to sell more sneakers, you can create a synthetic event with just sneaker purchase data and send them to Meta. Meta will understand the intent of the ad campaign clearly and optimize it for more purchases of sneakers.
Turn every click on your ad into conversions
By utilizing first-party audience data and retargeting strategies, CustomerLabs users have seen up to a 4X increase in conversion rates for ASC campaigns. This significant improvement in conversion rates underscores the effectiveness of targeted, personalized marketing approaches enabled by CustomerLabs’ advanced features.
Increase in custom audience match rate
CustomerLabs stores audience data for an extended period, allowing you to leverage this data effectively. By sending this data to Meta, businesses achieve higher match rates when creating custom audiences, and this results in more accurate targeting.
Improves overall ad performance
CustomerLabs not only gives way to accurate campaign measurement but also goes beyond and leverages campaign optimization. Each of the above-mentioned benefits you get out of using CustomerLabs such as enhanced EMQ score, improved match rates, and optimized ad campaigns maximizes your overall ad campaign performance and boosts your revenue.
With these benefits in mind, let’s look at best practices for maximising the impact of CustomerLabs CAPI.
Best Practices for Conversions API to boost ad performance for Shopify store
Let’s look at some of the the best practices for conversions API that have consistently proved itself successful ways to boost ad performance.
Meta Pixel + CustomerLabs Conversions API: The powerful duo
Instead of using Meta Pixel with Shopify CAPI, you must use Meta Pixel in combination with CustomerLabs CAPI. Only when you send events via both Meta Pixel and CustomerLabs CAPI, Meta’s system deduplicates the events, ensuring accurate attribution without double-counting.
Refer to this blog- How to Install Meta pixel on Shopify in 2024
Automatic and manual advanced matching
To enhance ad performance, there is an option called advanced matching for the Meta Pixel. You must set up both automatic and manual advanced matching in Meta Ads to guarantee better user matching.
Real-time data syncing
Syncing data with Meta in real-time or near-real-time is crucial. This enables Meta’s algorithm to personalize ads effectively, reducing cost per result. Check the frequency of your event data in the Events Manager under the EMQ score to check if the data is fresh.
Note: It is recommended to send the data at least in the hourly frequency.
Steady vigilance
Regularly monitoring event data in the Meta Events Manager is a must. A continuous data flow improves ad algorithm efficiency, while breaks can harm the ad campaign performance.
Providing more customer data
To help Meta match users in its accounts center and boost the EMQ score, you must send as many customer information parameters as possible to Meta using CustomerLabs. Plus, parameters like fbc, fbp, and external ID are valuable for tracking anonymous visitors, so they must be sent to Meta.
However, it’s important to note that the default Shopify CAPI falls short in capturing this data over a long period of time and sending all the necessary data to Meta for optimal ad performance.
These practices ensure you get maximum value from Meta Conversions API using CustomerLabs, driving better results for your Shopify store.
In essence
Shopify CAPI limits your ability to scale your Meta ad campaigns for your Shopify store by restricting your abilities for audience segmentation and ad optimization for synthetic events. By going through a simple transition from Shopify CAPI to CustomerLabs CAPI you can open up a new world of advanced marketing strategies for achieving your marketing objectives.
This way, your Shopify store can witness improved targeting accuracy, enhanced ad campaign performance, higher EMQ, higher audience match rates, and unbelievable revenue growth in no time.
So, switch to a robust CAPI connection and put the best practices into action for a stunning Meta ad campaign success for your Shopify store!
Don’t let Shopify’s default CAPI hold back your marketing success. Upgrade to CustomerLabs CAPI in just 10 minutes and transform your Meta ad campaigns.

