Tracking marketing performance is more challenging than ever. Marketers face data inaccuracies, due to data privacy regulations, deprecation of third-party cookies and ad blockers. Therefore, disrupting conversion tracking, making accurate data collection and attribution difficult.
To solve this, server-side tagging is a reliable solution. By shifting data collection to the server-side, you can bypass ad blockers, preserve data accuracy, and ensure privacy compliance.
In this guide, you’ll learn how to set up server-side tagging using Google Tag Manager and, in the easiest way, with CustomerLabs CDP (it’s an alternative to GTM), configure GA4, and optimize conversion tracking for platforms like Google Ads and Meta Ads. Let’s start by understanding what server-side tagging is.
What is Server-side Tagging?
Server-side tagging is a method that moves the tag management process from a user’s browser (client-side) to the server-side. Instead of a third-party collecting the data directly from the user’s browser and sending to the third-party services like Google Analytics or Facebook Ads, the data is first collected by a server.
That server processes the data and forwards it to the intended platforms. This shift improves data privacy, accuracy, and the overall site performance.
This approach ensures that you track user behavior effectively while complying with tightening data privacy laws like GDPR and CCPA. Server-side tagging also gives you more control over data flow and ensures better data quality.
This is where CustomerLabs CDP comes into play—a powerful platform that helps businesses collect, manage, and sync audience data through server-side tracking. It ensures to capture high-quality first-party data and seamless integration with ad platforms, optimizing marketing efforts while maintaining compliance with privacy regulations.
Benefits of Server-Side Tagging
Server-side tagging offers multiple benefits that directly impact campaign performance:
- Consented First Party Data: Server-side tagging or tracking coupled with consent collection helps you collect consented first-party data (1p data) that is rich of customer insights. This leads to understanding the customer better, leading to better results.
- Data accuracy: You have greater control over how data is collected, processed, and sent to platforms like Google Ads or Facebook Ads using server-side tracking. You filter out unwanted data, ensuring you only share what’s relevant.
- Improved page load speed: Since fewer scripts are loaded on the user’s browser, server-side tagging reduces the load time, leading to a better user experience—something that directly affects bounce rates and conversion rates.
- Enhanced privacy compliance: With growing concerns around user privacy, using a server container allows you to restrict the amount of data sent to third-party platforms. This reduces exposure to potential data privacy violations.
- Resilience against ad blockers: Since requests originate from your server and not the user’s browser, server-side tags are less likely to be blocked by ad blockers, ensuring your tracking data remains intact.
A testament to the effectiveness of server-side tracking is CookD’s success. By adopting server-side tracking with CustomerLabs, CookD improved attribution and saw a 37% lift in ROAS. You can read more about this success here and explore the details in this blog on how first-party server-side tracking enhances ad performance.
Traditional vs Server-side Tagging
Traditional tagging through Google Tag Manager (GTM) relies on client-side tagging. This means that tags—pieces of code used for tracking—are executed directly in the user’s browser. The browser sends data, such as user actions or pageviews, to various third-party platforms like Google Analytics, Facebook Ads, or other marketing tools.
This is how you’ve likely been tracking user behavior across campaigns, channels, and platforms. It’s been a core part of gathering remarketing audiences, measuring conversion paths, and optimizing ROAS (Return on Ad Spend).
Here’s How Client-side Tracking Works
Here’s what happens during traditional client-side tagging:
- The browser loads multiple scripts (tags) from third-party services.
- Data is sent directly from the browser to platforms like Google Analytics, Google Ads, or Facebook Ads.
- Cookies, especially third-party cookies, are used to track user behavior across different websites.
- User data is sent to third parties through the third-party scripts.
However, this approach has started to run into major issues, especially for performance marketers who rely heavily on accurate, real-time data.
The Need for Server-side Tagging
With browsers phasing out third-party cookies, increased use of ad blockers, and tighter privacy regulations like GDPR and CCPA, client-side tagging is becoming less reliable. You’re likely seeing a drop in the completeness of your tracking data, which can hurt campaign performance analysis and optimization.
That’s where server-side tagging comes in. Instead of using a third-party script to send the data straight from the user’s browser to external platforms, you first route it through a server that you control. This shift lets you maintain more control over what data is shared, how it’s processed, and ensures compliance with new privacy standards. This helps optimize your ad campaigns.
Advantages of Server Container Over Traditional Tagging
Here’s why server-side tagging offers an edge over client-side tracking:
- More reliable data collection: Server-side tags aren’t as easily blocked as third-party scripts are blocked by browsers or ad blockers, which means you capture more complete data.
- Faster website performance: You can implement server-side tracking and eliminate the third-party scripts from your website. As fewer scripts run on the user’s browser, they can witness quicker load times leading to a better user experience—key metrics for reducing bounce rates.
- Better control over data: When you collect users data using your own server, you can filter and modify the data before sending it to third-party platforms. This ensures that only the most relevant information is shared in compliance with data privacy updates.
- Improved compliance: Compared to traditional client-side tracking, server-side tagging allows you to align your tracking setup with data privacy laws, reducing the risk of legal issues related to data breaches or non-compliance.
Setting Up Server-side Google Tag Manager (SGTM)
There are several tools out there to setup Server-side GTM tracking. But you must remember that there are several Ad Blockers that blog out the GTM too. To avoid that, first, we’ll show you the easy and right way to setup an alternative server-side tracking instead of a server-side google tag manager (sGTM).
Easy server-side tracking setup (Alternative for GTM or GTM + 1PD Ops tool)
CustomerLabs offers an easy integration with Google Tag Manager. By integrating GTM with CustomerLabs, you can streamline your website’s event tracking. CustomerLabs provides simple tracking codes and ready-to-use snippets, allowing you to set up server-side tracking effortlessly and start capturing valuable insights quickly. This integration ensures that all your key events are tracked without the hassle of manual setup.

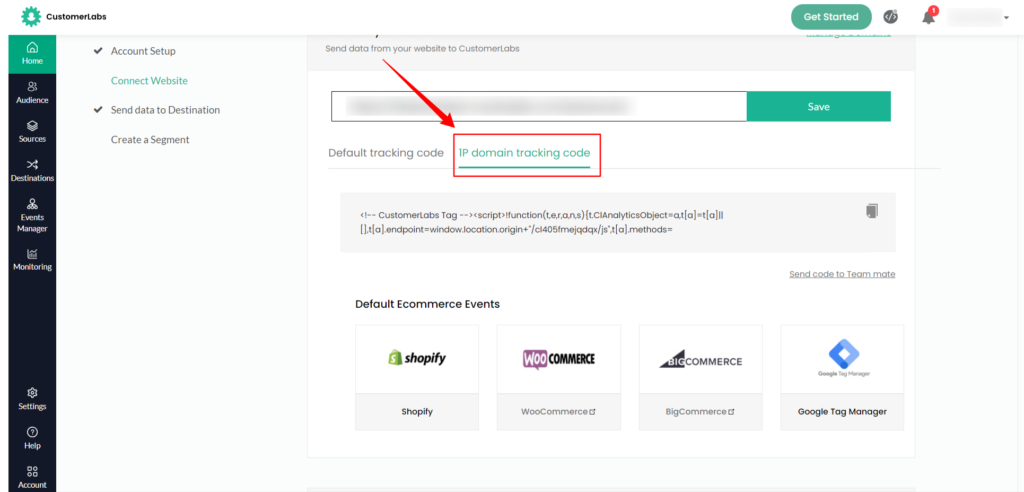
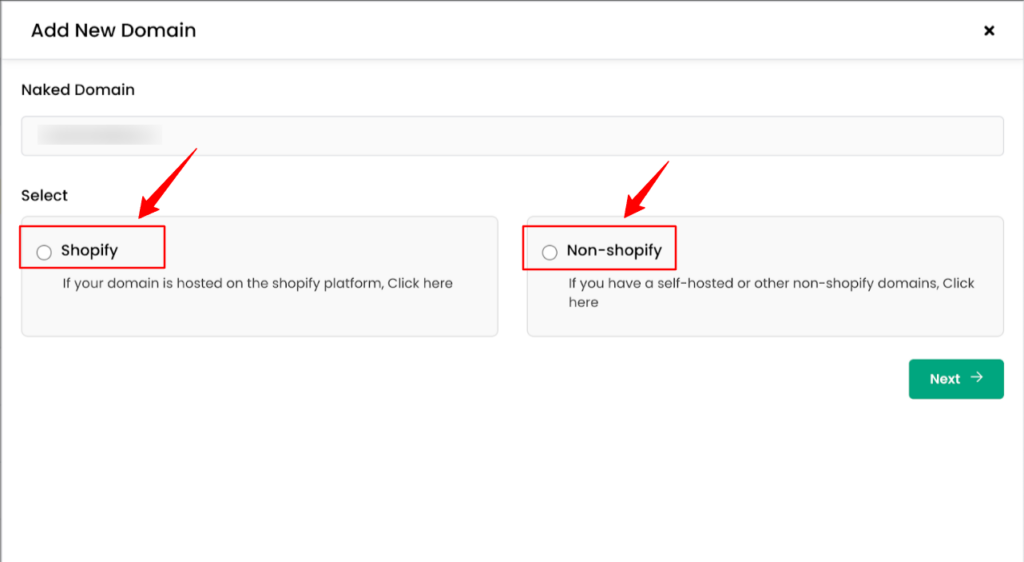
Beyond GTM integration, CustomerLabs stands out as a top alternative to GTM. Instead of using a GTM, which needs a certain coding part and difficulty in setup, you can easily use CustomerLabs’ 1P domain tracking to setup server-side tracking. If you have a Shopify store, the procedure is different and for non-shopify the procedure is different.

With CustomerLabs 1PD Ops, you can easily track key events—such as clicks and form submissions—without needing developer assistance, on the server-side. This makes it ideal for marketers looking to focus on strategy without technical barriers. CustomerLabs ensures accurate data collection, simplifies compliance, and offers a more intuitive experience for event tracking.
The Hard Way to Setup sGTM (server-side Google Tag Manager)
To get started with server-side tagging, you first need to create a server container in Google Tag Manager (GTM). Here’s how to do it:
- Log in to GTM (Google Tag Manager) and select “Create Container.”
- Choose ‘Server’ as the container type, instead of Web or App.
- Once created, you’ll receive a container snippet. This needs to be added to your website or app, allowing your client-side tags to forward data to your server container.
- After that, you’ll be prompted to set up a Google Cloud Platform (GCP) project. This is essential because your server container will run on GCP.
Google Cloud Platform Billing Account Instructions
To keep the server container running, you need a Google Cloud Platform billing account. Here’s how to set it up:
- Log in to Google Cloud and create a new project (or use an existing one).
- Navigate to Billing and link your payment method.
- Set up a billing threshold or alert so you don’t exceed your budget unintentionally. Server-side tagging usually incurs minimal cost for low traffic sites, but high-traffic campaigns can scale up costs.
- Make sure you select the correct GCP region close to your user base to minimize latency, especially if you’re running international campaigns.
Automatic vs Manual Server Creation Options
When setting up the server container, you can choose between automatic or manual server creation:
- Automatic: This option lets Google handle everything for you. The setup is faster and simpler. Google deploys the container to a Google-managed App Engine, which works for most marketers. If your campaign doesn’t require deep customizations, this is your best option.
- Manual: Here, you take full control over the server. You can choose the type of cloud infrastructure, fine-tune security settings, and optimize for performance based on your needs. This is recommended if you’re working with complex data sets or need custom security configurations to comply with specific privacy regulations.
Configuring Tags, Triggers, Variables, and Clients
In server-side Google Tag Manager (GTM), the term “Client” takes on a crucial role. A Client is essentially a gateway that receives data requests (like hits from your website) and passes them on to server-side tags for further processing.
Think of it as the first stop where your server container gathers incoming data, decides how to handle it, and then pushes it to the appropriate tags, like Google Analytics 4 (GA4) or Facebook.
Default GA4 Client and Additional Client Creation
When you set up a server-side container in GTM, the default client created is the GA4 client. This client is designed to capture GA4 hits and route them to your GA4 tags.
However, you may also need to create additional clients if you’re working with other platforms or have custom data flows. For example, you might create a custom client to handle Facebook conversions or other third-party services that send data to your server container.
The key here is flexibility—each client helps you manage different types of data requests efficiently.
On the other hand, you have CustomerLabs, which can send your data to any destination of your choice – Google Ads, GA4, Meta Ads, Klaviyo, etc., with just a few clicks! (Trigger on)
Google Analytics 4 Server Tag Setup
Setting up the GA4 tag within the server-side container is similar to how you’d set up a client-side tag, but with more control. After your GA4 client has processed a data request, you create a GA4 tag that will handle sending this data to Google Analytics servers.
You configure this tag to include key variables such as user IDs, page views, or events. This setup ensures that your analytics data is clean, accurate, and protected from common issues like ad blockers or client-side data loss.
Trigger Creation for GA4 Client
Triggers are the rules that tell your tags when to fire. For the GA4 client in your server-side setup, you need to create a trigger that specifies when the GA4 tag should be activated.
For example, this could be when an event like a page view or form submission occurs on the client-side, and the corresponding data is sent to the server container.
It’s crucial to align triggers with your conversion goals, ensuring you’re only tracking relevant interactions that impact your campaigns.
Activation and Use of Server-side Preview and Debug Mode
Before you finalize your setup, it’s essential to test everything thoroughly. GTM offers a server-side preview mode, allowing you to see exactly how your clients, tags, and triggers behave in real-time.
You can access this preview mode from your GTM interface and view the server-side interactions in your browser’s network tab. Debug mode helps you validate that the data being sent is accurate and reaches the right platforms, ensuring that your tracking flows smoothly and without errors.
Event Processing in Server Containers
When a user interacts with your website or app, their actions trigger events like page views, clicks, or form submissions.
In traditional client-side tagging, these events are immediately sent to platforms like Google Analytics or Facebook Ads. However, with server-side tagging, these interactions follow a different path.
Web Requests Handling and Event Transformation
In server-side tagging, when an event occurs (like a user clicking a button), the data is sent from the user’s browser to the server container, typically hosted on a Google Cloud server.
Once the server receives the web request, it processes and transforms the data before forwarding it to the desired platforms. This transformation can include filtering out unnecessary information, modifying event parameters, or combining multiple requests into one.
This allows you to streamline your data by sending only the most valuable pieces of information to platforms, improving data quality.
It also provides an extra layer of control, helping you ensure that the data is in the correct format and free of any noise or duplication before it hits your marketing platforms.
Additionally, if you choose CustomerLabs, you also have the capability to play around with your data such as – data unification (identity resolution), audience segmentation, and a lot more! (Again, with just a few clicks!)
Tags, Triggers, and Variables in Server Containers
Server containers in Google Tag Manager (GTM) function similarly to traditional client-side containers but with a few key differences.
Tags, triggers, and variables still play a central role, but their execution happens on your server, not on the user’s browser.
- Tags: Tags in the server container control which data gets sent to your marketing platforms, like Google Analytics or Facebook Ads. For example, a Google Analytics 4 (GA4) tag in the server container sends processed event data to your GA4 property.
- Triggers: Triggers determine when a tag should fire. In server-side tagging, the event received from the browser (like a page view or button click) serves as the trigger. You can set conditions within the server container, such as only firing the tag if the event contains specific data (e.g., a purchase event only fires if the transaction value is above a certain threshold).
- Variables: Variables hold the dynamic data used by tags and triggers. In a server container, variables can store things like user IDs, event parameters, or campaign data that you want to pass along to your marketing platforms.
The server-side setup ensures that the data sent from your website or app is first processed on your server before reaching platforms like Google Analytics, reducing the chances of inaccurate or incomplete data.
Methods to Send Data to Server Container
To send data from the browser to your server container, there are several methods you can implement depending on your tracking needs.
Each method offers flexibility in how data is transmitted and processed, giving performance marketers control over the quality and accuracy of their data. Below are the most common ways to send event data to your server container:
HTTP POST or GET Requests
- The browser sends data using HTTP POST or GET requests to the server container’s endpoint URL.
- Use cases: Tracking user interactions like form submissions, clicks, or page views.
- Example: A form submission triggers a POST request that sends form data to your server container.
Fetch API
- A method to send asynchronous HTTP requests directly from the browser to the server container.
- Use cases: Sending custom event data, like purchase or engagement metrics.
XMLHTTPRequest
- Another method to send HTTP requests to the server container, typically used for older browsers.
- Use cases: Can be implemented for custom event tracking across different devices and browsers.
Image Beacon (img tag)
- A simple method where an image request (via an <img> tag) is used to send data to the server container.
- Use cases: Tracking events where JavaScript is disabled or minimal tracking code is needed.
Custom Domain
- Web requests sent to the server container can be routed through a custom domain, making them appear as first-party requests.
- Benefit: Less likely to be blocked by privacy tools or browsers restricting third-party cookies.
Data Streams in GTM Web Container
- Configure a tag in the GTM web container that forwards event data to the server container.
- Use cases: Automatic forwarding of events like purchases, clicks, or page views to the server for further processing.
Example: Configuring GA4 Tag in GTM Web Container
Let’s walk through a simple example of how to configure a GA4 tag in the GTM web container, which forwards data to the server container.
- Set up a GA4 Configuration Tag: In your GTM web container, create a GA4 configuration tag. This tag collects event data like page views or user interactions on your website.
- Create an HTTP Request Tag: In the web container, create an HTTP request tag that sends the event data to the server container. This tag will include your server container’s endpoint URL and any necessary event parameters.
- Configure the Server Container: In the server container, set up a GA4 client to handle incoming requests. When the server container receives data from the web container, the GA4 client processes and forwards the event to your GA4 property.
- Set Triggers: You can create specific triggers in the server container to decide which events to send to GA4. For example, only send “purchase” events with a minimum transaction value or only forward user interactions with high-value landing pages.
Testing and Publishing
Once your server-side tagging setup is complete, testing and publishing are essential steps to ensure everything runs smoothly and data flows correctly between your tags and platforms.
Refresh Preview Modes
Before testing, make sure you’re using the preview mode in both the web container and server container of Google Tag Manager (GTM). You’ll need to verify that your changes in each container work as expected before they go live.
- Start by entering preview mode in your web container through GTM. This will allow you to inspect the tags firing on your website.
- Open preview mode for your server container. This checks how data moves through your server and processes correctly before being sent to third-party platforms.
Refreshing both preview modes is key to viewing the updated tag setup across your web and server environments. Any time you make a change, ensure you refresh the preview to avoid missing errors.
Testing Instructions with Network Tab Validation
Testing your server-side setup requires more than checking whether tags fire—it’s about validating the data flow. Here’s how you can confirm this:
- Use Google Chrome’s Developer Tools and head to the Network tab. This will help you track HTTP requests going from the browser to your server container.
- Filter by Fetch/XHR to see network requests. Look for requests to your server’s custom domain (e.g., https://gtm.example.com). These should contain events such as page views or conversions being sent to the server-side GTM.
- Verify that these events match what you expect by checking payload details. For example, confirm that your GA4 event parameters are included, like event_category, event_action, or custom dimensions relevant to your campaigns.
This step ensures that the right data is passed from the browser, processed correctly by your server container, and sent to platforms like Google Analytics.
Final Steps to Publish Changes in Both GTM Containers
Once testing is complete, it’s time to publish your changes:
- Publish your web container first. This ensures that all web-based tags (client-side) go live. Your web container should now send requests to your server-side container.
- After confirming this, publish your server container. This ensures your server-side processes will handle and forward data to marketing platforms like Google Ads or Facebook.
- Once everything is live, the final step is verifying the end-to-end process. Re-enter preview mode to track how events are processed from the user’s browser, through your server container, and onto third-party platforms.
- Review your tag reports in platforms like Google Analytics to confirm data is being tracked accurately.
Connecting Custom Domain
- Mapping a custom domain to your server-side Google Tag Manager (GTM) setup gives you better control over data and strengthens security. This is critical for maintaining data accuracy and ensuring compliance with privacy regulations.
- Map a Custom Domain
- To map your custom domain, set up a CNAME record in your DNS provider, pointing your subdomain (e.g., track.yourdomain.com) to the GTM server URL. Ensure that the DNS changes propagate, which can take up to 24 hours.
- SSL Certificate Setup
- To secure the domain, you need an SSL certificate. Google Cloud handles this automatically, but if you’re using another platform, you may need to install one manually (e.g., using Let’s Encrypt) and verify the setup through browser tests or tools like SSL Labs.
- DNS Record Validation
- Afterward, use DNS tools like MXToolbox to confirm that the CNAME record points to the correct GTM server and that the SSL is active and properly installed.
- Scaling Your Server for Traffic
- To handle increased traffic, you can upgrade your server using the Google Cloud Console to adjust memory or instance numbers. Regularly monitoring performance through Google Cloud Monitoring ensures smooth operations as traffic scales.
The Easy Way using CustomerLabs 1PD Ops (GTM Alternative or GTM + 1PD Ops tool)
There are very few simple steps to setup server-side tracking for your website using CustomerLabs 1P domain tracking. Once you setup, you can seamlessly start collecting the data, unify it, segment, and activate the users across marketing platforms. Implementing any marketing strategy will be a piece of cake with CustomerLabs.
To know more about it, get in touch with our server-side tracking expert by scheduling a free consultation call.
Conclusion
Server-side tagging offers performance marketers enhanced data accuracy, improved compliance, and stronger campaign performance. By shifting data processing to a server, you gain control over first-party data, improve privacy, and boost attribution accuracy. However, it’s crucial to safeguard this power from potential misuse by bad actors who could exploit vulnerabilities if proper security measures aren’t in place.
When it comes to privacy regulations like GDPR and CCPA, server-side tagging can help you meet compliance by keeping personal data secure and limiting the amount shared with third-party platforms. Yet, implementing this solution requires a clear evaluation of the investment—server costs, cloud infrastructure, and expertise—versus the long-term benefits of better campaign performance and more accurate data.
Instead of using Google Tag Manager (GTM), and Google cloud platform, which can require coding expertise, complex setup, and huge costs, marketers can leverage CustomerLabs CDP. It simplifies 1P domain tracking and server-side tracking setup without much efforts. This tool seamlessly integrates with platforms like Google Ads, Meta Ads, and Klaviyo, among others, ensuring secure data capture and privacy compliance while streamlining campaign tracking efforts.
Wanna know more? Talk to us!


