Customerlabs CDP Documentation
(A ‘Source’ platform is one where data can be brought in from any platform into CustomerLabs 1PD Ops)
Salesforce is a customer relationship management (CRM) platform helping organizations effectively streamline their sales and marketing operations.
Marketing teams connect Salesforce with CustomerLabs 1PD Ops to send their Accounts, Contacts & Opportunity related information to create unified customer profiles in CustomerLabs 1PD Ops and sync the enriched customer data to all their favorite tools in their martech stack.
Getting Started
Codelessly connect your Salesforce account with CustomerLabs 1PD Ops by following the steps below.
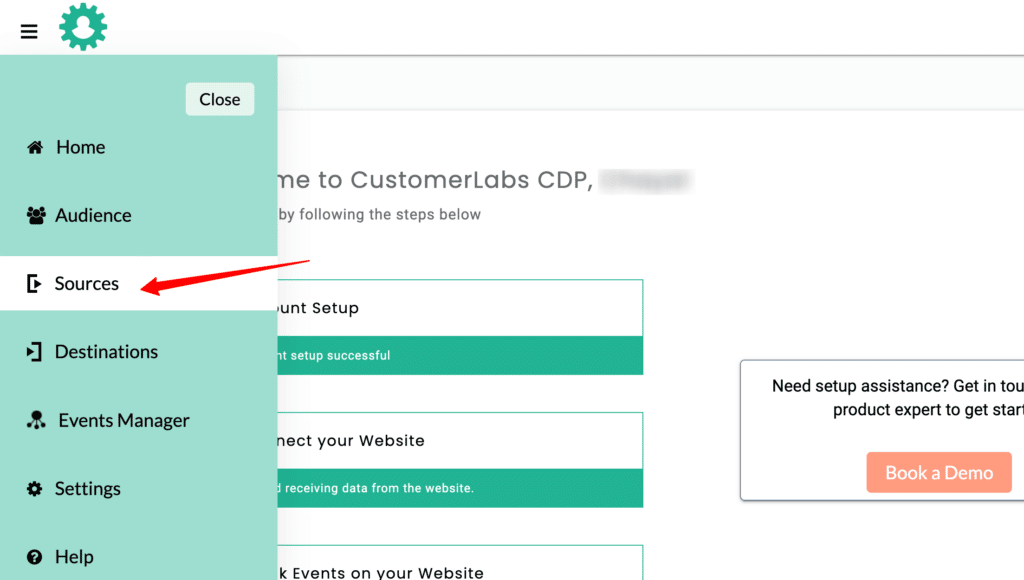
1. Login to CustomerLabs 1PD Ops and navigate to Sources
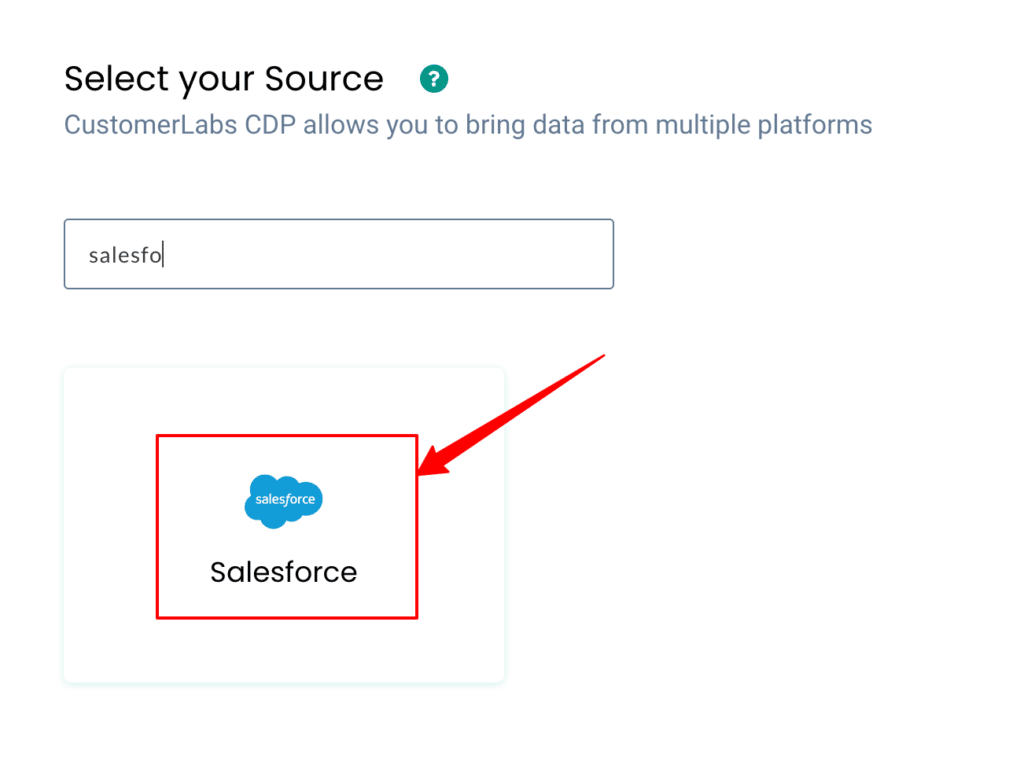
2. Choose Salesforce from the list of sources.
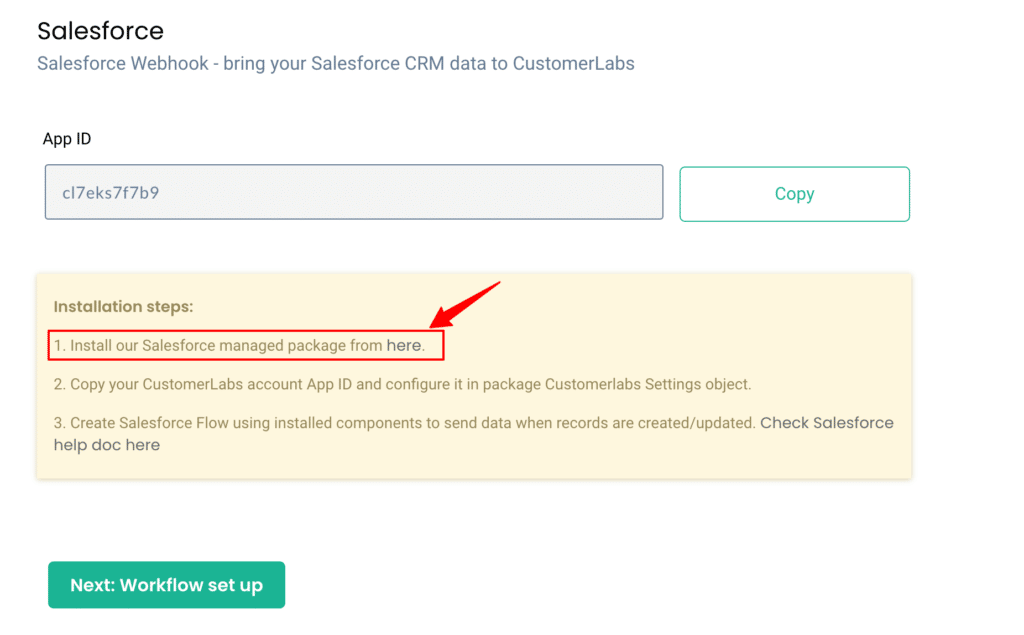
3. Install the Salesforce Managed Package as given in the instructions.
4. You will be redirected to Salesforce Login page. After logging in, install CustomerLabs Webhooks package.
Note: You can install the package only if you have admin access to the Salesforce account.
5. After installation, go to Settings → Setup

6. Now search for Custom Settings → CustomerLabs Settings
7. Click Manage near CustomerLabs Settings
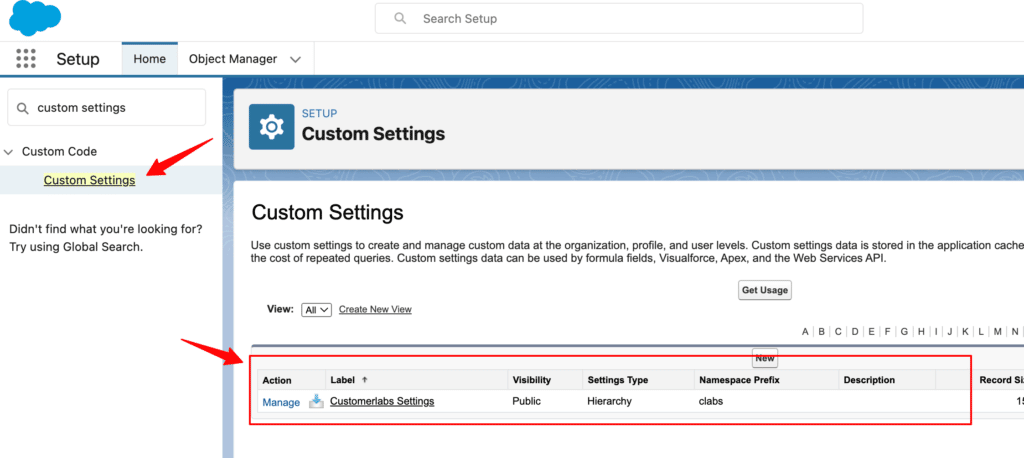
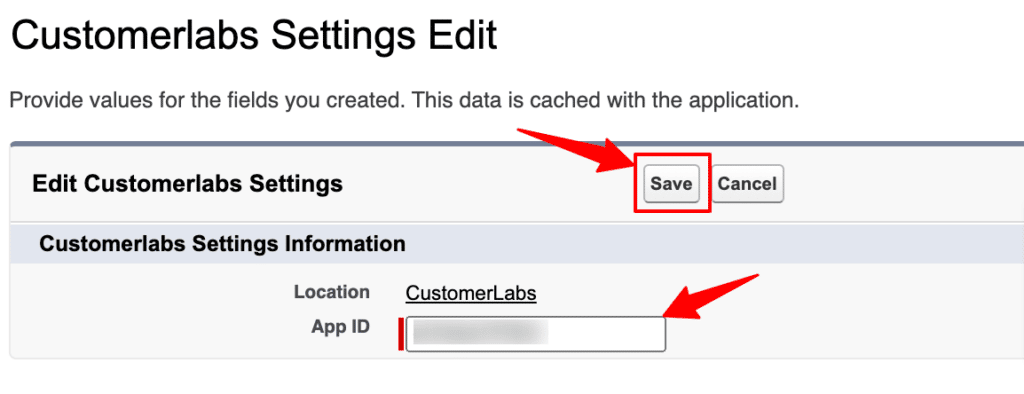
8. Click on Edit under CustomerLabs Settings

9. Now, you will have to copy the App ID from the CustomerLabs Salesforce Authentication screen.
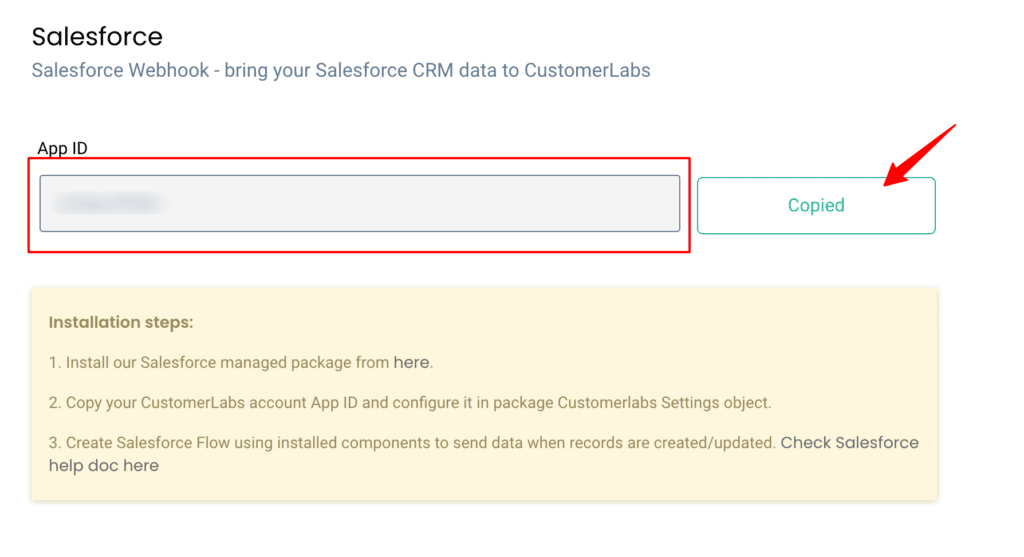
10. Paste the App ID in the box under CustomerLabs Settings as shown in the image.
11. Click Save
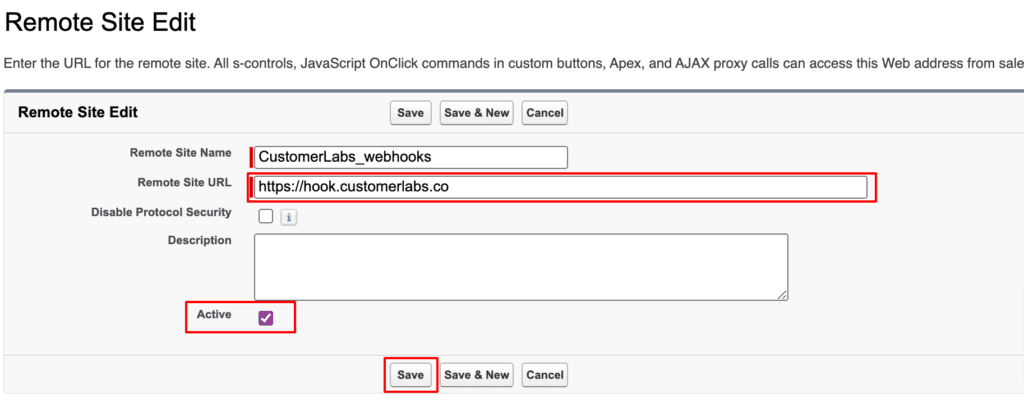
12. Search for Remote Site Settings
13. Click New Remote Site

14. Give a Remote Site Name as you wish and for the Remote Site URL, copy and paste this URL – https://hook.customerlabs.co
15. Leave the Disable Protocol Security checkbox unchecked.
16. Tick the Active checkbox → Click on Save
Set up Flows in Salesforce
Flows in Salesforce help you to collect and streamline the data based on the configuration of the flow. You have to setup up different flows to receive the corresponding data you want in CustomerLabs. Here are a few sample flows that you may require. These can be modified wherever necessary based on your requirements.
Set up a flow – when a new account is created (single object)
Now, set up the flow in Salesforce to send the data to CustomerLabs when a new account is created.
1. Go to your Salesforce account → Settings → Setup
2. Search for Flows which is available under Process Automation

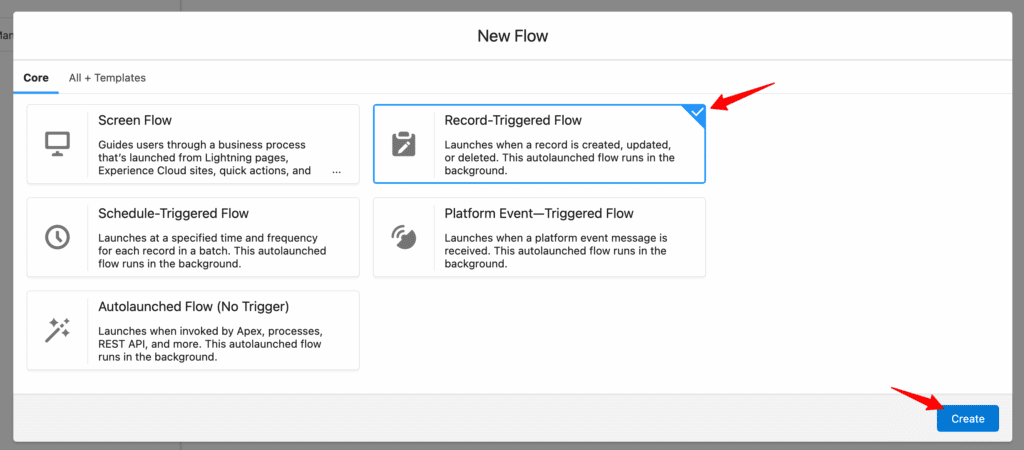
3. Click on New Flow → Record-Triggered Flow → Create
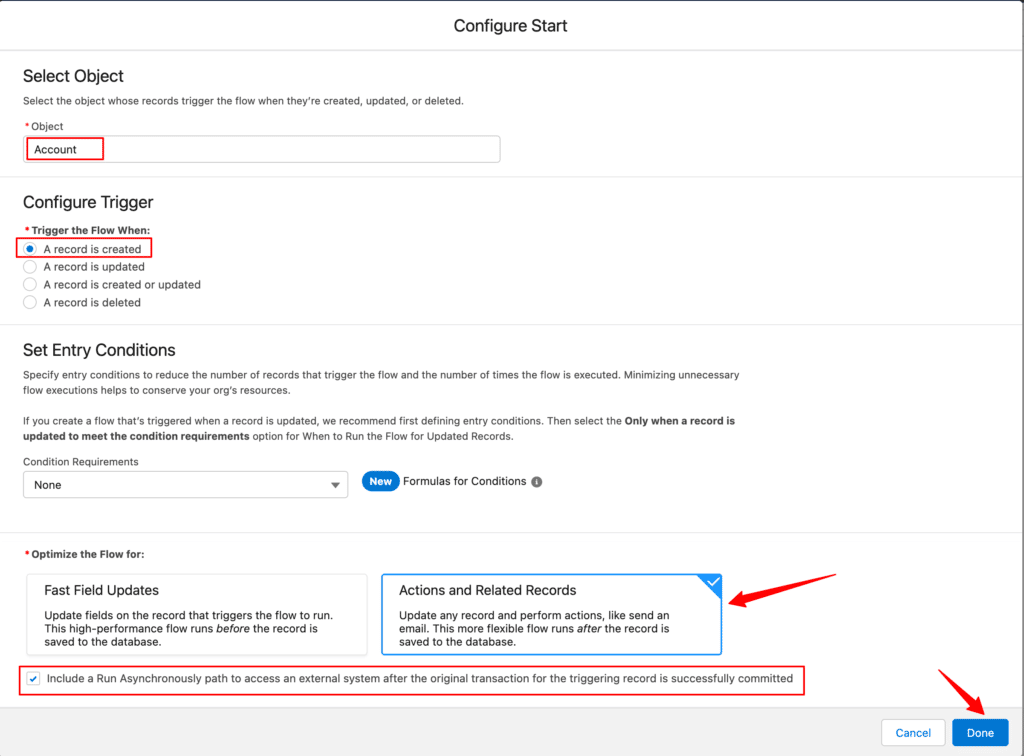
5. Select the object as Account
6. Choose the A record is created radio button
7. Set entry conditions if required or choose None
8. Select Actions and Related records under Optimize the flow for section
9. Tick the Include a Run Asynchronously path checkbox
10. Click Done.
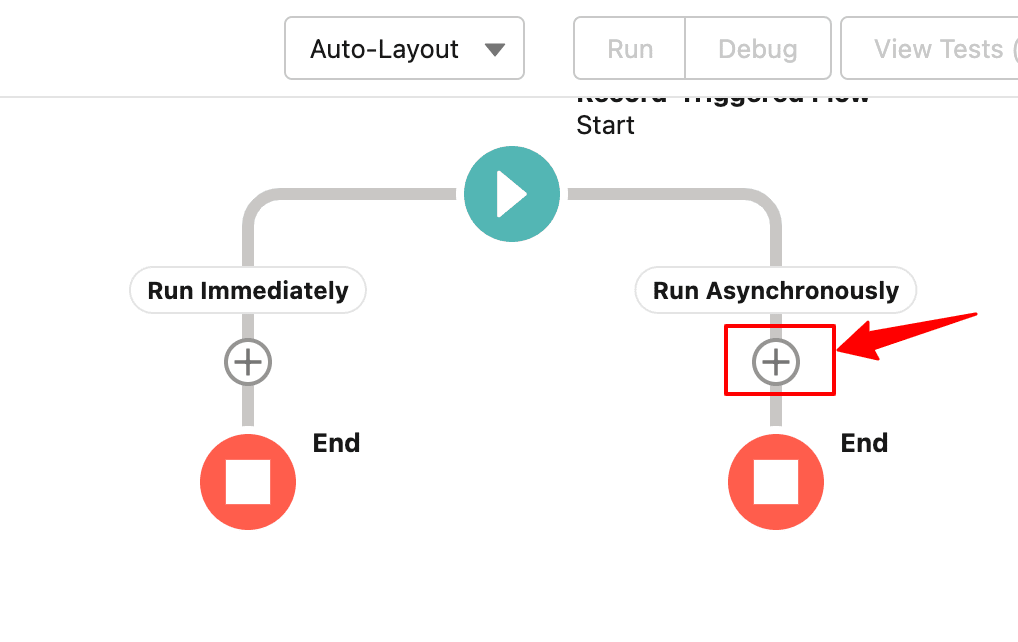
11. Now you will see the flow. Here, click the “+” icon under Run Asynchronously to configure the flow.
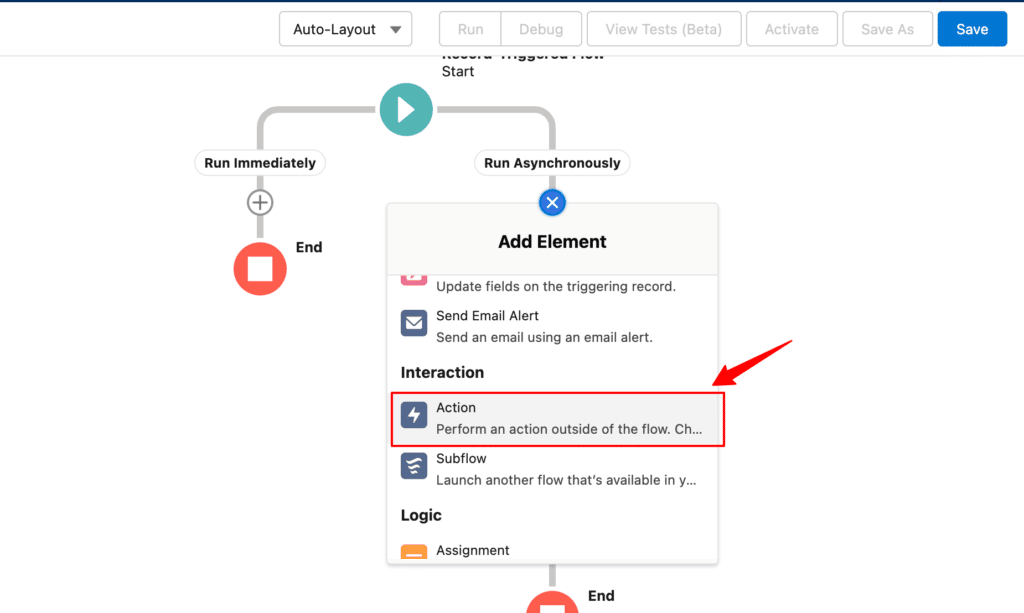
12. Choose Action under Interaction from the list of elements.
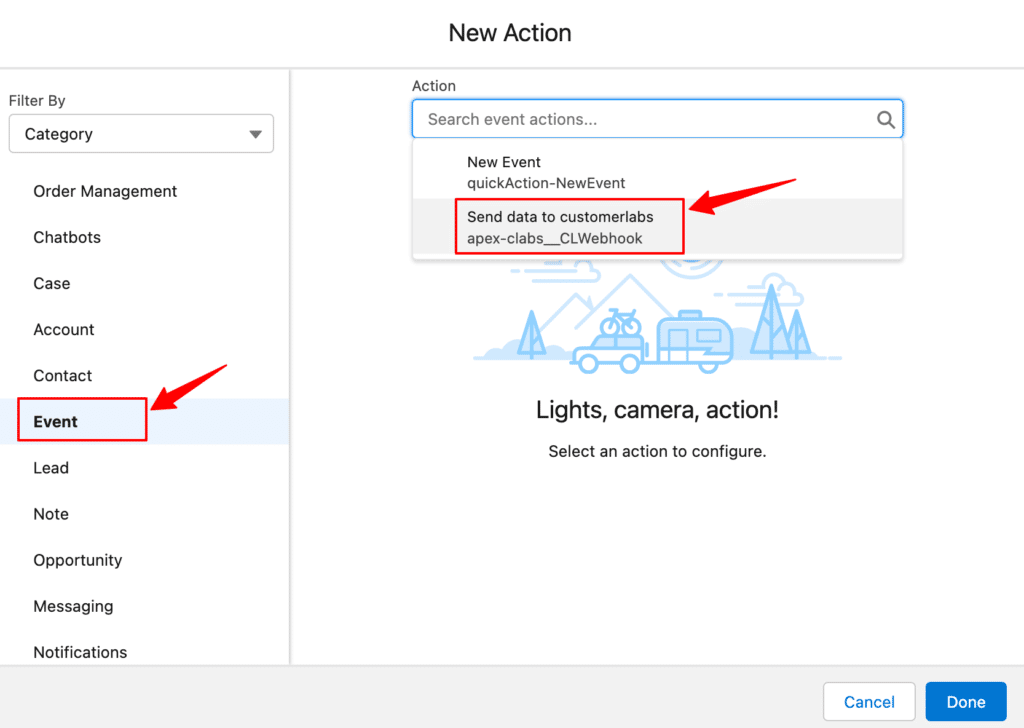
13. Select the category as Event and Choose the event action as Send data to customerlabs
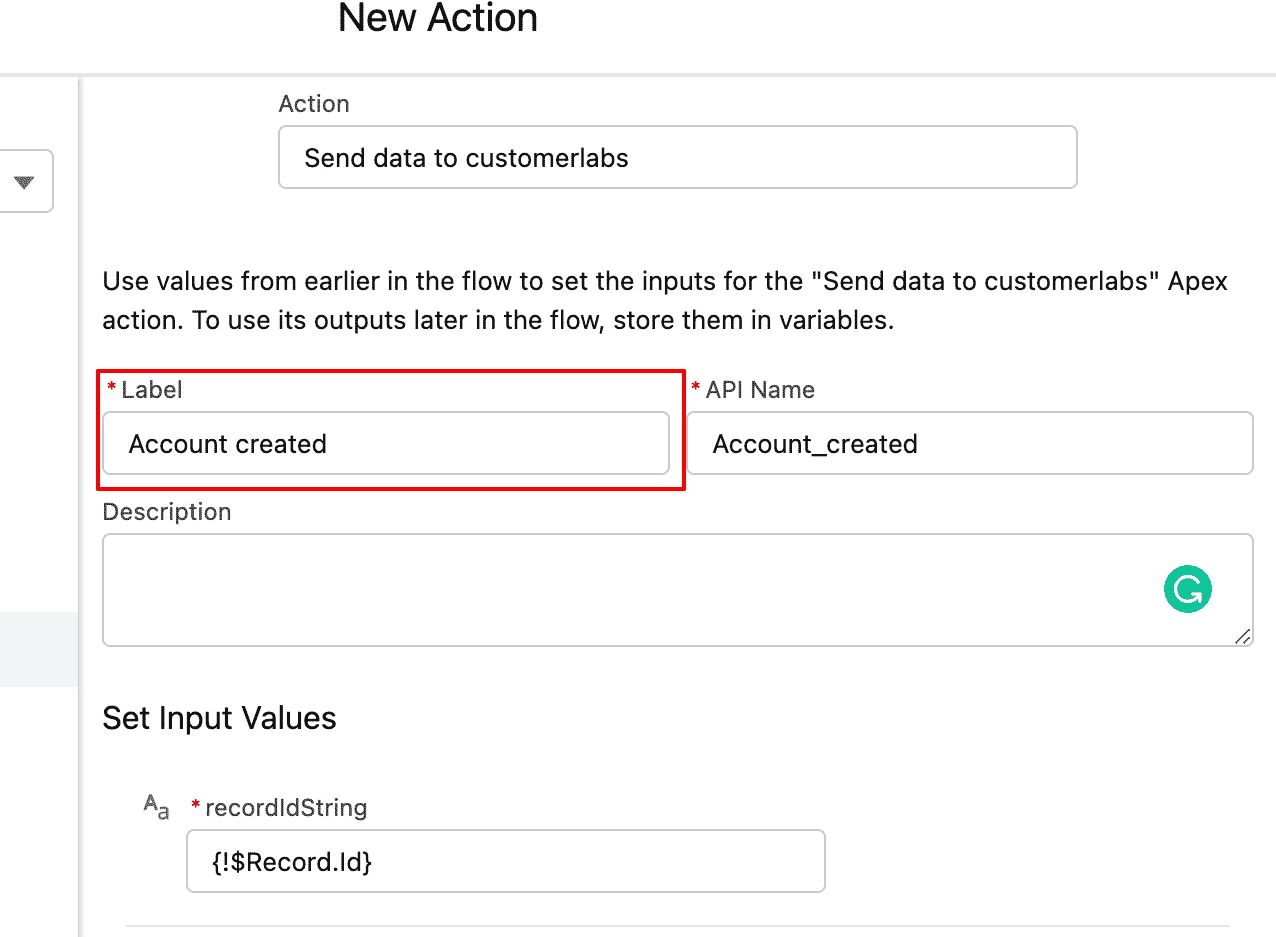
14. Give a relevant Label
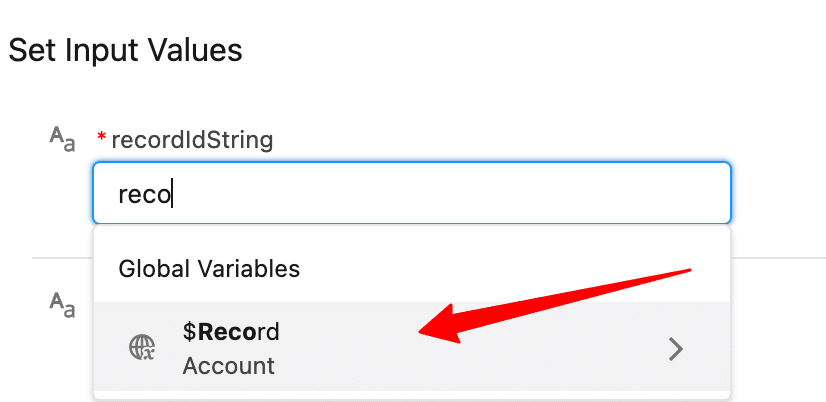
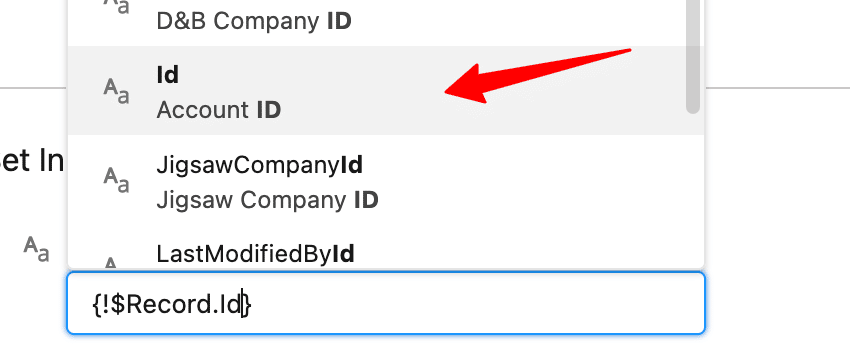
15. Under the Set Input Values section, choose Record (Account) and Id (Account ID) for recordIdString
16. Click Done
17. Save the flow by giving the Flow label and Description as required.

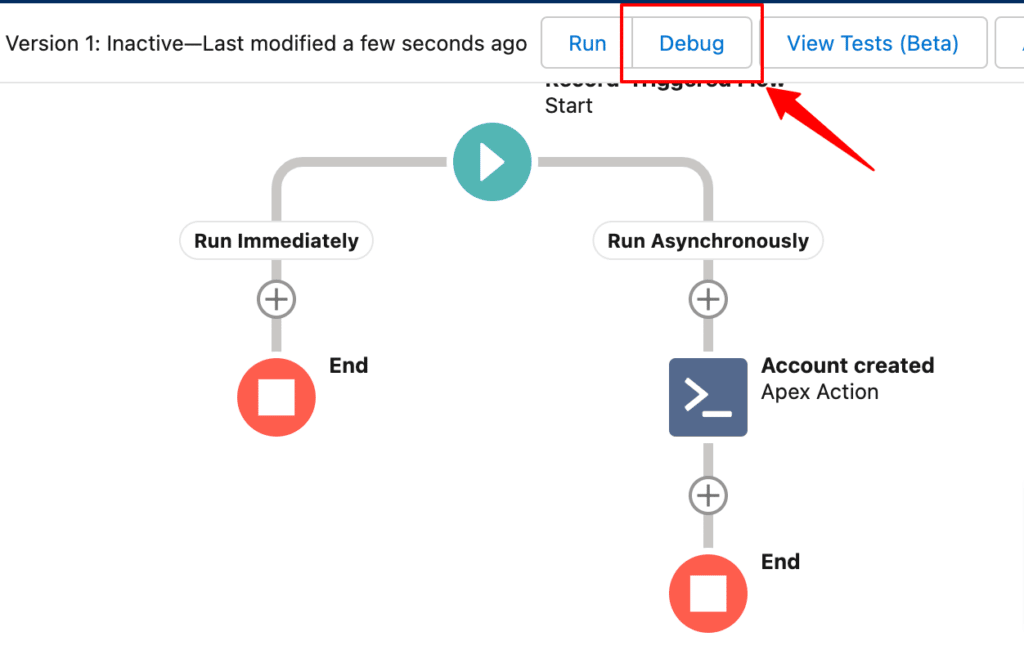
18. Now, Click on Debug
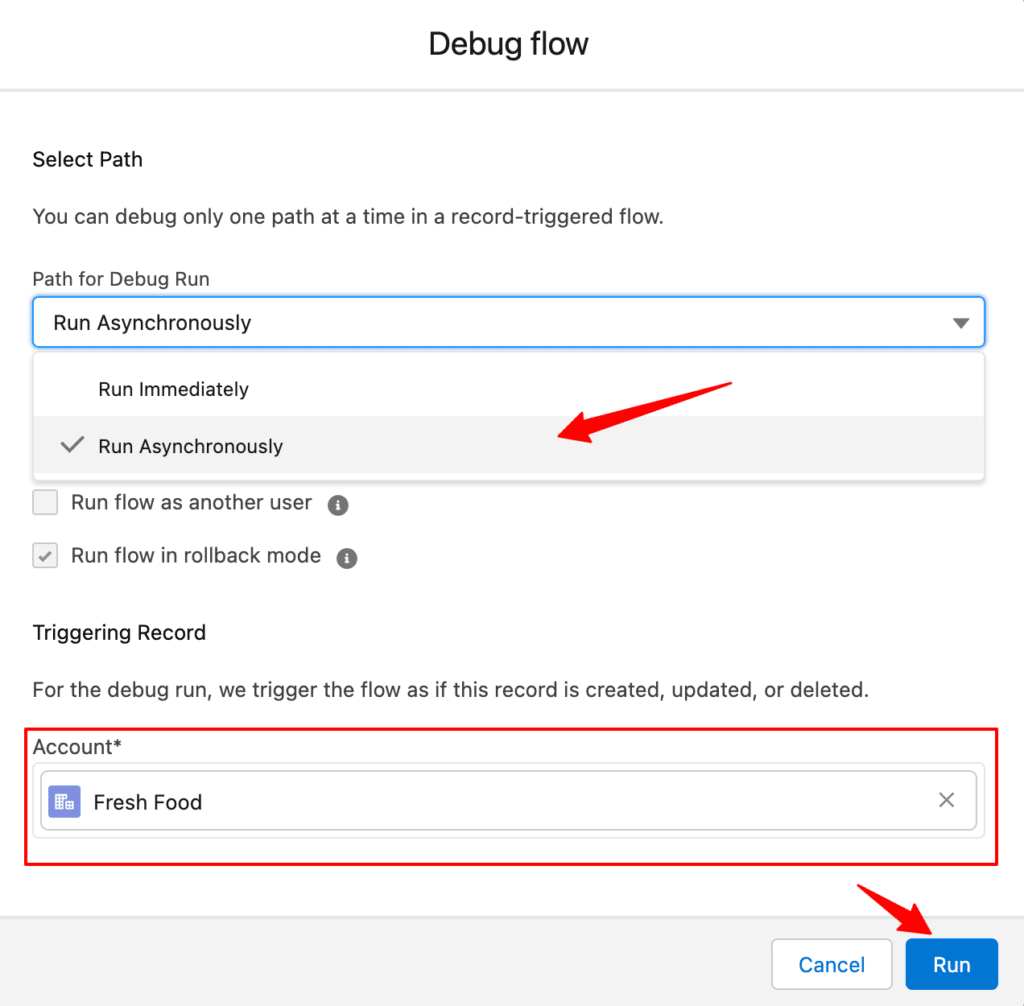
19. Choose Run Asynchronously from the Path for Debug Run drop-down.
20. Select the Account from the drop-down → Run.
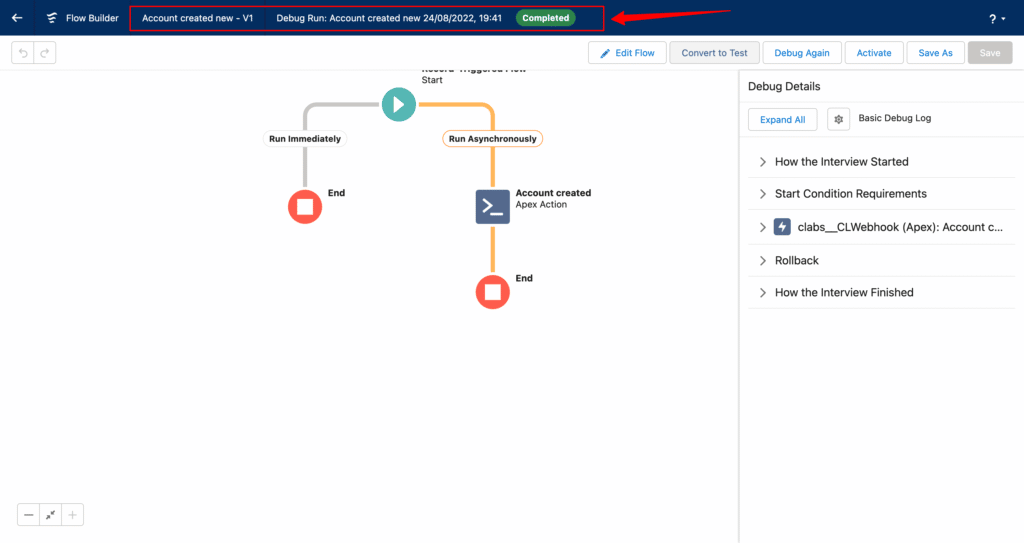
You will get a notification that the flow is running correctly as configured. If there is an error, check and try the entire process again to configure it correctly.
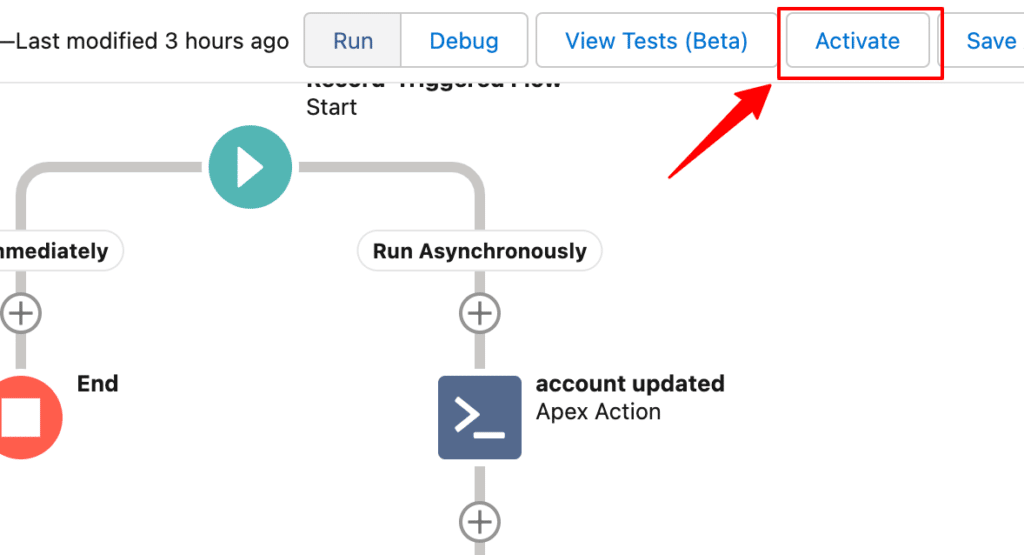
21. Now, Activate this flow to send the data to CustomerLabs whenever an account is created in Salesforce.
You will receive this data in CustomerLabs which you can use to configure the workflows as explained in the workflow section below.
Set up a flow – when an account is updated (single object)
Now, set up the flow in Salesforce to send the data to CustomerLabs when account/contact is updated.
1. Go to your Salesforce account → Settings → Setup
2. Search for Flows which is available under Process Automation

3. Click on New Flow → Record-Triggered Flow → Create
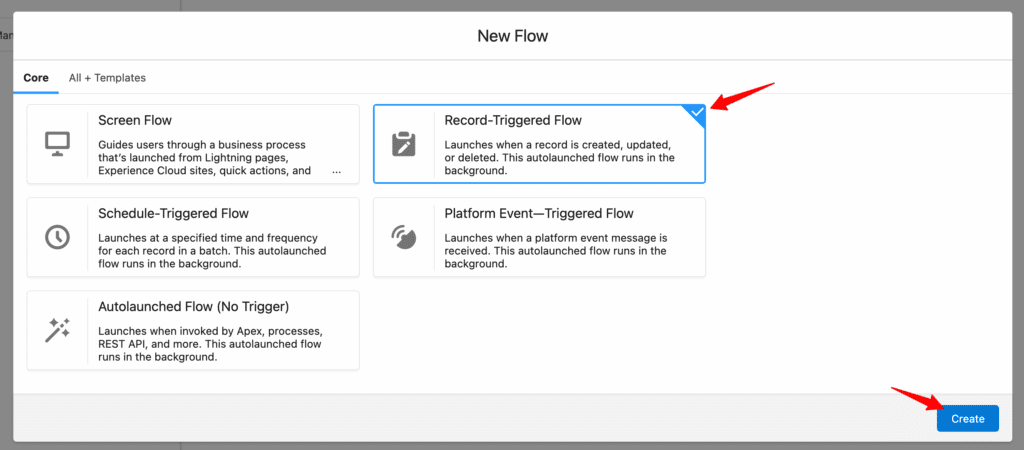
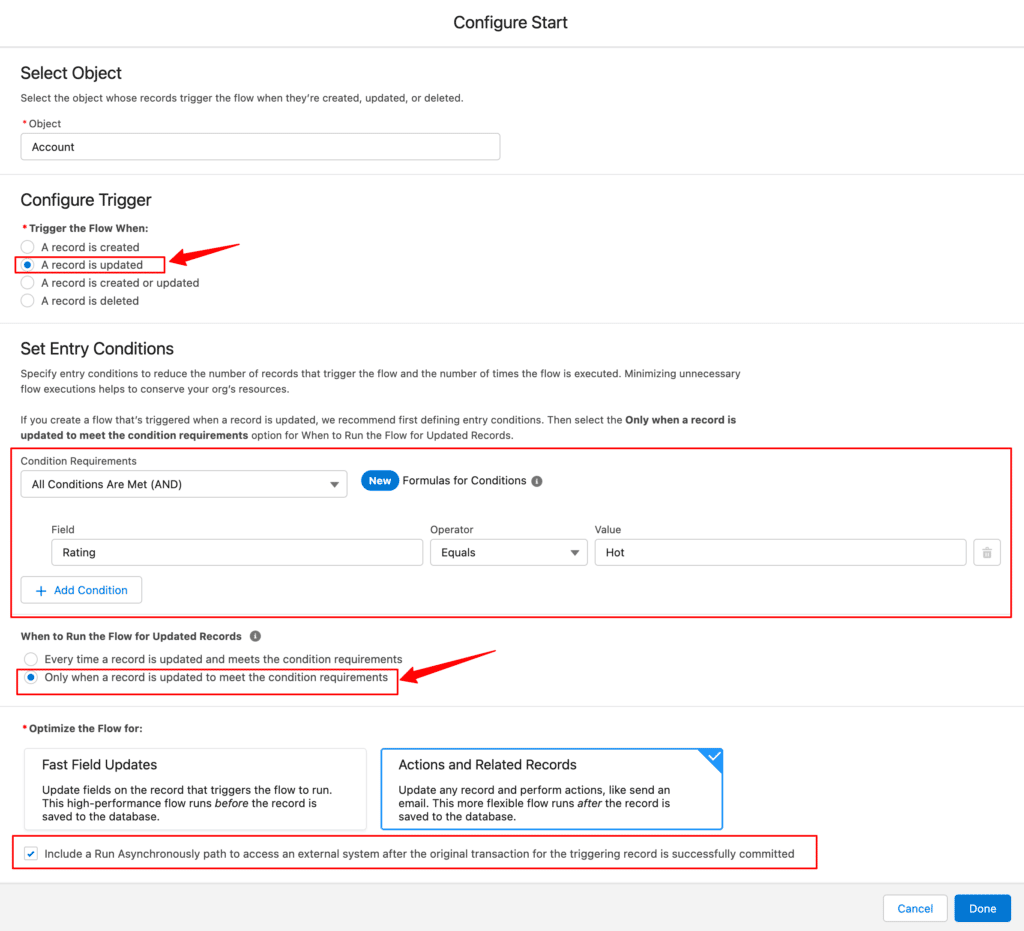
5. Select the object as Account
6. Choose the A record is updated radio button
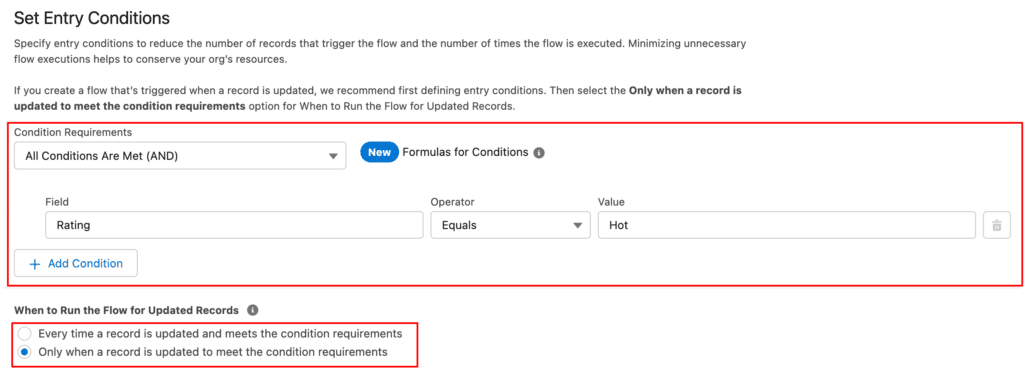
7. It is mandatory to Set Entry Conditions when you want to send the record updated data.
8. Set up entry conditions based on your requirements and choose the Only when a record is updated to meet the condition requirements radio button.
Note: Only this option is currently accepted.
For example, when you give the filter as Rating equals Hot, and choose Only when a record is updated to meet the condition requirements radio button, the data is sent only when the Rating is updated to Hot.
9. Select Actions and Related records under Optimize the flow for section
10. Tick the Include a Run Asynchronously path checkbox
11. Click Done.
12. Now you will see the flow. Here, click the “+” icon under Run Asynchronously to configure the flow.
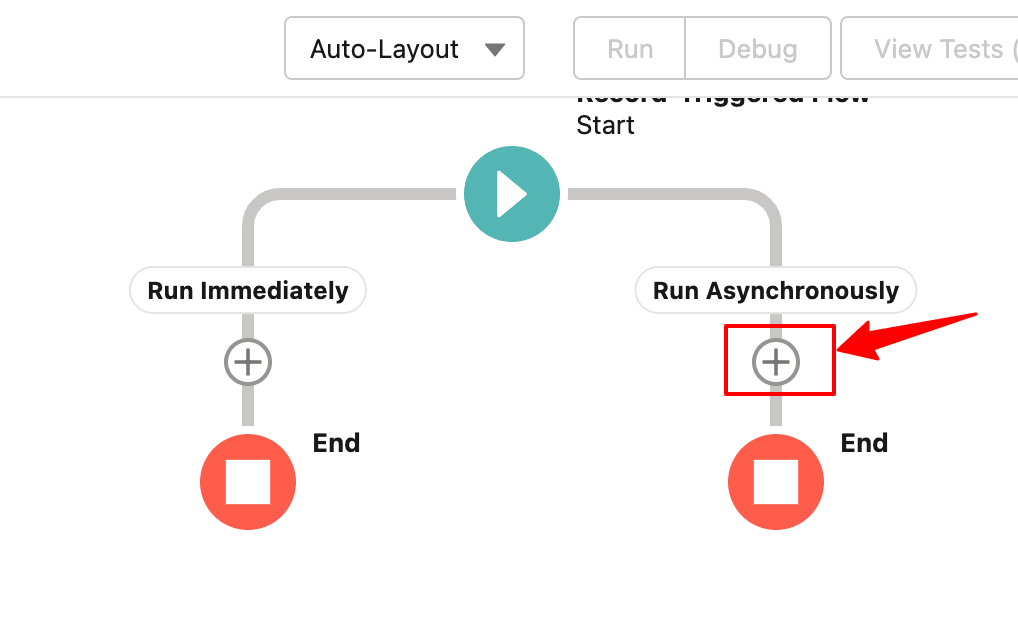
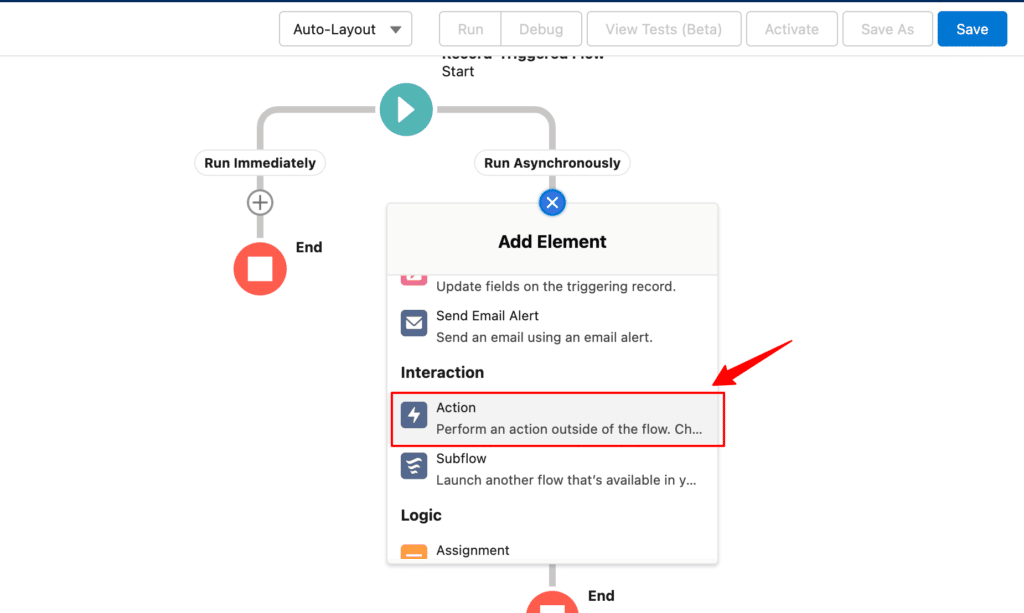
13. Choose Action under Interaction from the list of elements.
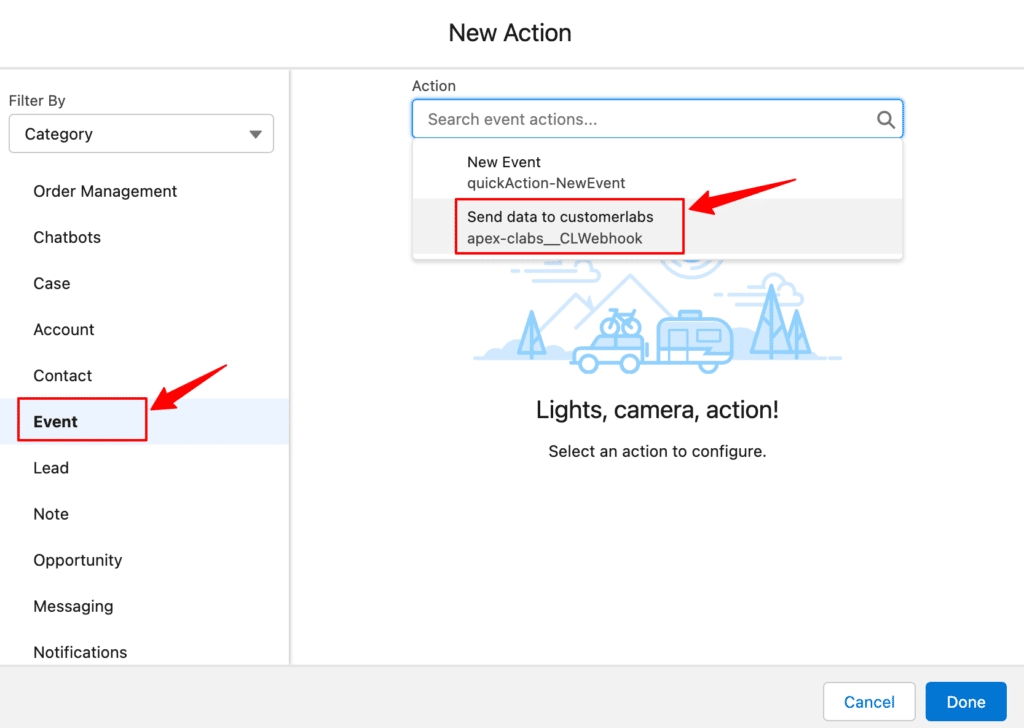
14. Select the category as Event and Choose the event action as Send data to customerlabs
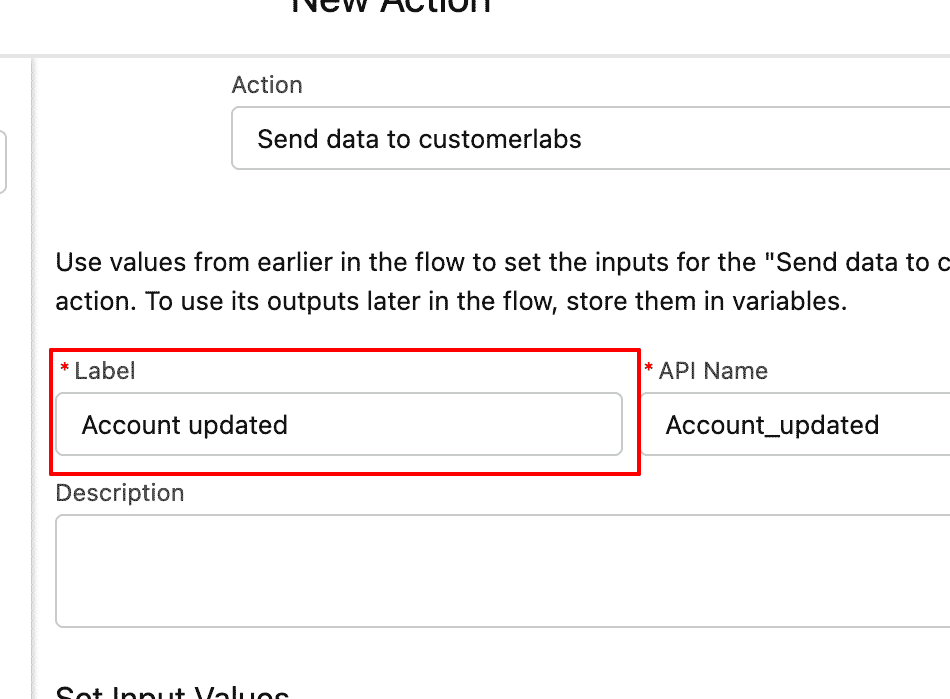
15. Give a relevant Label
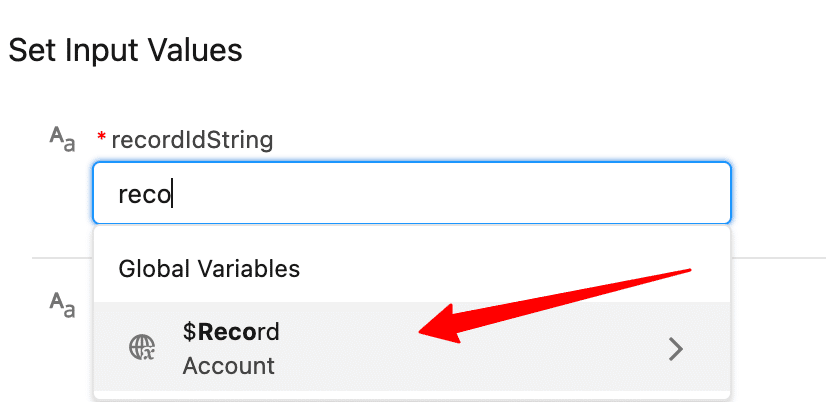
16. Under the Set Input Values section, choose Record (Account) and Id (Account ID) for recordIdString
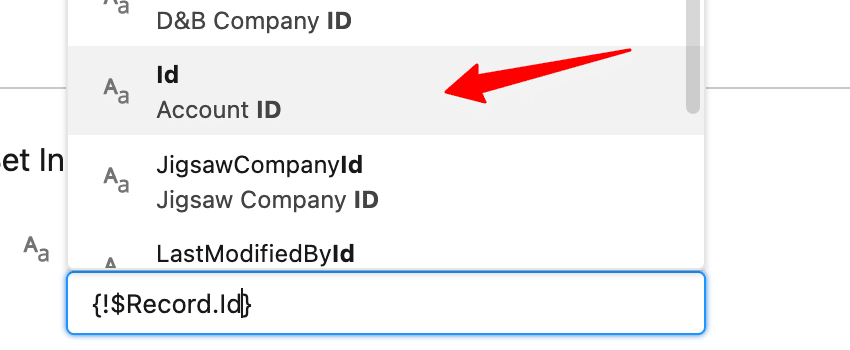
17. Click Done
18. Save the flow by giving the Flow label and Description as required.
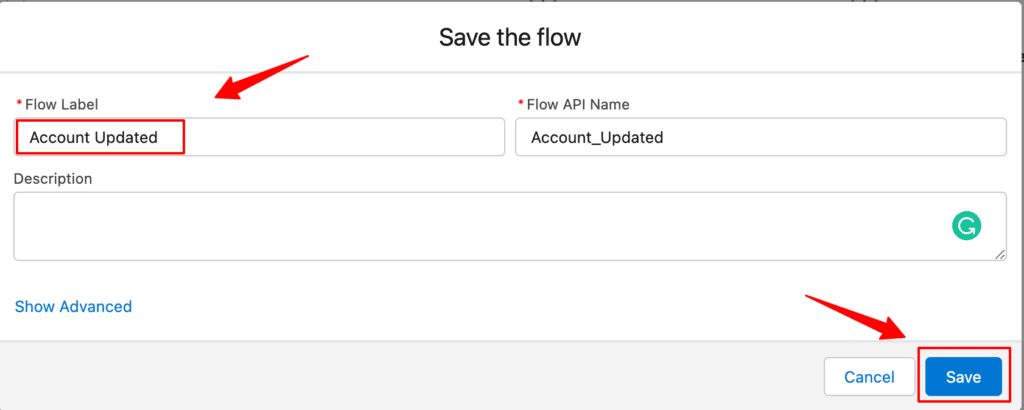
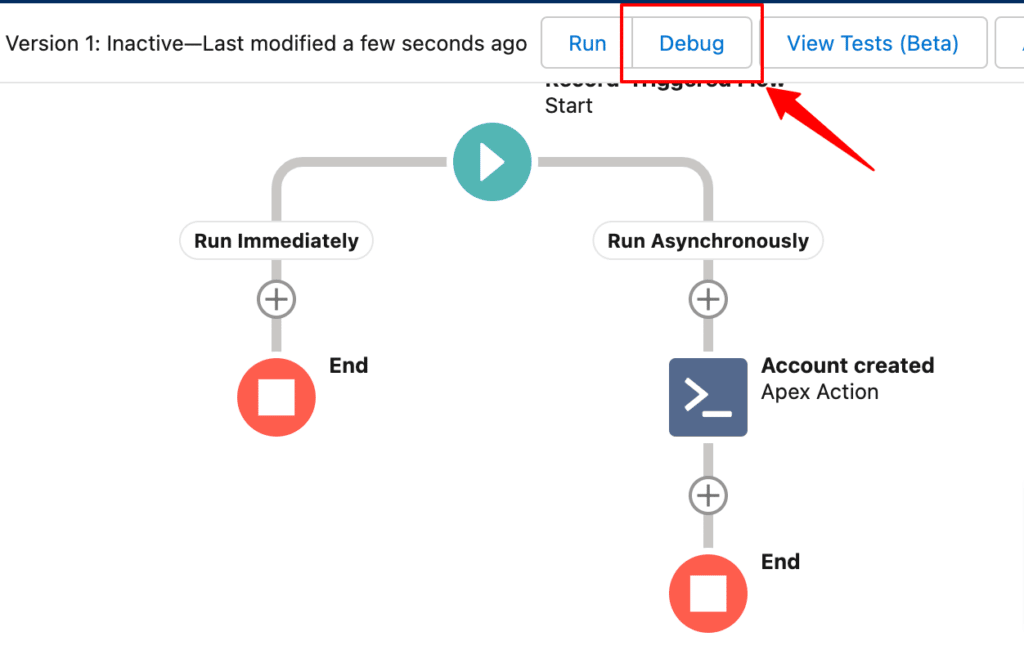
19. Now, Click on Debug
20. Choose Run Asynchronously from the Path for Debug Run drop-down.
21. Select the Account from the drop-down.
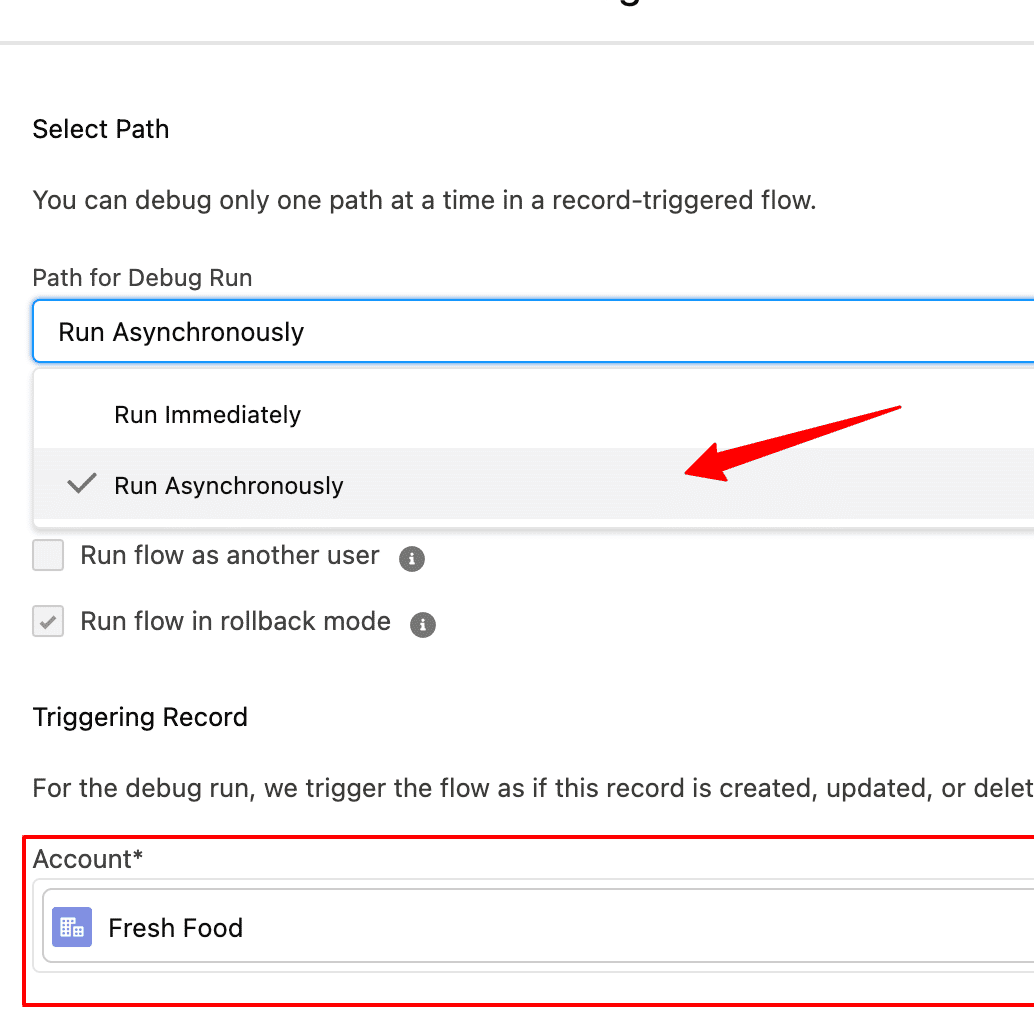
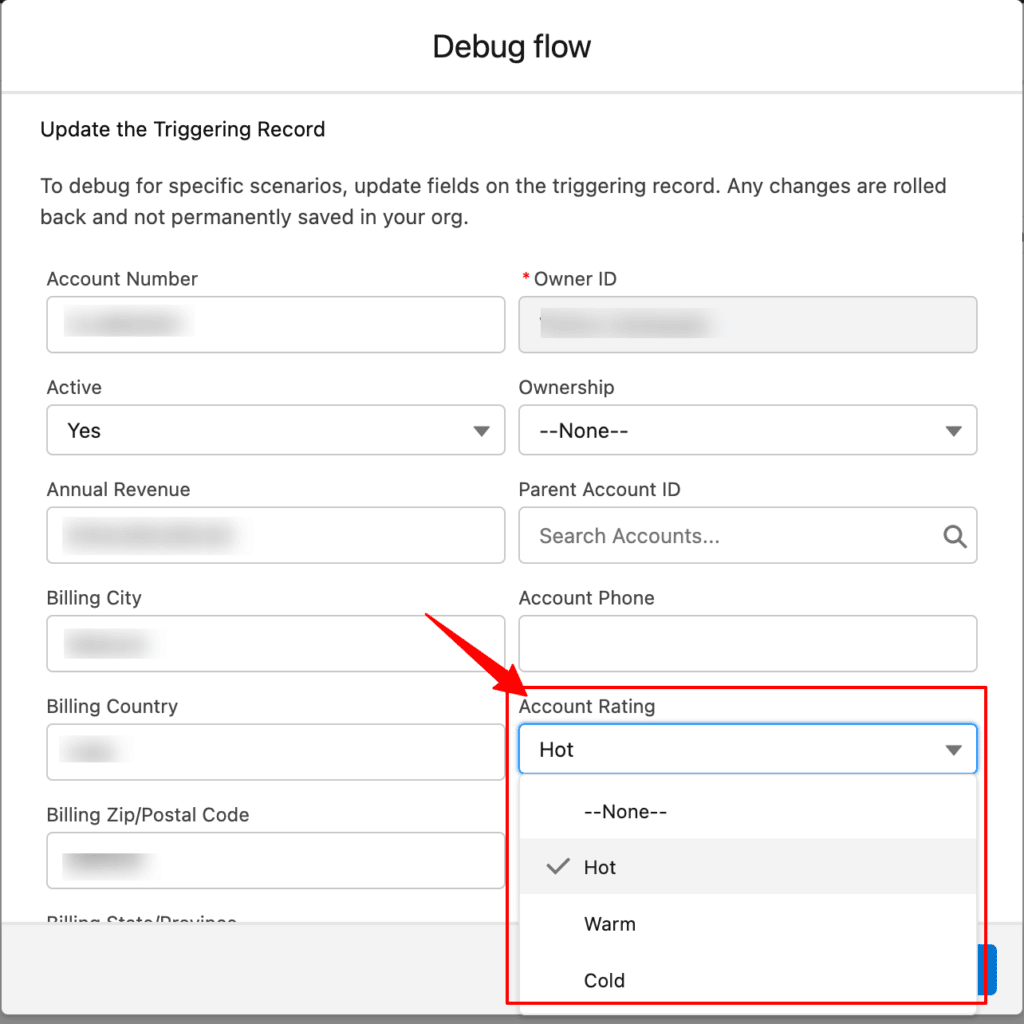
22. In this case, update the Account Rating field as Hot, Warm or Cold and click Run.
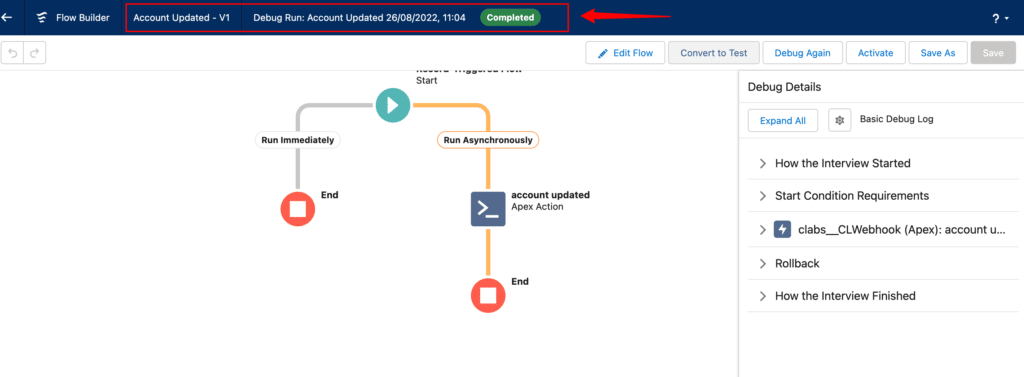
You will get a notification that the flow is running correctly as configured. If there is an error, check and try the entire process again to configure it correctly.
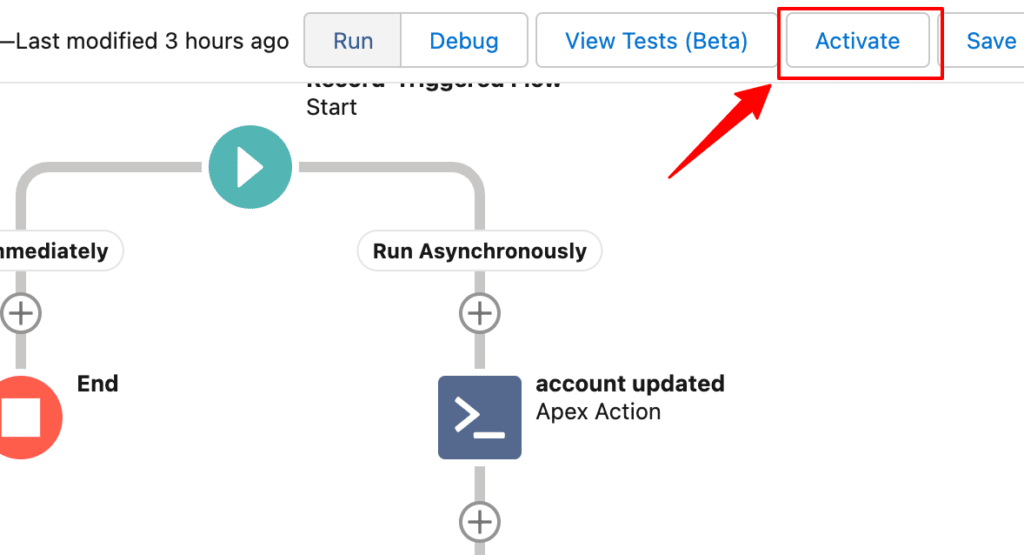
23. Now, Activate this flow to send the data to CustomerLabs whenever an account is updated in Salesforce.
You will receive this data in CustomerLabs which you can use to configure the workflows as explained in the workflow section below.
Set up a flow – when an account is created (related objects)
Here’s how you set up the flow in Salesforce to send the related object data to CustomerLabs when a contact is created. For eg. When you want to send opportunity data along with Account data, follow the steps below,
1. Go to your Salesforce account → Settings → Setup
2. Search for Flows which is available under Process Automation

3. Click on New Flow → Record-Triggered Flow → Create
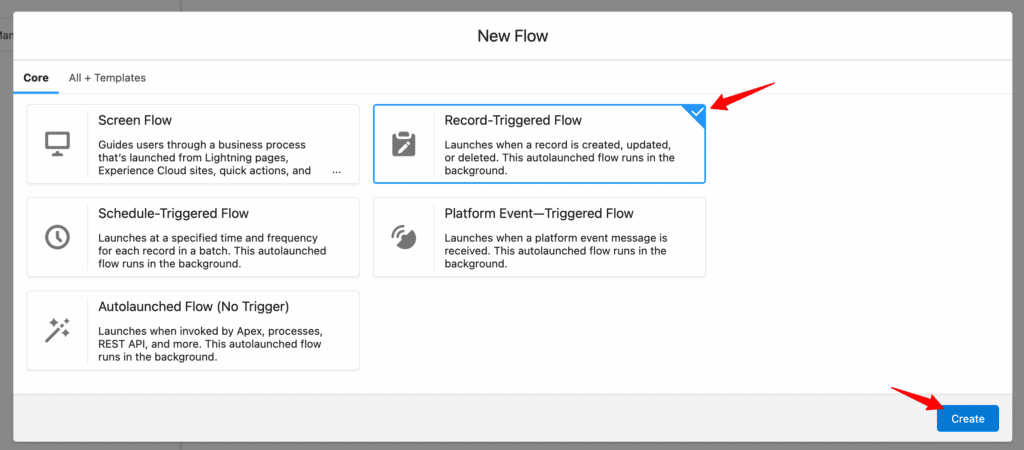
5. Select the object as Account
6. Choose the A record is created radio button
7. Set entry conditions if required or choose None
8. Select Actions and Related records under Optimize the flow for section
9. Tick the Include a Run Asynchronously path checkbox
10. Click Done.
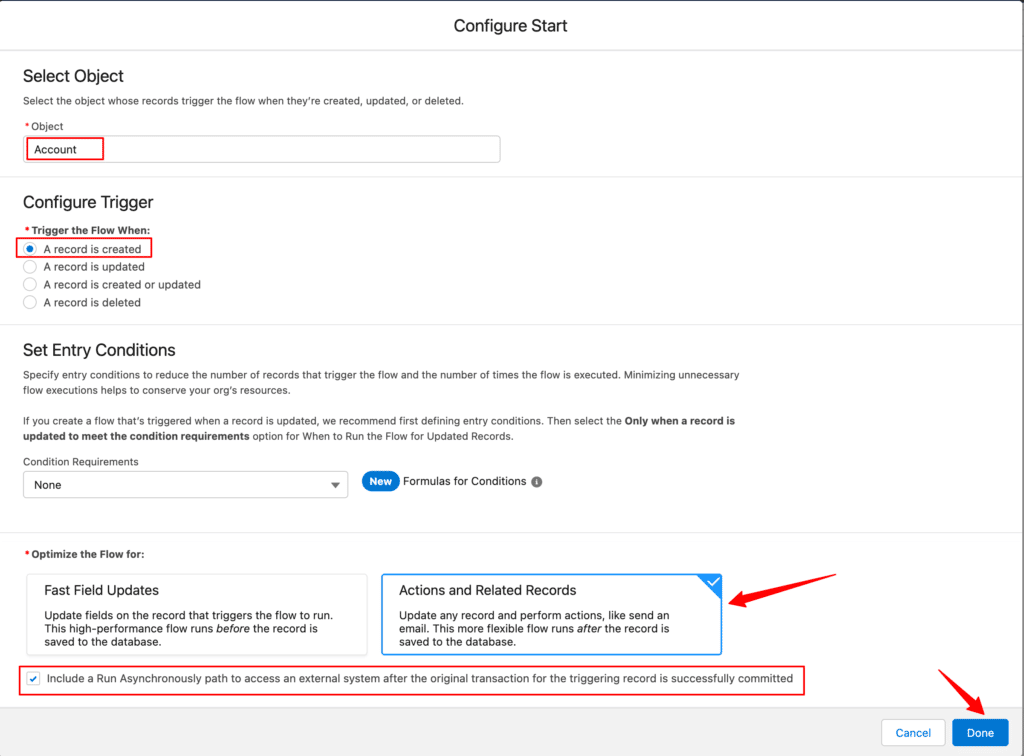
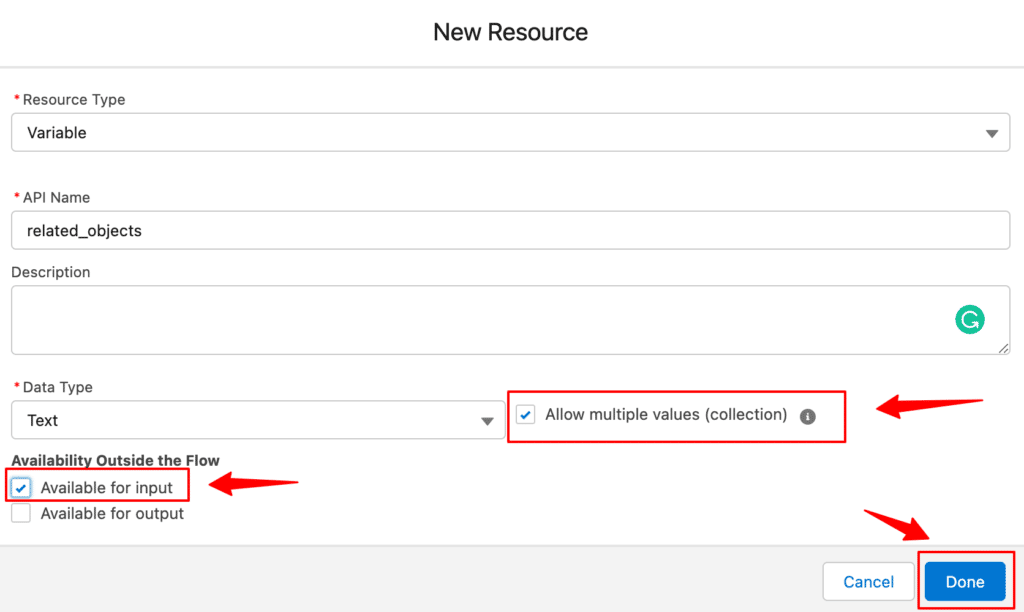
11. Now click on New Resource
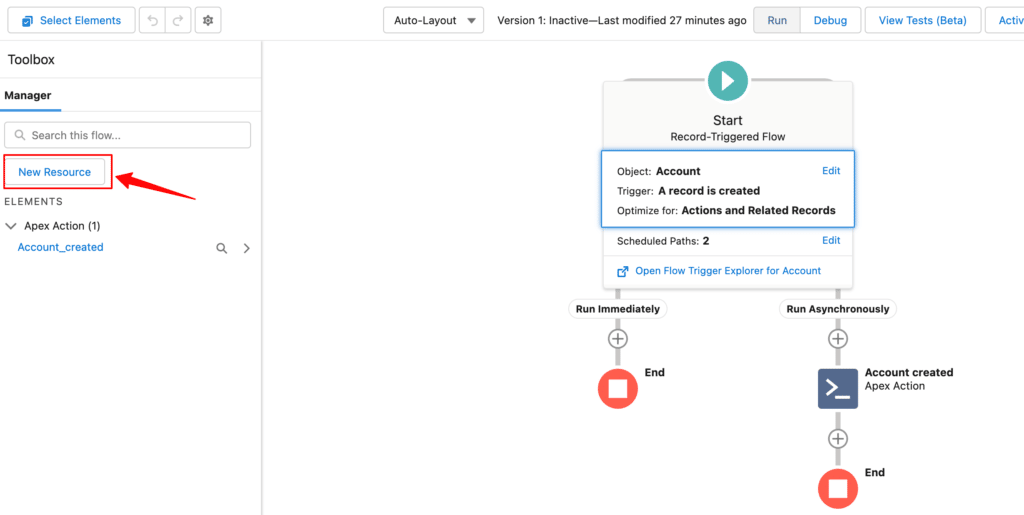
12. Choose Resource Type as Variable
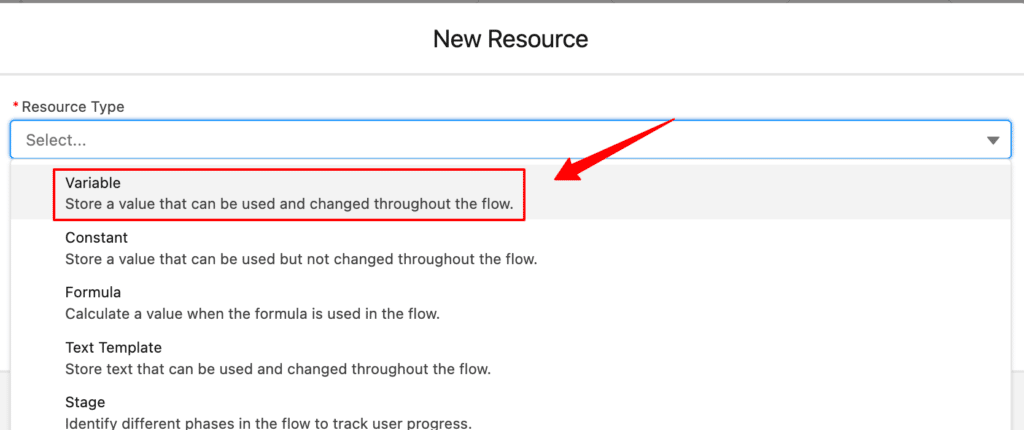
13. Give an API Name and Description as required
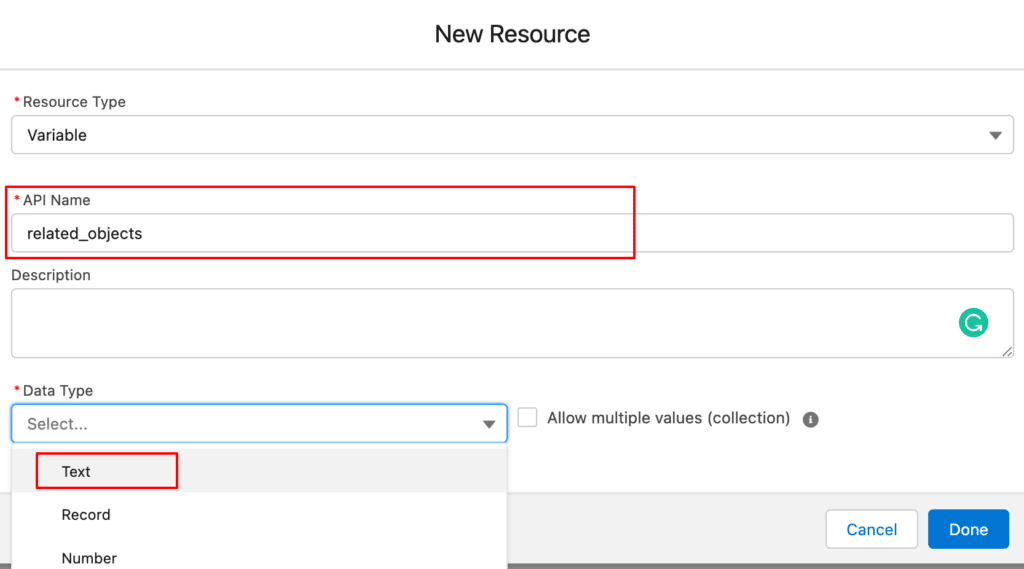
14. Choose Text from the Data type drop-down. Tick the Allow multiple values (collection) checkbox
15. Tick the Available for input checkbox → Click Done
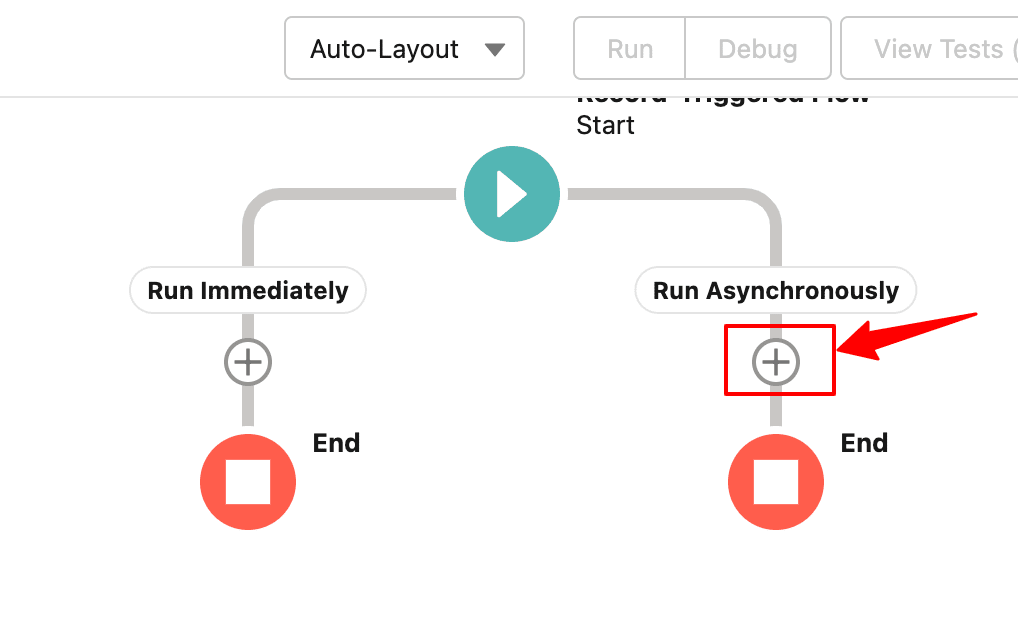
16. Now, click the “+” icon under Run Asynchronously to configure the flow.
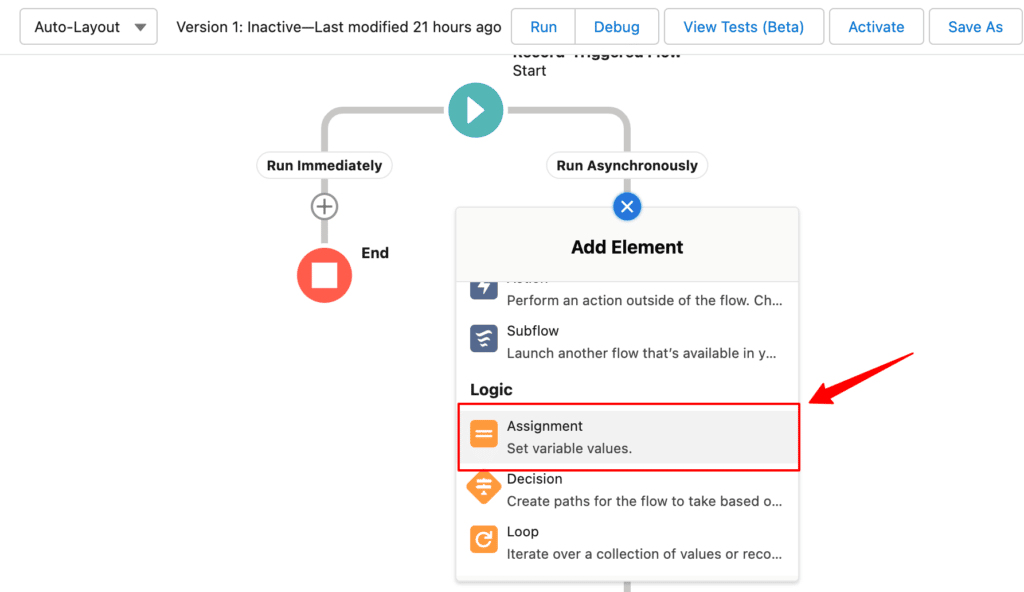
17. Select Assignment from the list of Elements
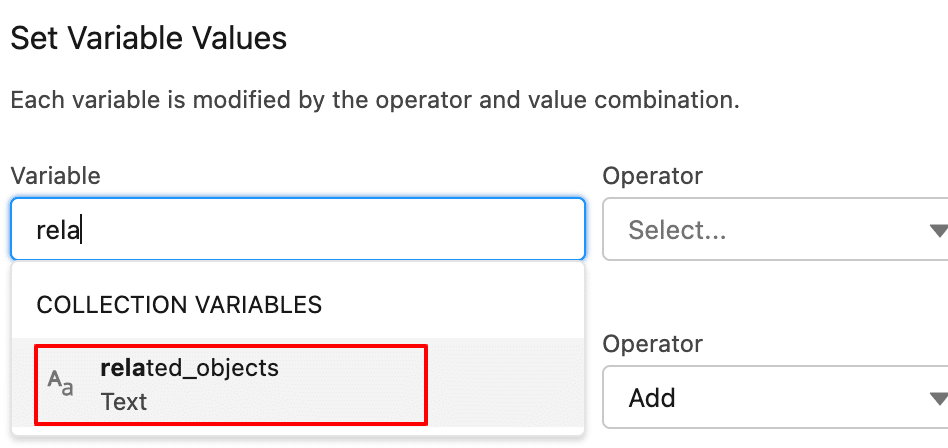
18. Give a label and description as required.

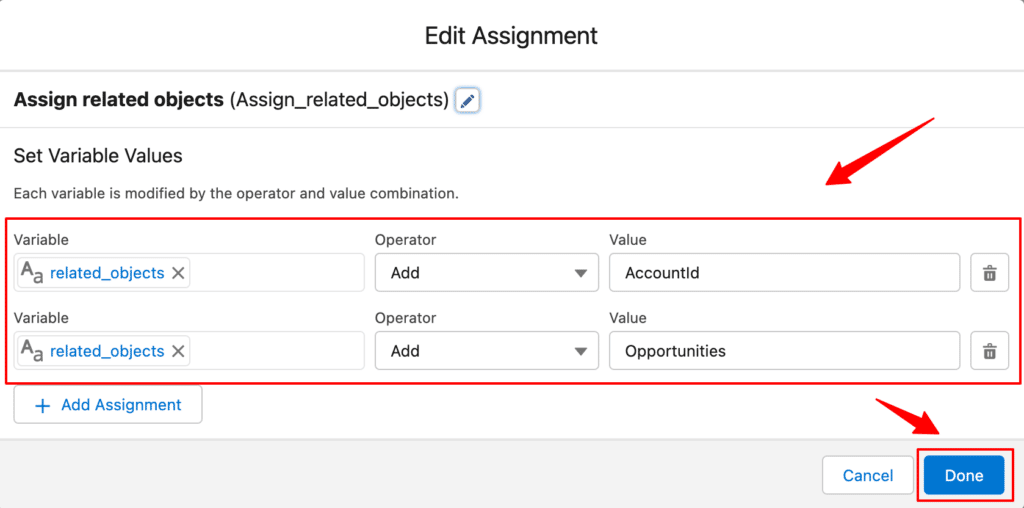
19. In the Set Variable Values section, choose the variable created in the steps 12-15.
20. Add parent and child relationship names like AccountId and Opportunities in the related values by using the Add Assignment button → Click Done
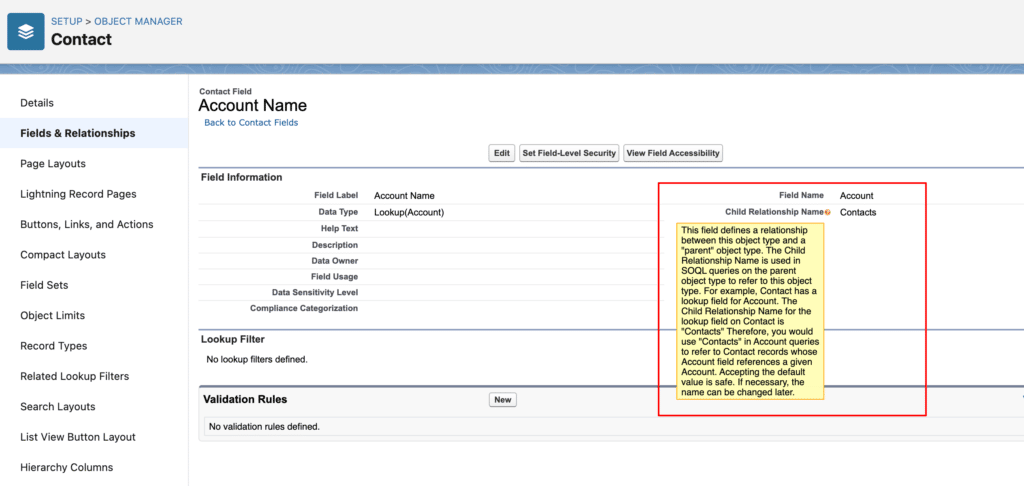
Note: You can check the child relationships from Setup → Object Manager → Click on any ChildObject → Fields & Relationships → Child Relationship Name [This is child relationship name between parent and child objects].
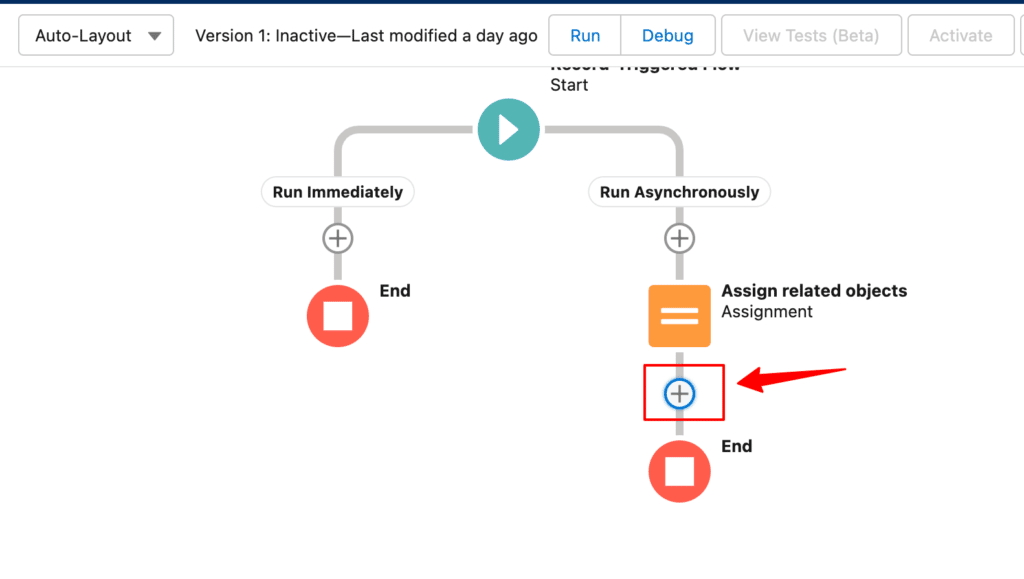
21. Again, click the “+” icon under New Assignment created.
22. Choose Action under Interaction from the list of elements.
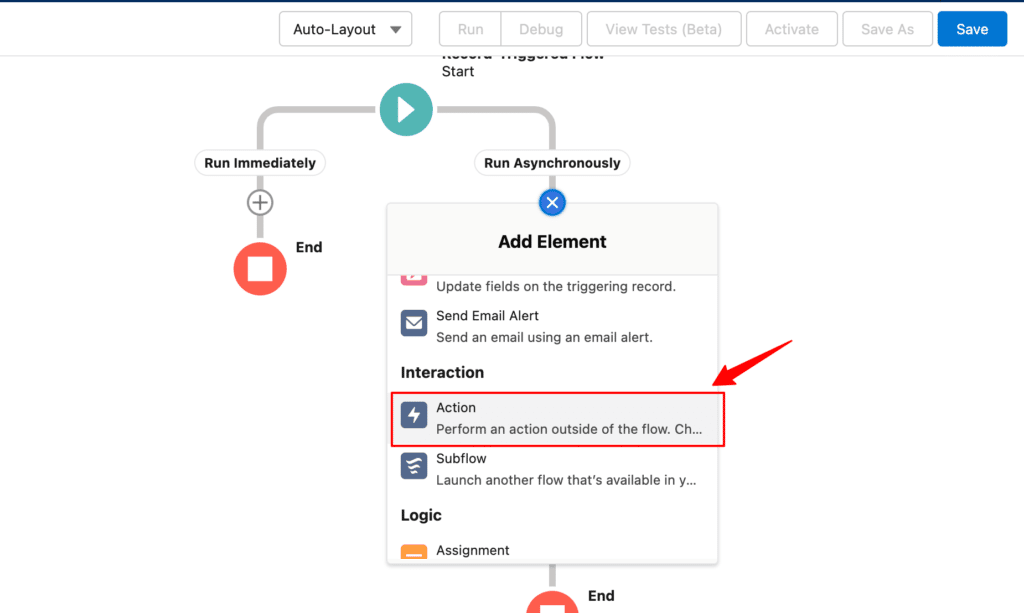
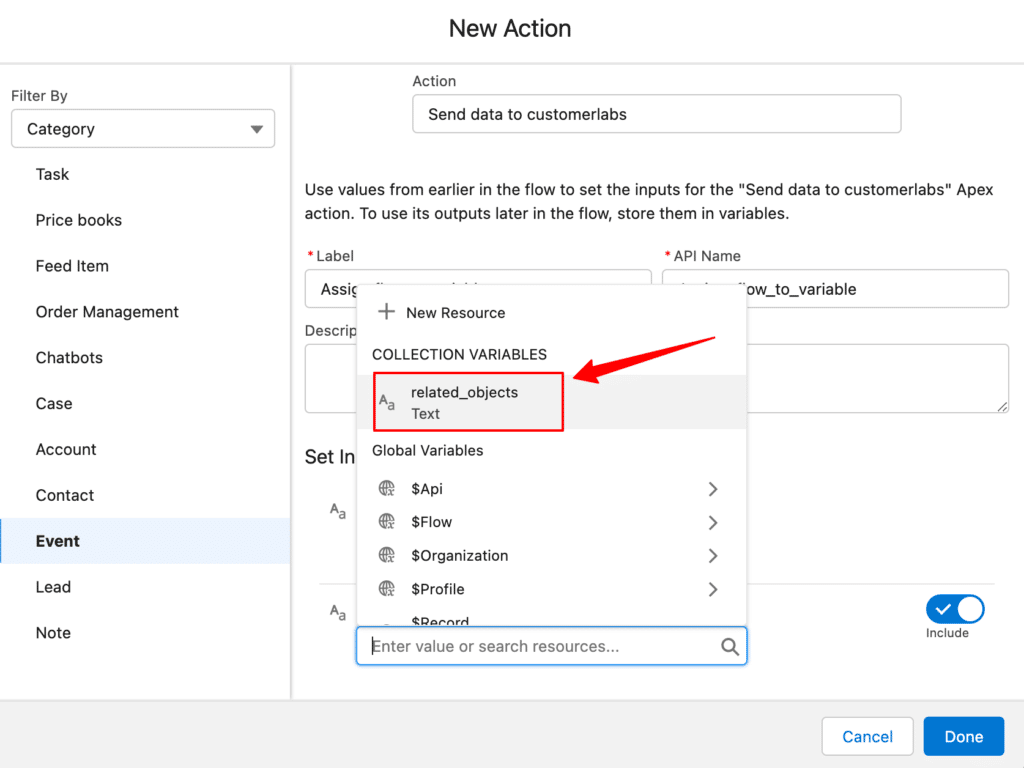
23. Select the category as Event and Choose the event action as Send data to customerlabs
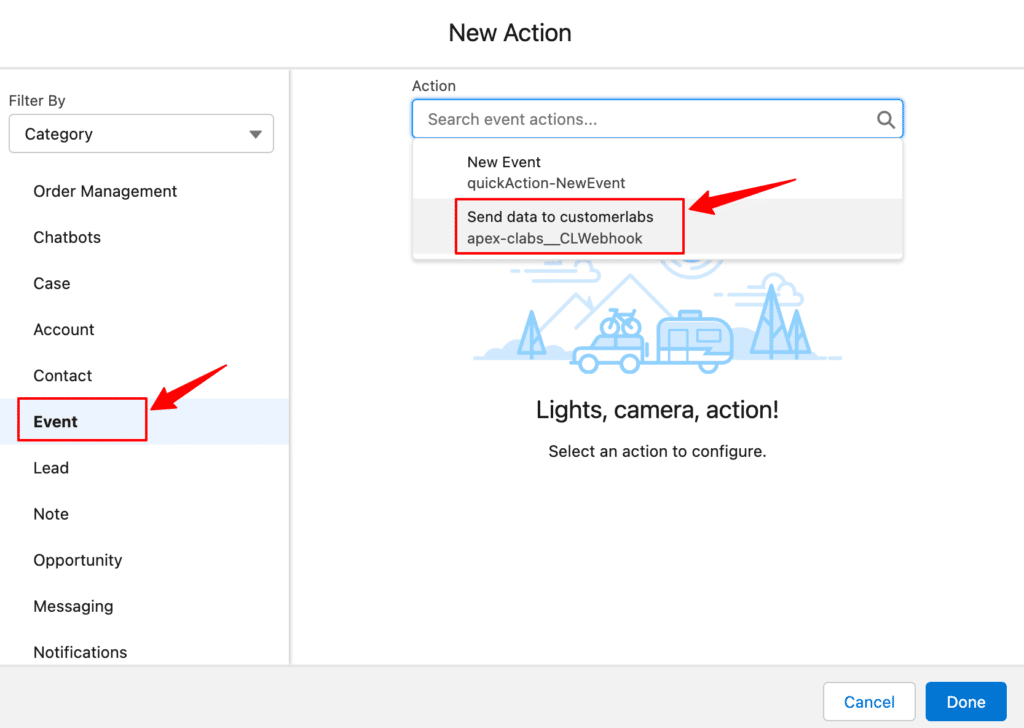
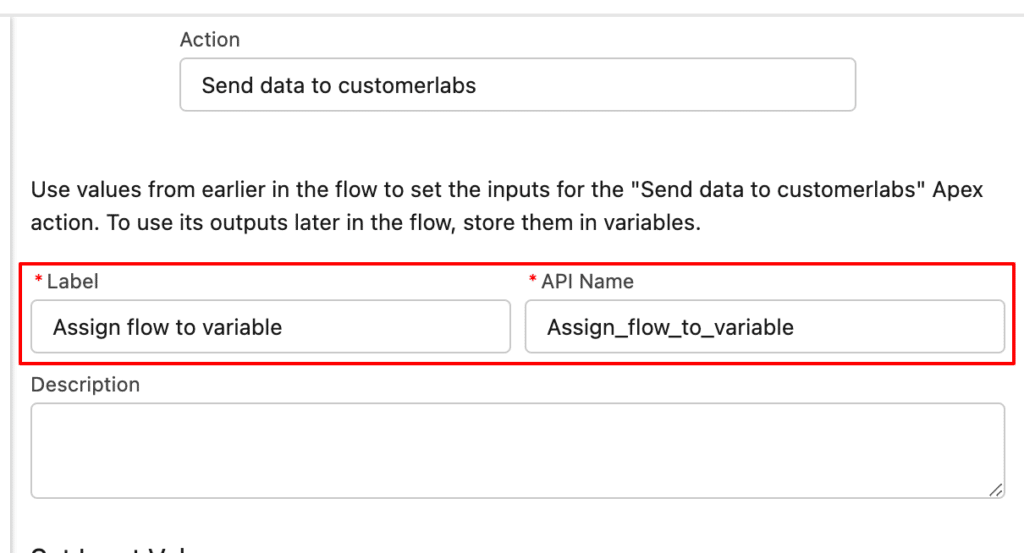
24. Give a relevant Label
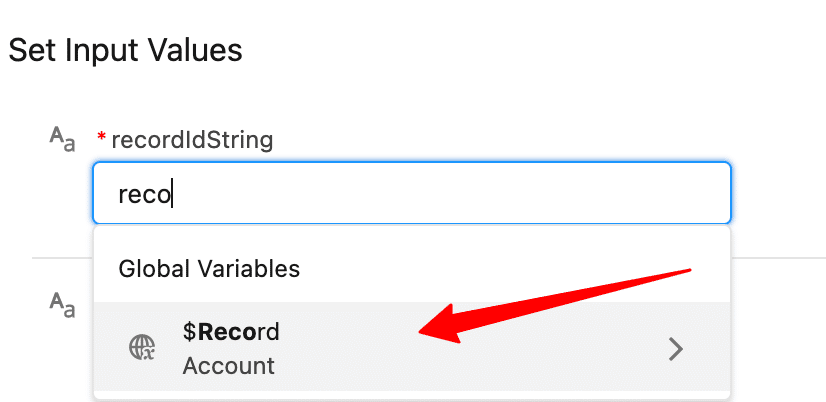
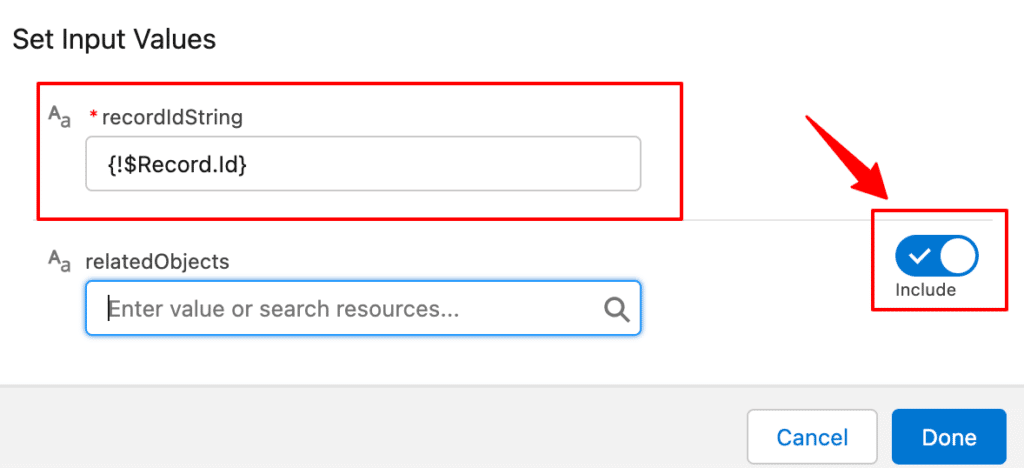
25. Under the Set Input Values section, choose Record (Account) and Id (Account ID) for recordIdString.
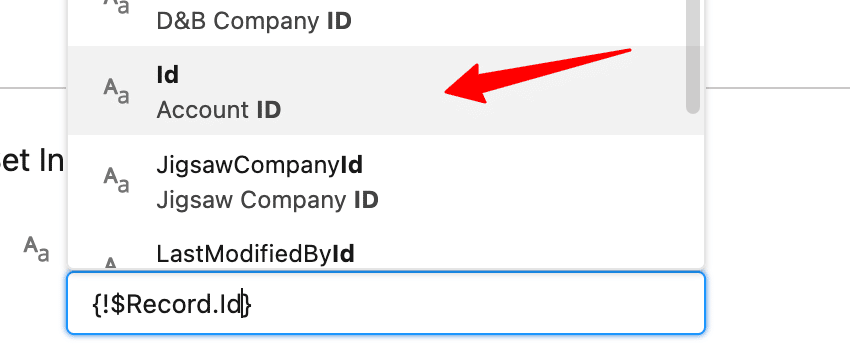
26. Turn the toggle on (Include) for relatedObjects → Choose the variable created in steps 12-15
27. Click Done
28. Save the flow by giving the Flow label and Description as required.

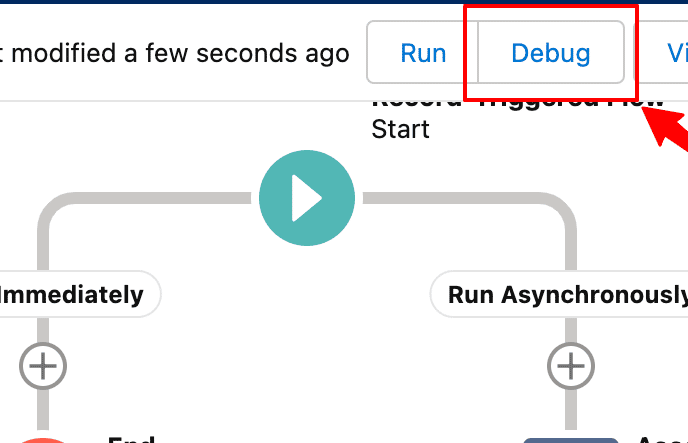
29. Now, Click on Debug
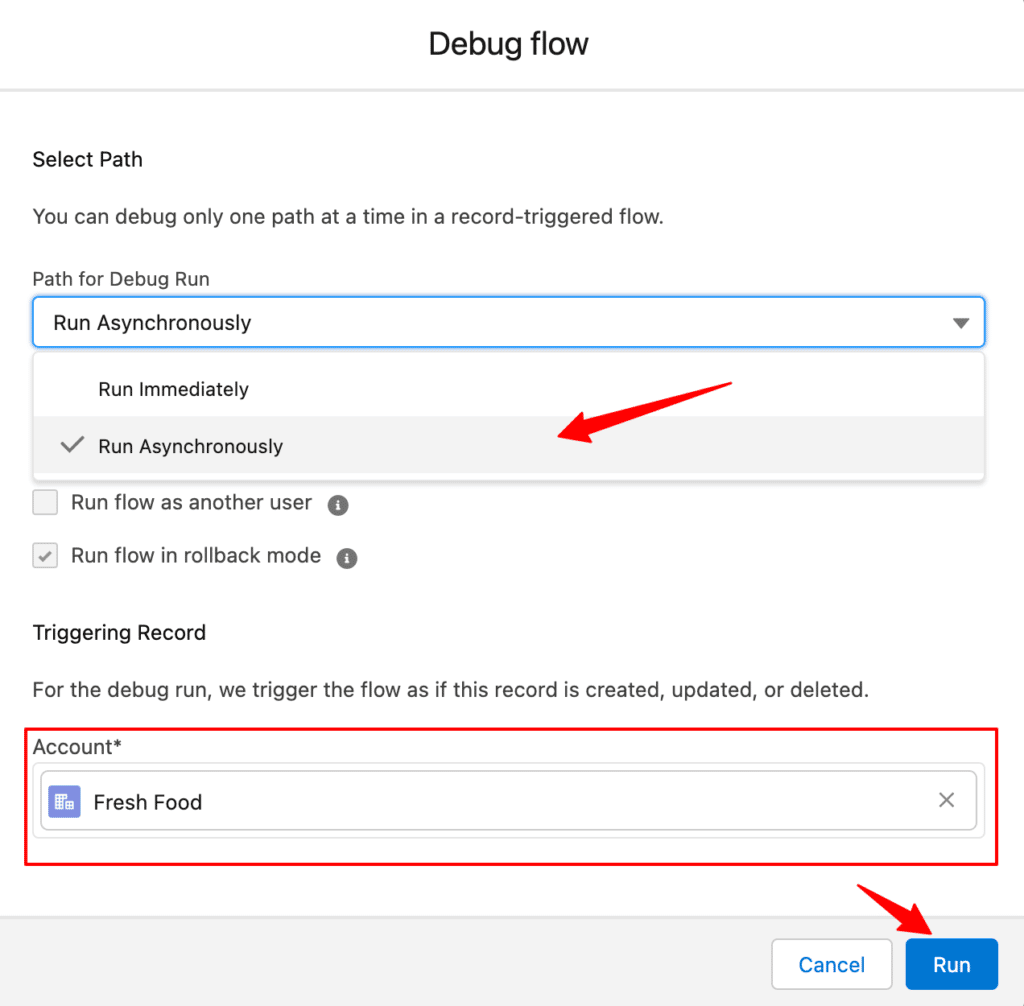
30. Choose Run Asynchronously from the Path for Debug Run drop-down.
31. Select the Account from the drop-down → Run.
You will get a notification that the flow is running correctly as configured. If there is an error, check and try the entire process again to configure it correctly.
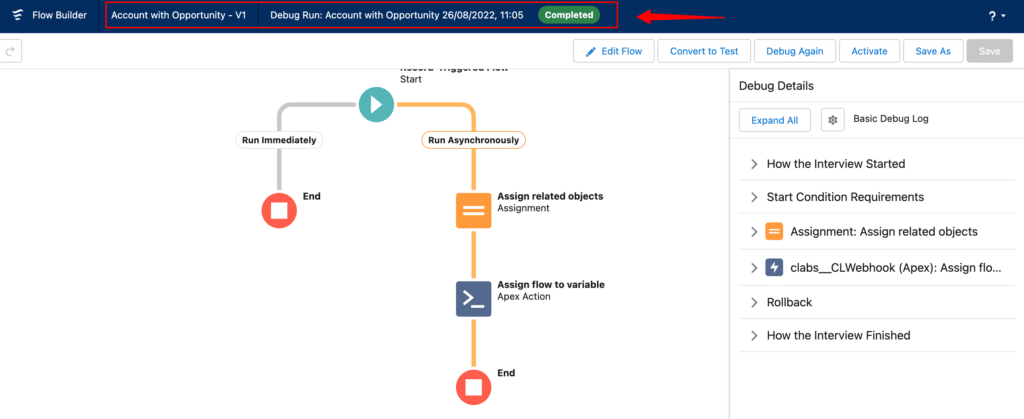
32. Now, Activate this flow to send the data to CustomerLabs whenever an account is created along with opportunity details.
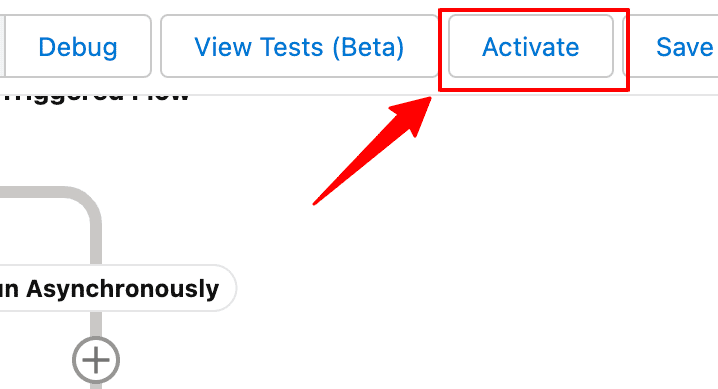
You will receive this data in CustomerLabs which you can use to configure the workflows as explained in the workflow section below.
Building Workflows in CustomerLabs 1PD Ops
Setting up a workflow in CustomerLabs 1PD Ops will allow you to receive notifications about changes that happen to your Salesforce data in real-time.
For example, you can set up a workflow that will trigger a notification to be pushed to the CustomerLabs 1PD Ops specified every time a contact/account/opportunity has been created/updated in your Salesforce account.
Workflow #1 – How to send data to CustomerLabs 1PD Ops when a new account is created in Salesforce
The below steps explain how you can filter and map incoming account information from Salesforce to Customerlabs 1PD Ops
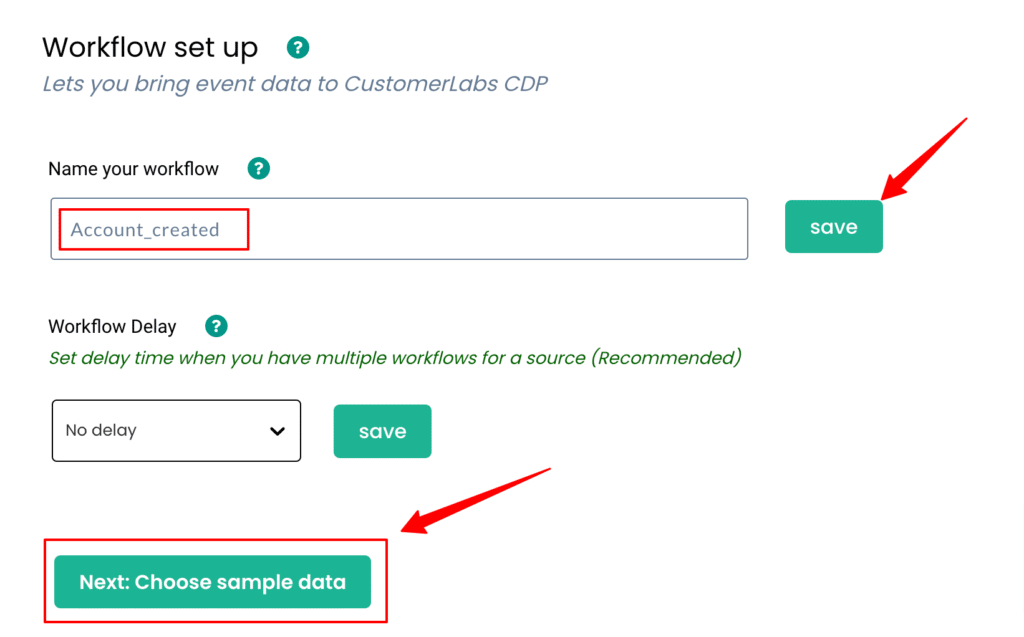
1. Give a name to your workflow and before proceeding, create a test account in Salesforce to get related data samples. Once a new account is created, click on Choose sample data.
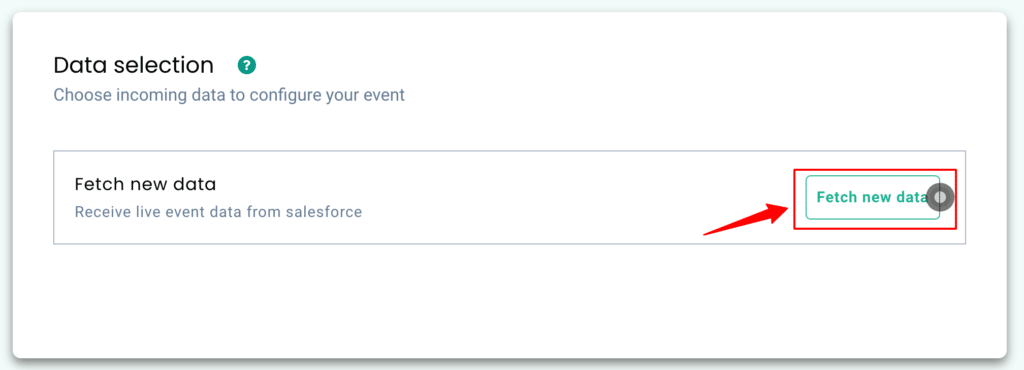
2. Click on Fetch new data to see sample account data created in Salesforce inside CustomerLabs 1PD Ops.
3. By clicking on View details you’ll be able to see a JSON format of the same.
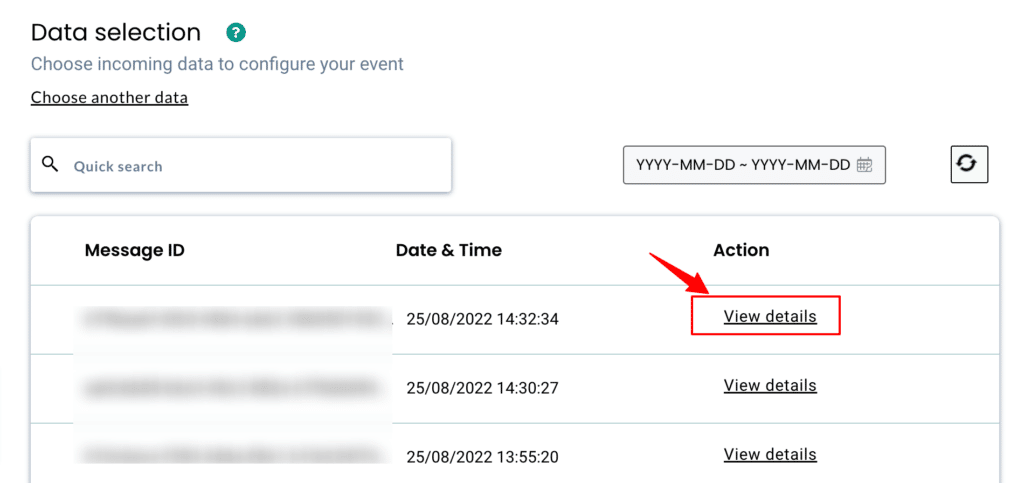
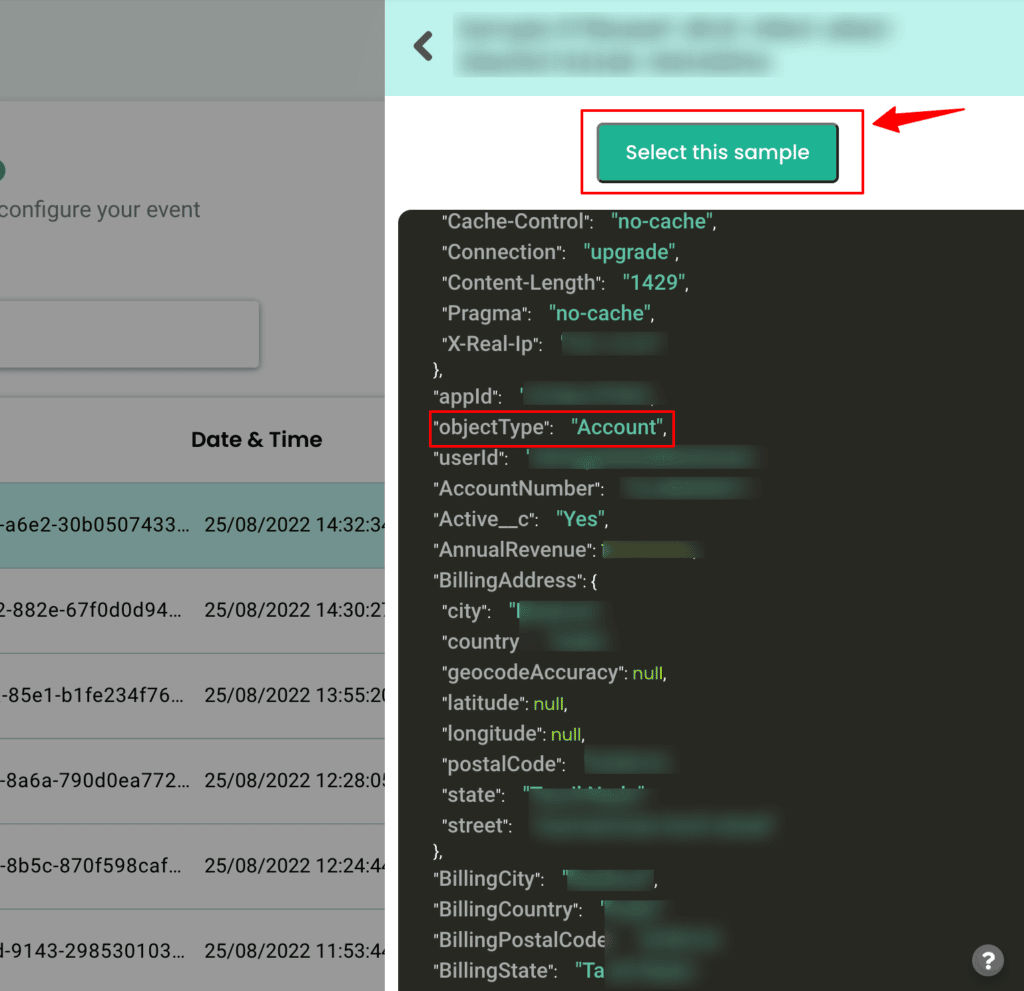
4. Now Select this sample & move to the next step.
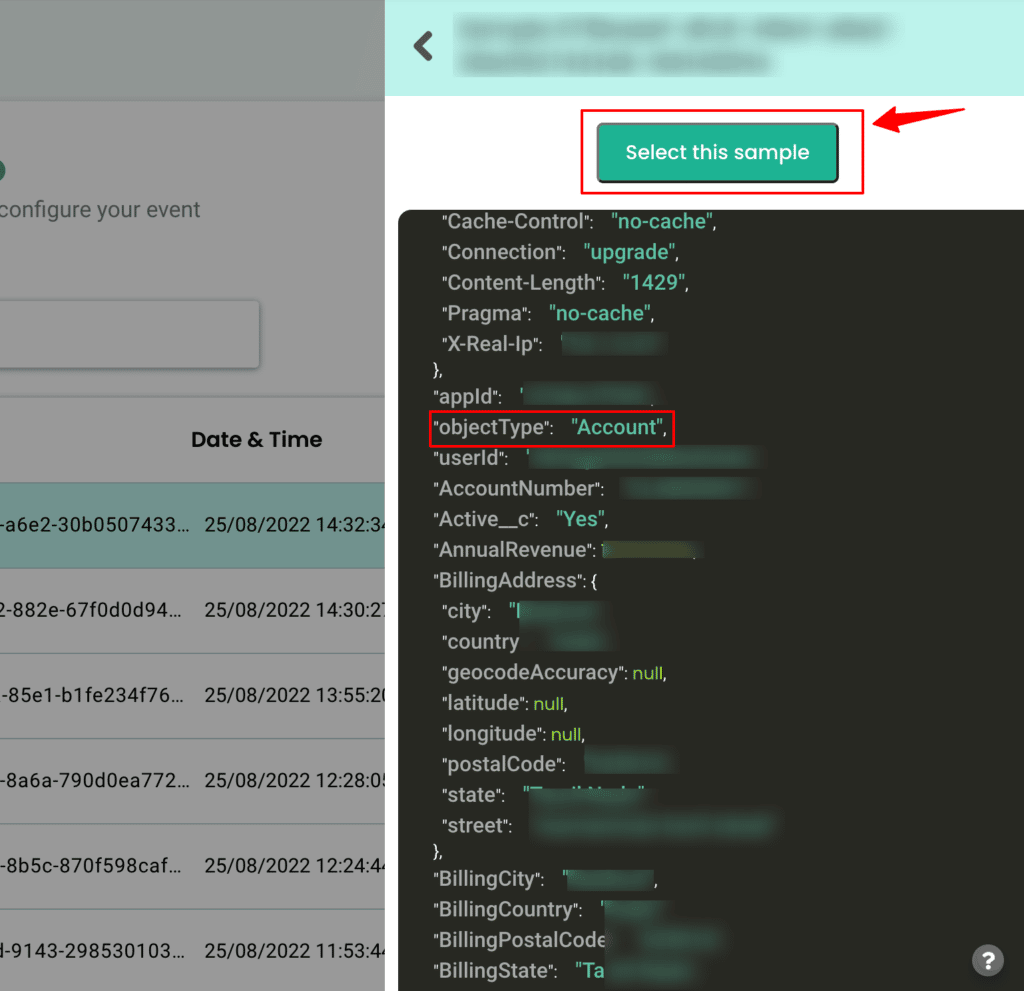
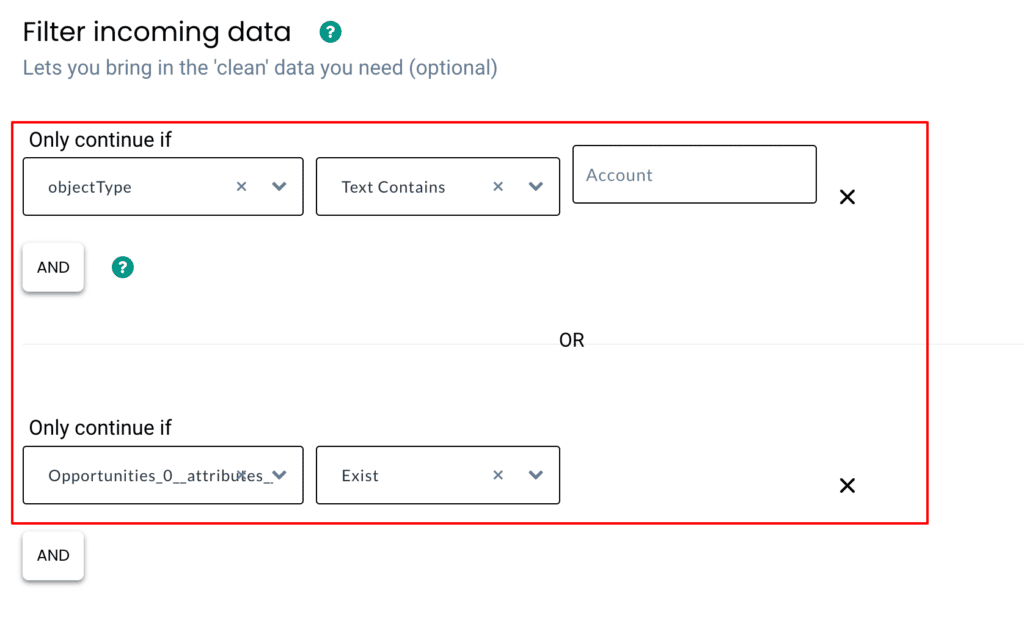
5. You can add your filter criteria to remove irrelevant information or simply skip this step. The screenshot below shows filter criteria to send the data only when the object type is Account.
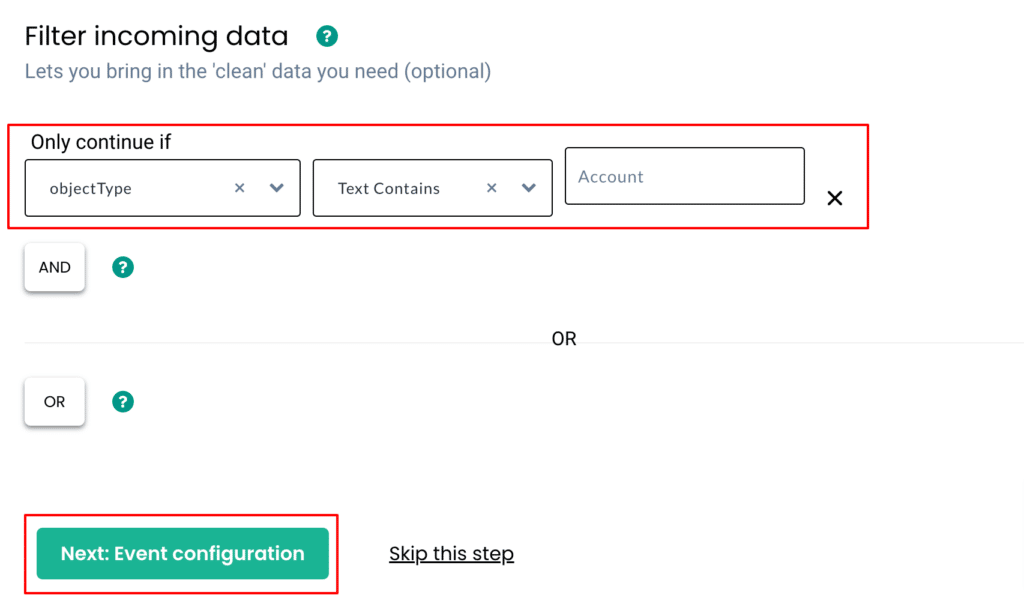
6. Lastly, in the event configuration screen, you’ll be able to map the incoming data to their respective fields in CustomerLabs 1PD Ops
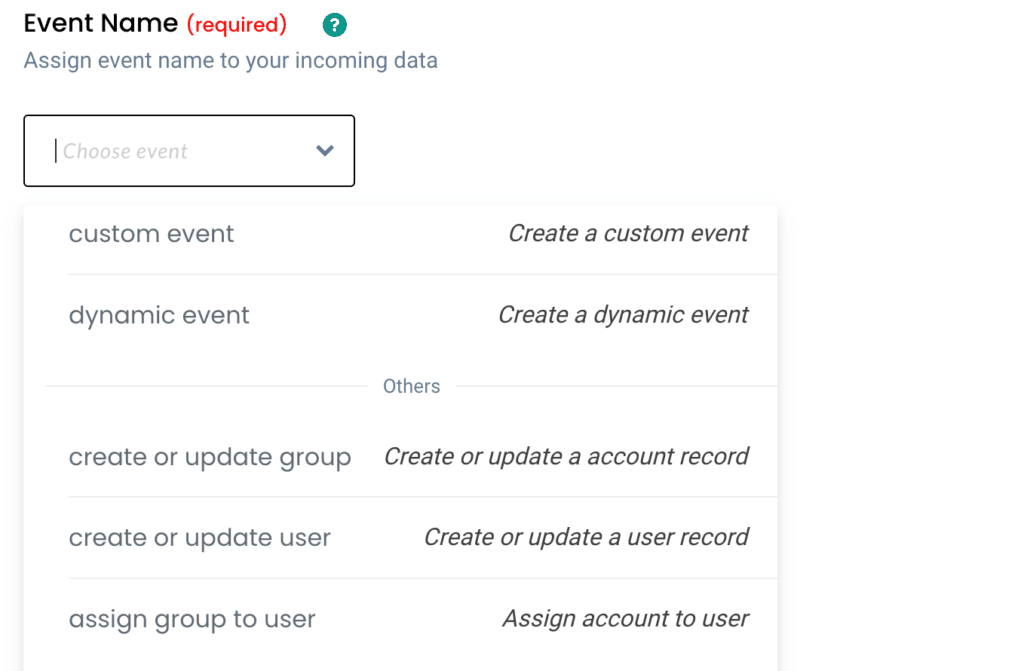
7. Give a name to your incoming event. In this case, since the account details have to be created, you can select a predefined event – Create or update group. In other cases, you can give a custom name based on your requirements. (Note: Selecting dynamic will let you take the name of the incoming event directly)
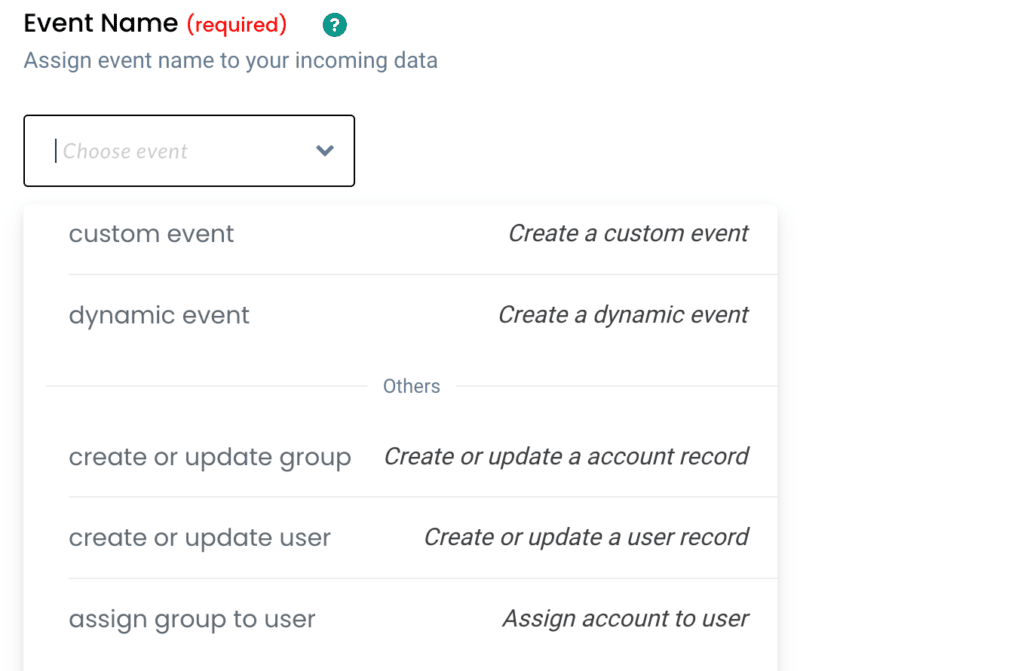
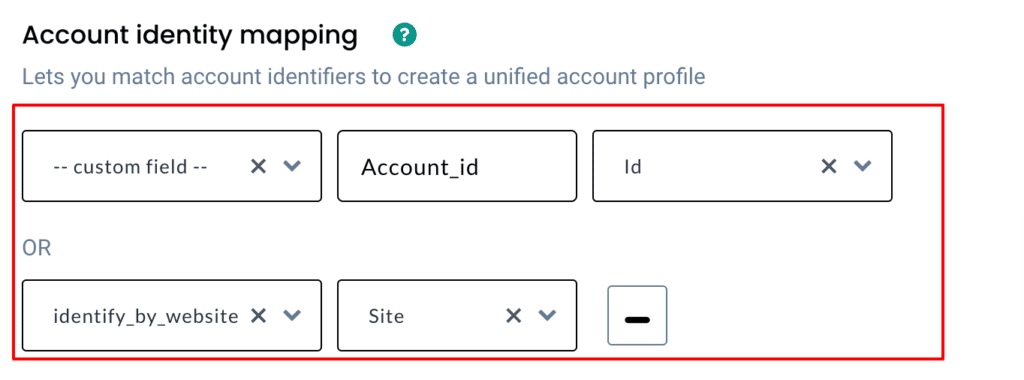
8. Account Identity mapping lets you combine all account-related events, since an incoming account has Account ID and website, you can use it to map them as shown below,
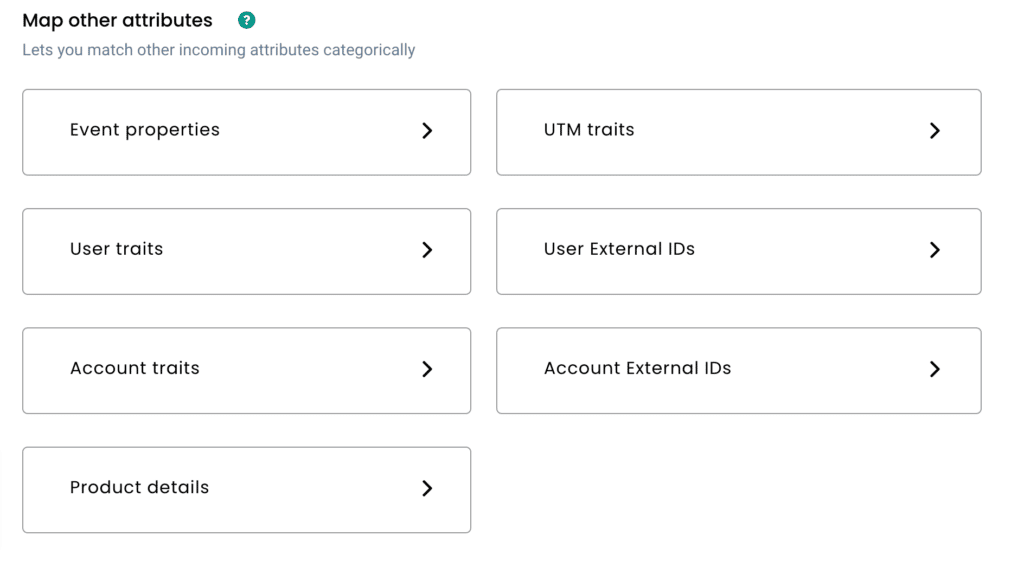
9. Once the account mapping is done, you can categorically map other incoming information into different buckets as shown below,
Workflow #2 – How to send data to CustomerLabs 1PD Ops when an account is updated in Salesforce
The below steps explain how you can filter and map incoming account information in Customerlabs 1PD Ops when an account is updated in Salesforce.
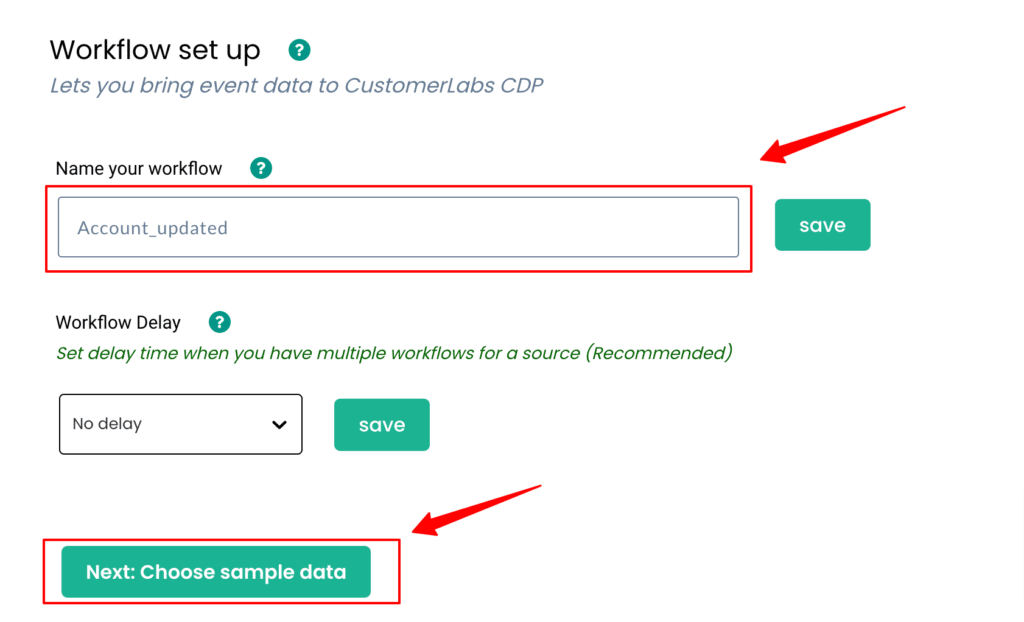
1. Give a name to your workflow and before proceeding, update the rating field in an account in Salesforce (as explained previously in this document) to get related data samples. Once it is updated, click on Choose sample data.
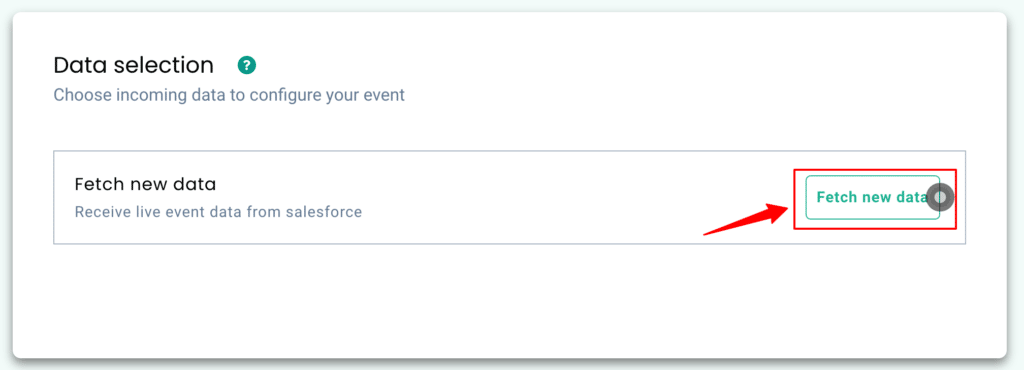
2. Click on Fetch new data to see sample account data created in Salesforce inside CustomerLabs 1PD Ops.
3. By clicking on View details you’ll be able to see a JSON format of the same.
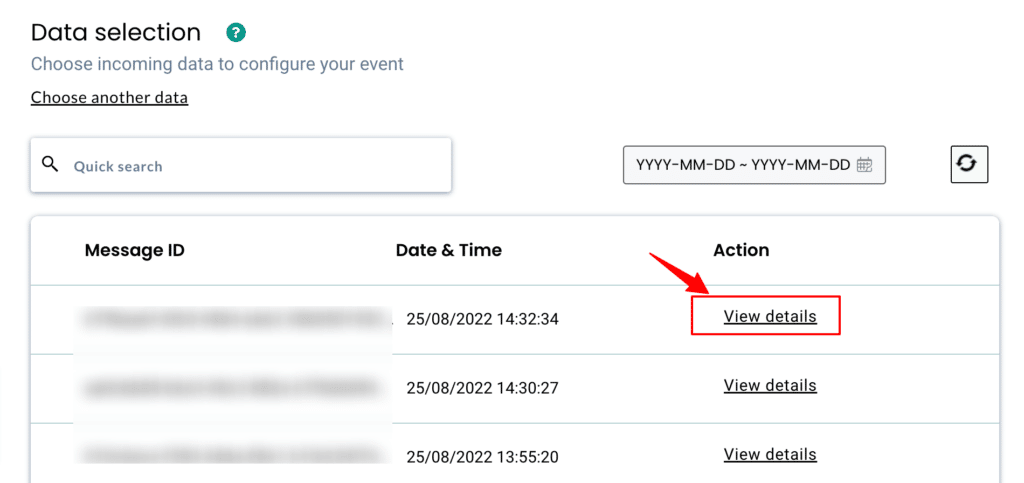
4. Now Select this sample & move to the next step.
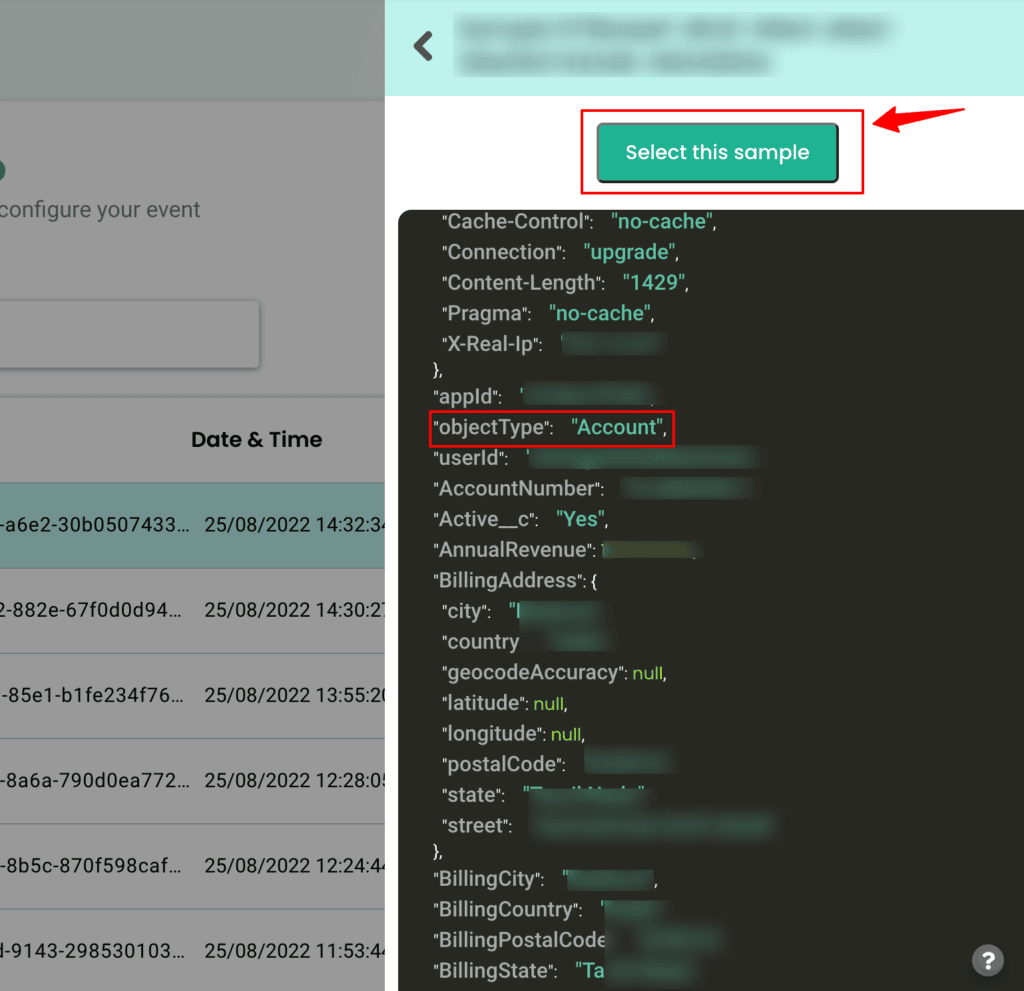
5. You can add your filter criteria to remove irrelevant information or simply skip this step. The screenshot below shows filter criteria to send the data only when the object type is Account.
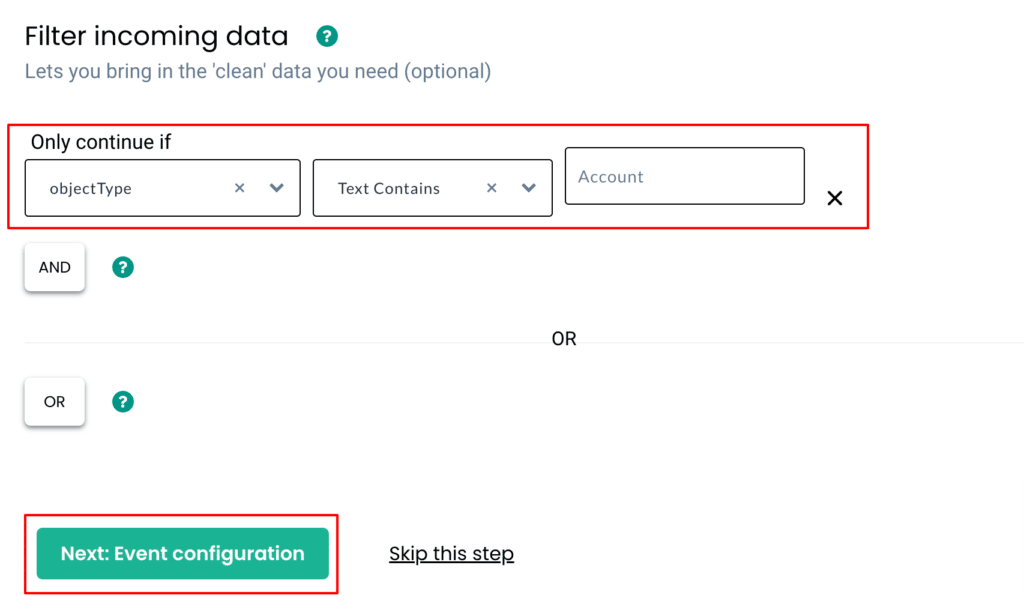
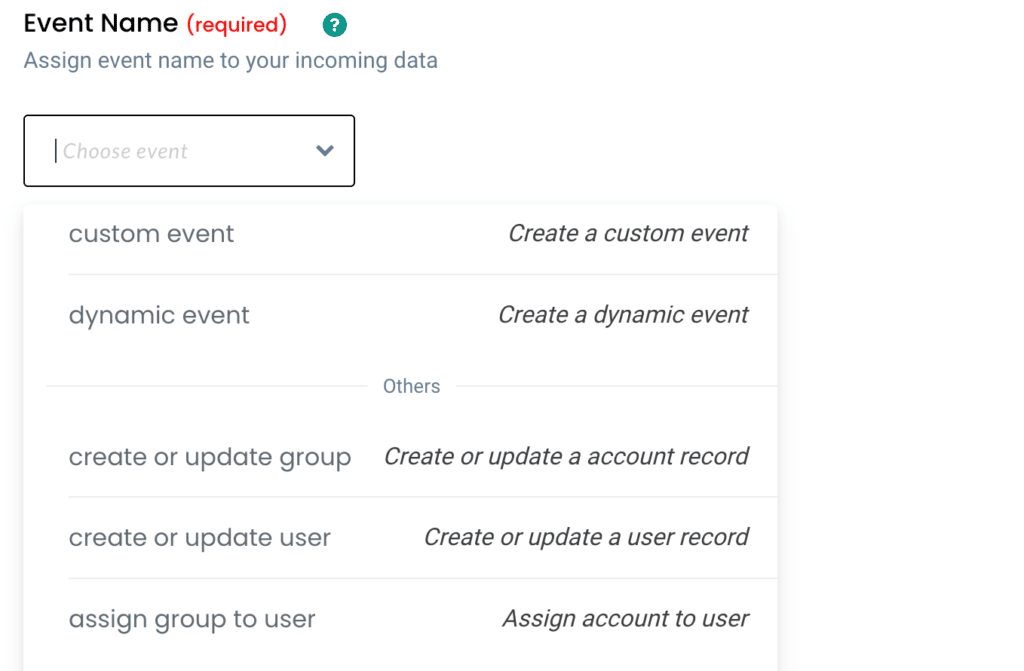
6. Lastly, in the event configuration screen, you’ll be able to map the incoming data to their respective fields in CustomerLabs 1PD Ops
7. Give a name to your incoming event. In this case, since the account details have to be created, you can select a predefined event – Create or update group. In other cases, you can give a custom name based on your requirements. (Note: Selecting dynamic will let you take the name of the incoming event directly)
8. Account Identity mapping lets you combine all account-related events, since an incoming account has Account ID and website, you can use it to map them as shown below,
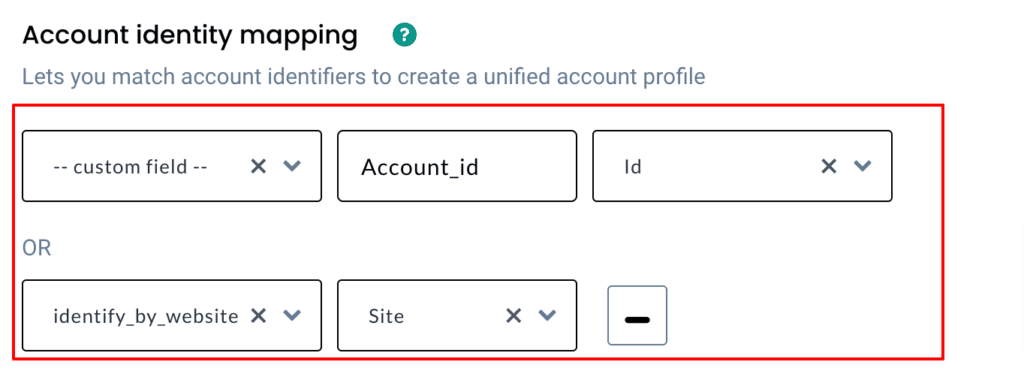
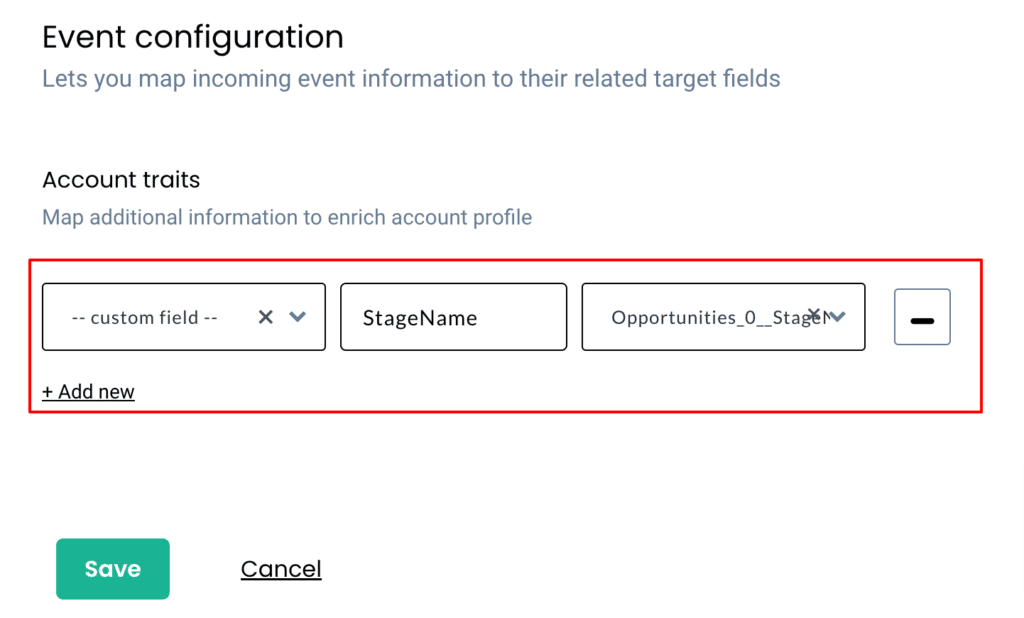
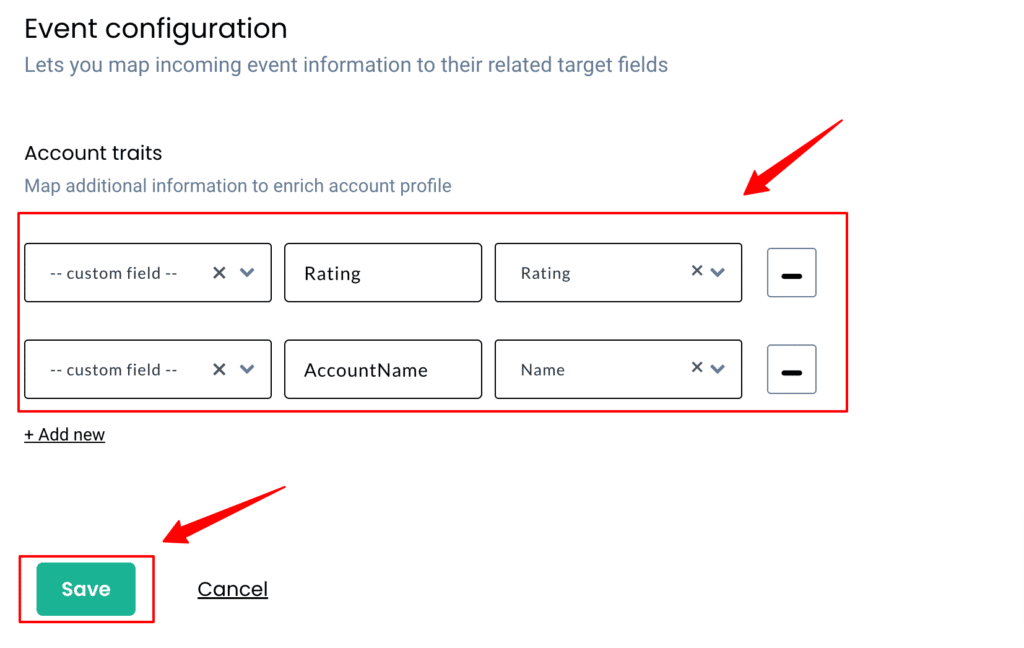
9. Once the account mapping is done, you can categorically map other incoming attributes into different buckets. For example, you can add the rating in the Account traits.
Workflow #3 – How to send data to CustomerLabs 1PD Ops when an account is created along with opportunity (sending related objects)
The below steps explain how you can filter and map incoming account information in Customerlabs 1PD Ops when an account is created along with opportunity in Salesforce.
1. Give a name to your workflow and before proceeding, create a test account with opportunity details (as explained previously in this document) to get related data samples. Once it is updated, click on Choose sample data.
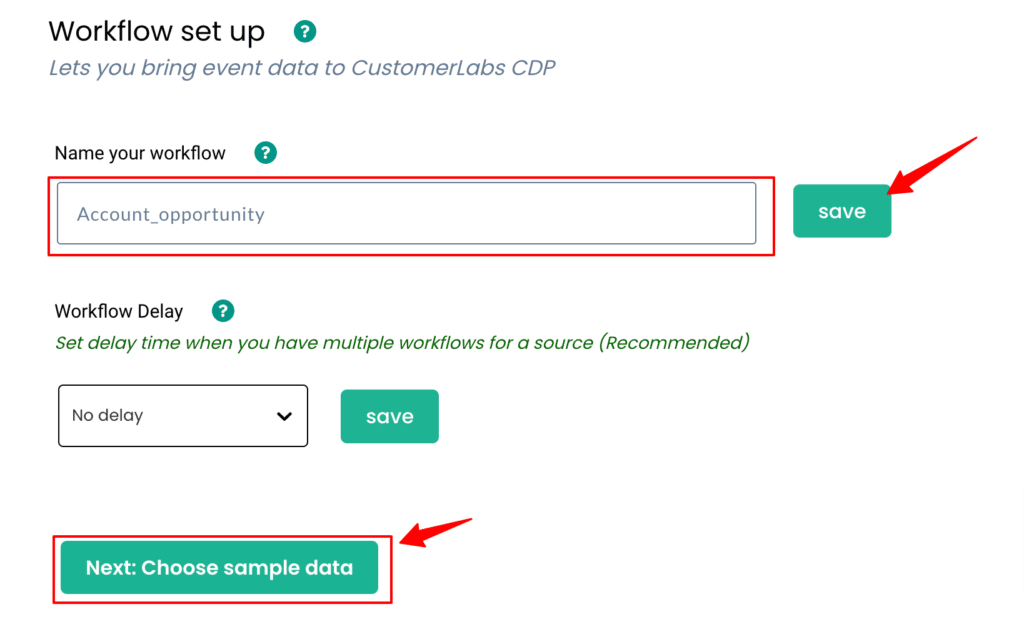
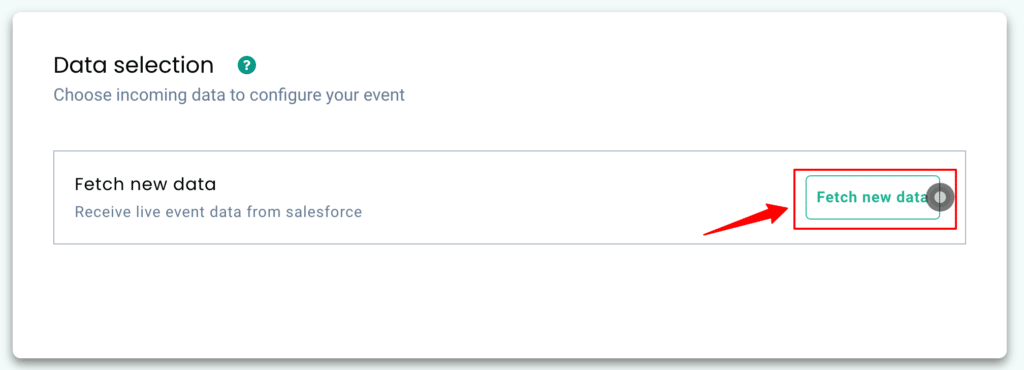
2. Click on Fetch new data to see sample account data created in Salesforce inside CustomerLabs 1PD Ops.
3. By clicking on View details you’ll be able to see a JSON format of the same.
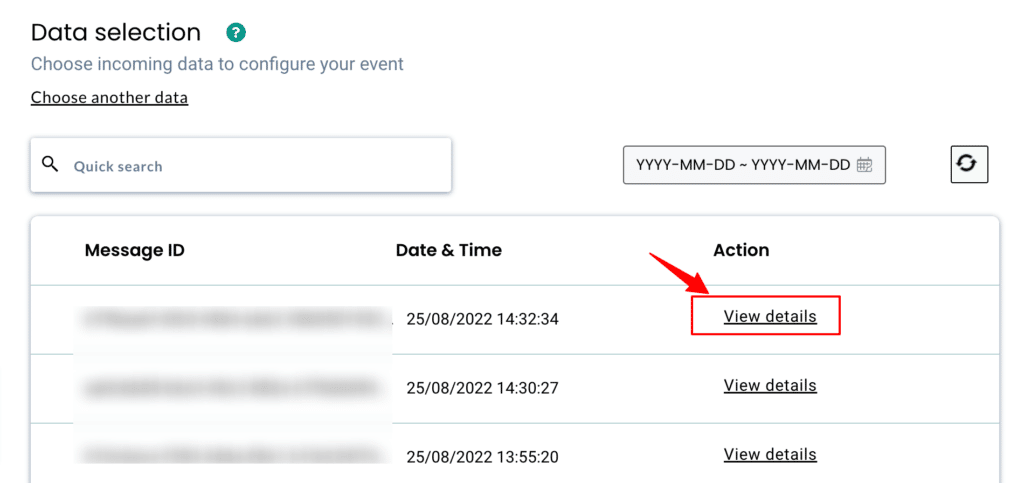
4. Now Select this sample & move to the next step.
5. You can add your filter criteria to remove irrelevant information or simply skip this step. The screenshot below shows filter criteria to send the data only when the object type is Account and Opportunity exists
6. Lastly, in the event configuration screen, you’ll be able to map the incoming data to their respective fields in CustomerLabs 1PD Ops
7. Give a name to your incoming event. In this case, since the account details have to be created, you can select a predefined event – Create or update group. In other cases, you can give a custom name based on your requirements. (Note: Selecting dynamic will let you take the name of the incoming event directly)
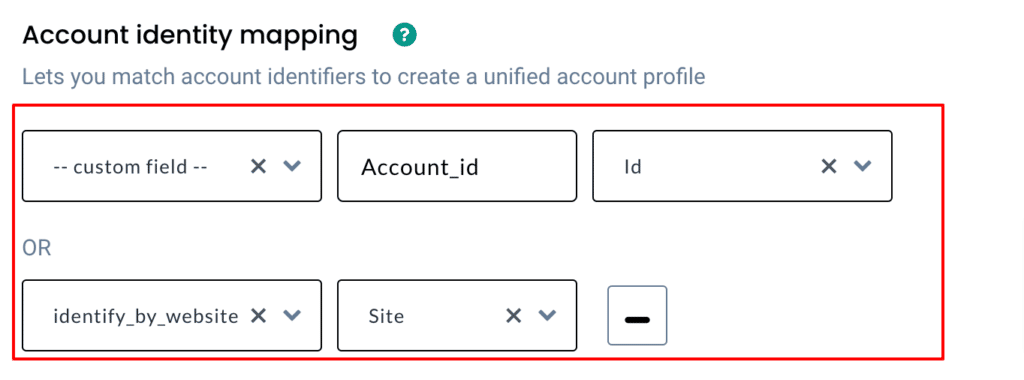
8. Account Identity mapping lets you combine all account-related events, since an incoming account has Account ID and website, you can use it to map them as shown below,
9. Once the account mapping is done, you can categorically map other incoming information into different buckets. For example, in this case, you can add Opportunity stage in the Account traits as shown below.
