Customerlabs CDP Documentation
Track and send Go High Level Forms effectively to Ad platforms!
Go High Level CRM is a popular choice for building landing pages and forms, but tracking user info from the browser can sometimes feel like you’re solving a tricky puzzle. One easy way to track form data in Google Tag Manager (GTM) is by using the data layer. But if you’re not a developer, no worries! You can still track things by passing external IDs as URL parameters.
I know, it might sound a bit techy, but hang in there—I’ll make it simple!
Go highlevel form tracking made easy
With GoHighLevel, there are some limitations when it comes to directly updating the JavaScript code to track lead forms. GHL isn’t exactly user-friendly in that department.
Here’s a simple workaround:
- Create a Hidden Field: Add a hidden field to your GHL form. Whenever a user fills out the form, assign them a unique user ID (let’s call it the “CL Unique User ID”). This ID will be passed through the URL query parameter when the form is submitted.
- Use Webhooks for Lead Information: Connect GoHighLevel to your system via a webhook. This webhook will directly receive the lead information (like email ID, first name, last name, phone number—basically all the PIIs).
- Unification of the both browser and server side lead event: Now, you can merge the server-side webhook data with the browser-side form submission data using the “CL Unique User ID”.
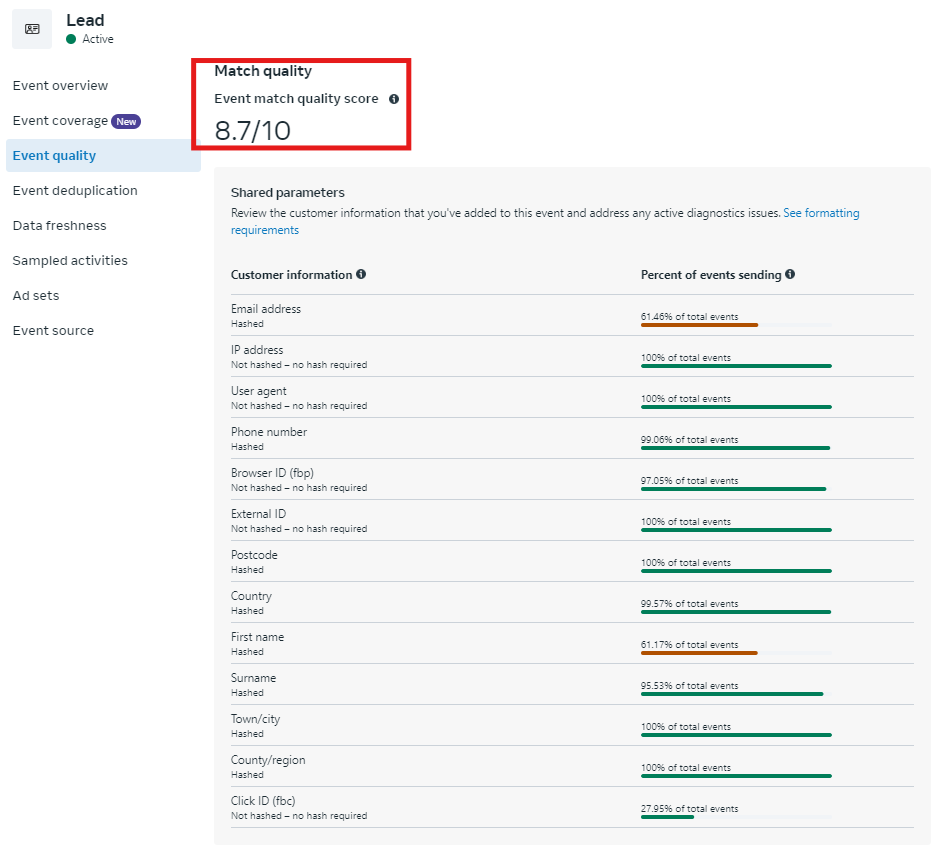
This approach improves the event match quality on Meta by ensuring that all customer information parameters are sent accurately.
This way, you’ll have a more efficient and streamlined process for tracking leads with GoHighLevel, even with its limitations!
Wow – Meta event match quality shines for your Go high level form
Optimizing the campaign with the high event match quality conversion event helps Meta algorithm to train better on what kind of prospects to attract.
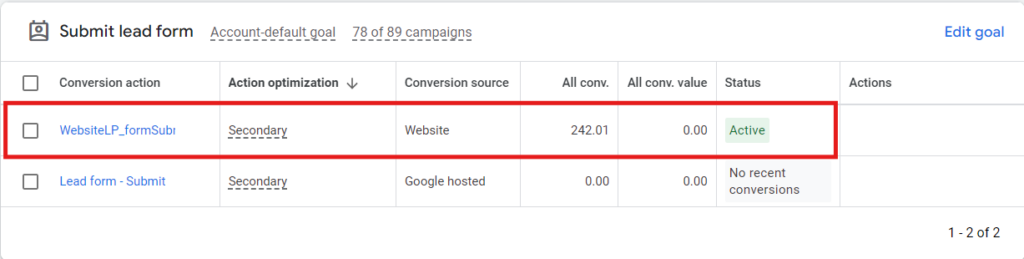
Higher reporting and attribution conversions on Google Adwords
Similarly on Google Adwords, you will have higher attribution on the conversion because we store all the cookie ids including Gclid id. This helps improve the reporting and attribution.
Now let’s follow the step by step instructions to configure the same.
The step by step guide to configure the form submit
First, we need to create a Hidden Field in the form. Please follow the below steps.
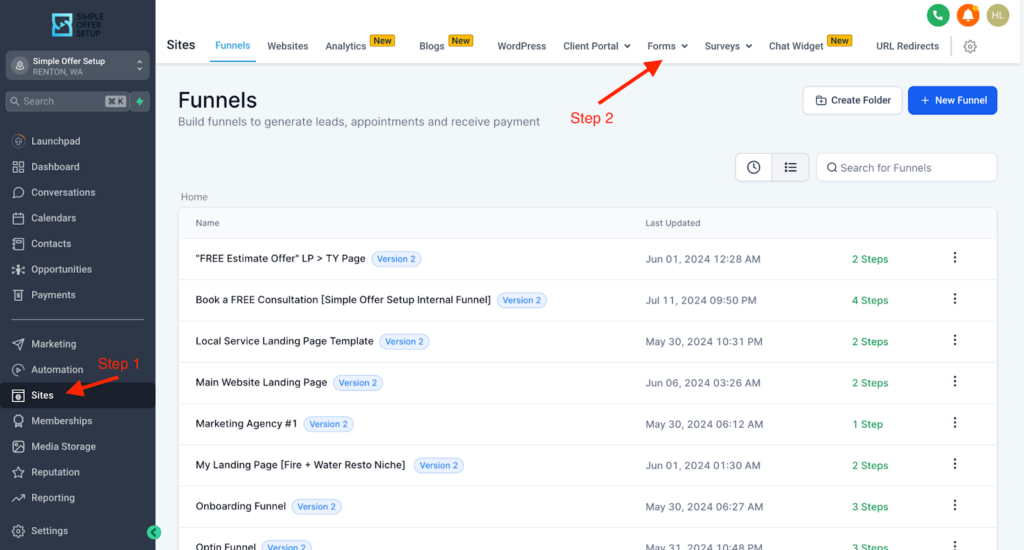
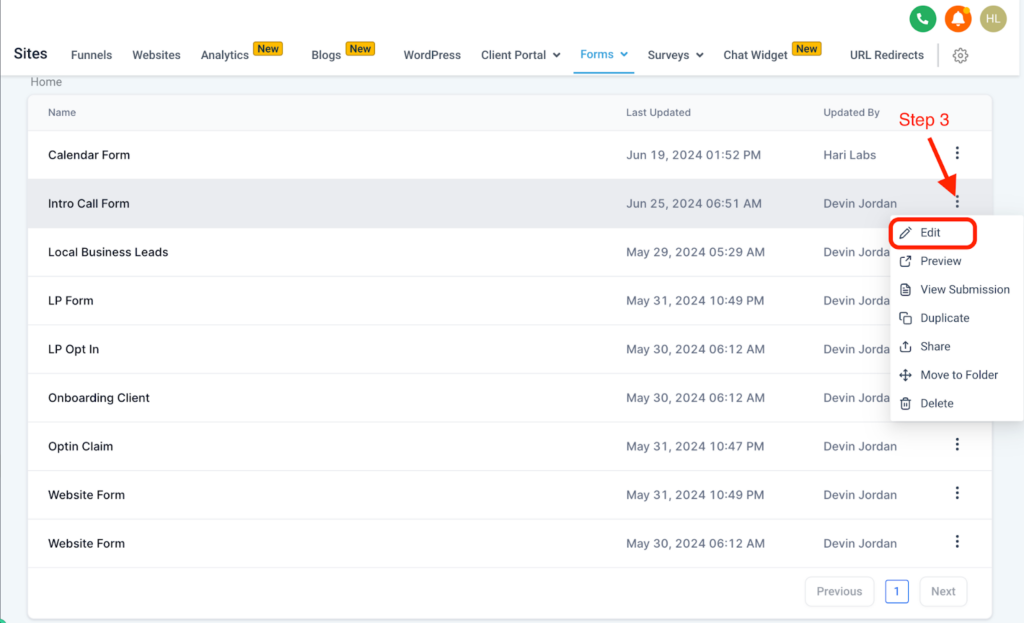
- Log In to the Go High Level CRM —-> Click “Site” on the menu —-> Click “Forms” on the page as shown below.
2. Please follow the below steps to edit the existing form to create a Hidden field.
3. Once you click edit “form fields” will be open and click “+” as shown in the screenshot.
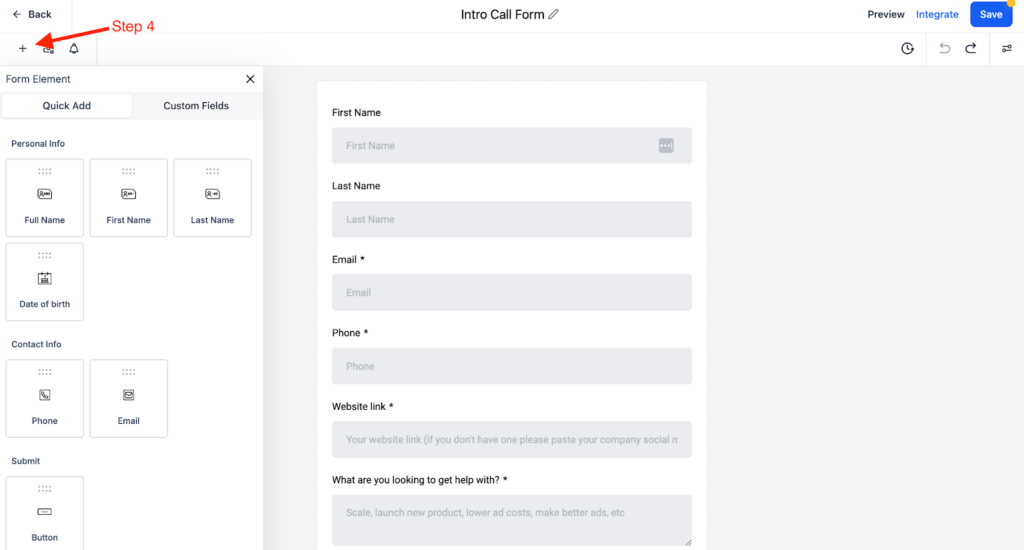
4.Click on the Custom Fields button.

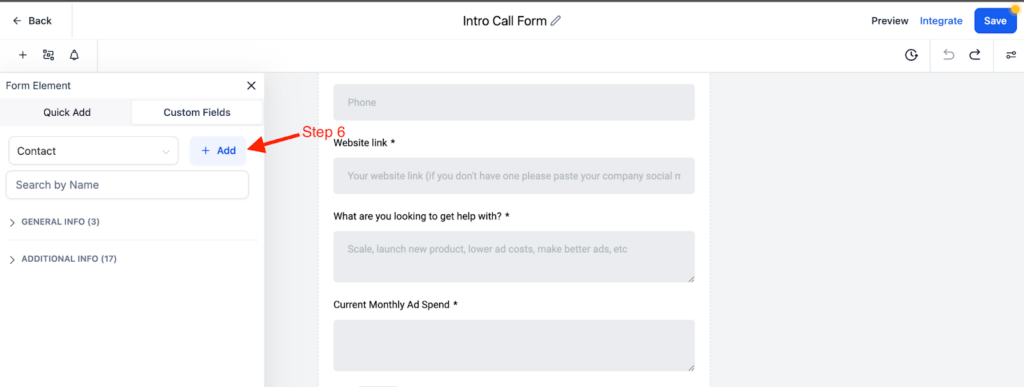
5. After clicking the Custom Field button you will have an option to “Add” a new field as shown
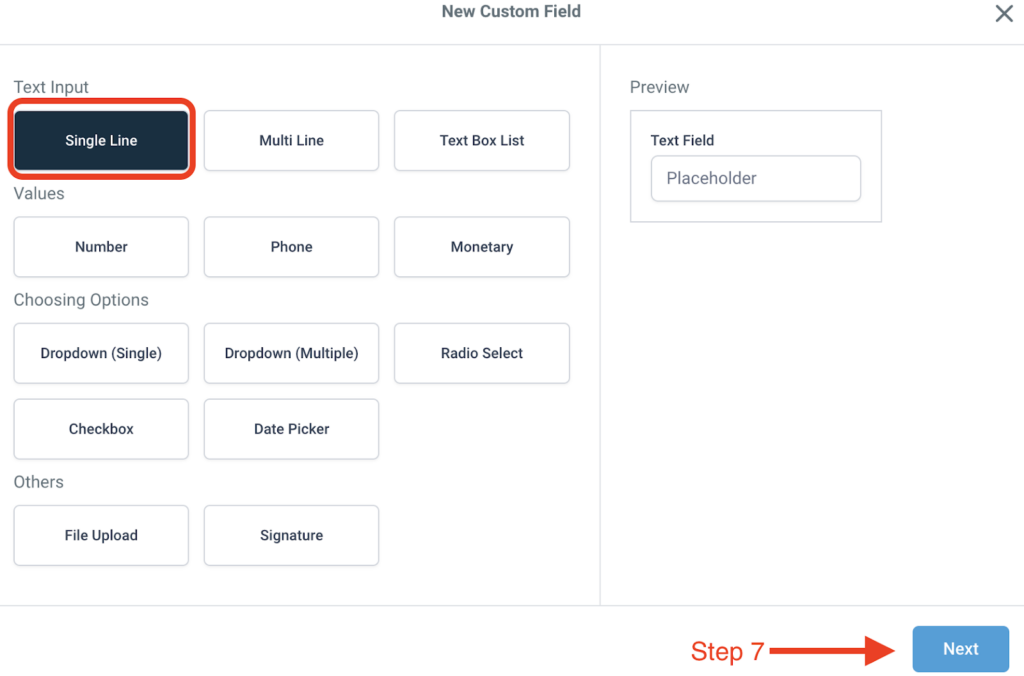
6. Opt for Single line Text input and click next
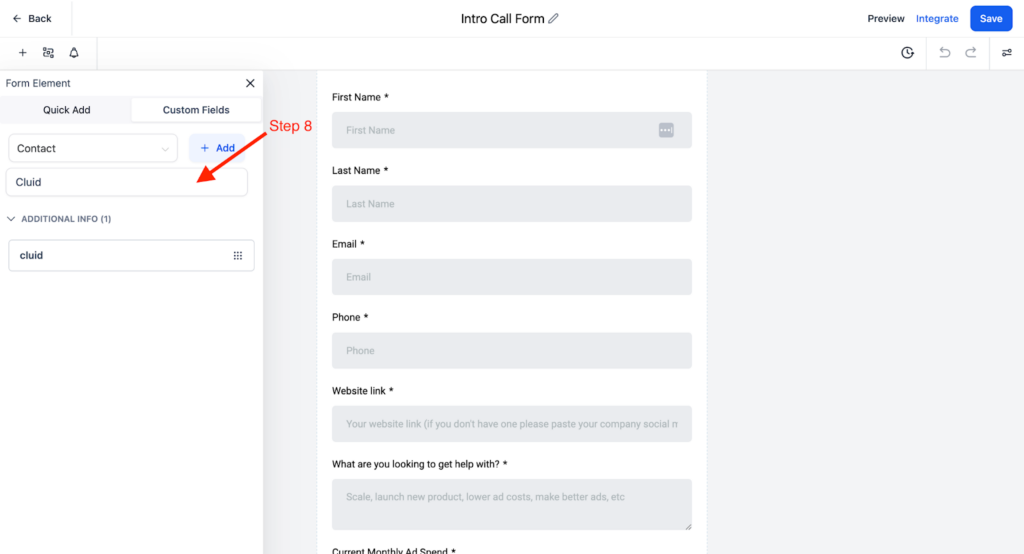
7. Name the Field and contact group as per the screenshot.
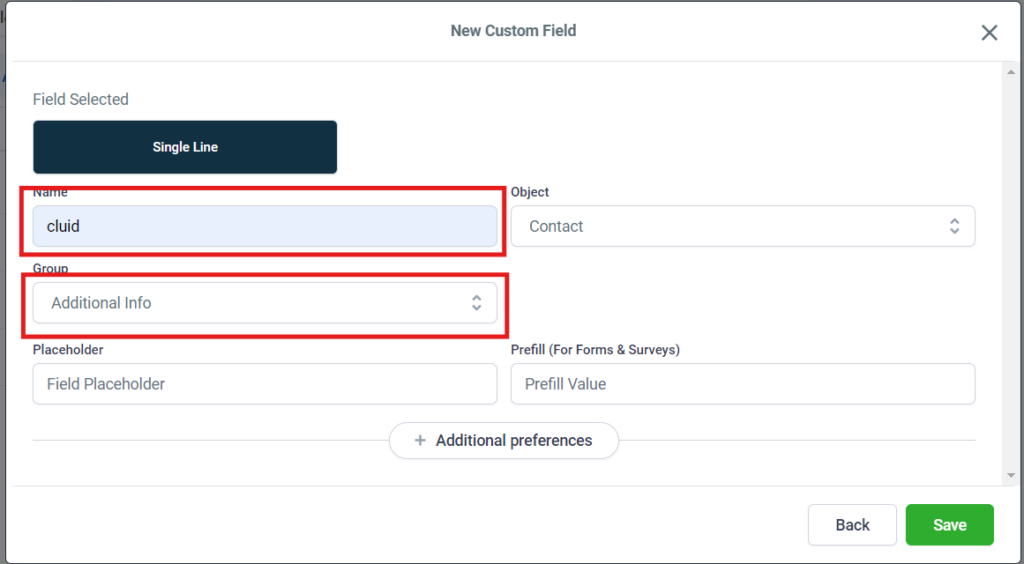
8. Fill the above fields which are marked in red (Name as unique ID or as per your requirement) and group it as additional info. Once filled, hit the save button.
9. Now you have to drag and drop the field inside the form as shown in the below screenshot.
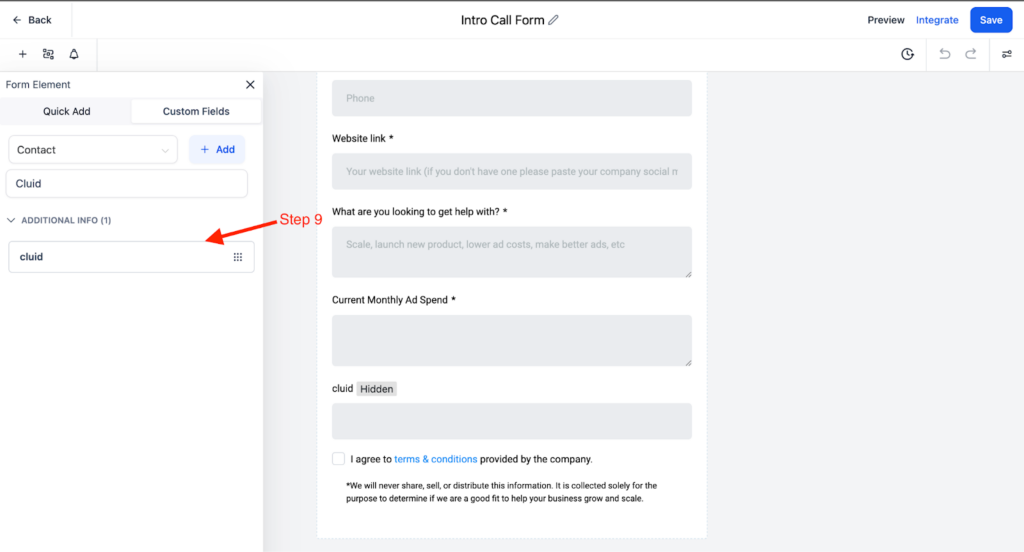
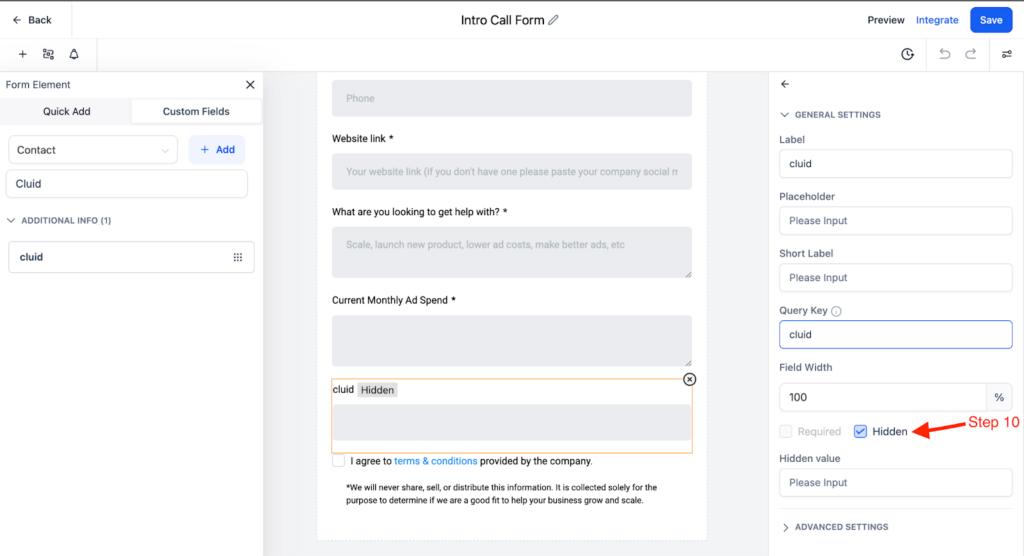
10. Once added to the field, click on the field to edit the field in the form and make the field hidden and save the form as shown below.
11. Now, you have to log in to the CustomerLabs and create a customer integration in the Destination.
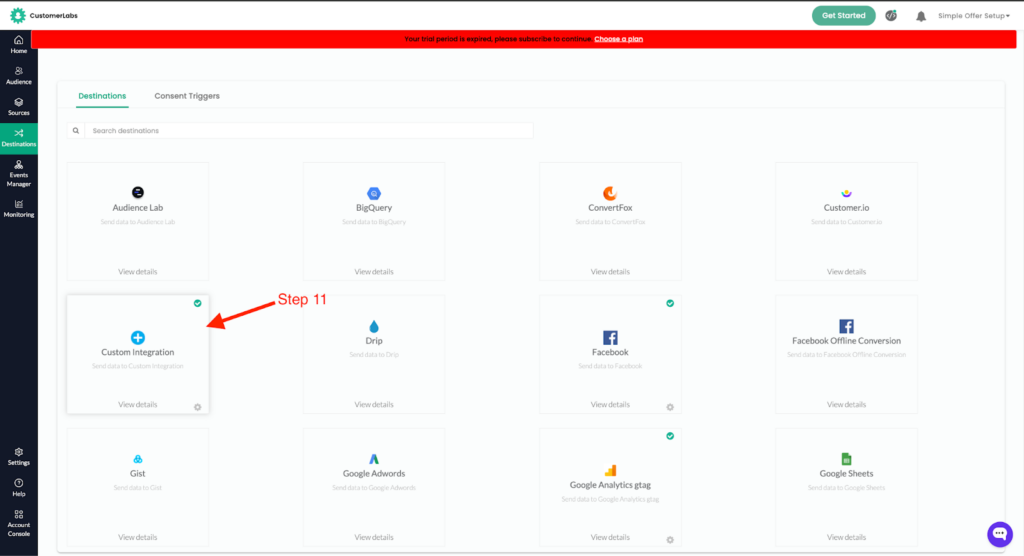
12. This custom integration will help us to add the unique ID in the URL query once the id is added that will automatically be captured in the hidden field.
To update the configuration please follow the below steps.
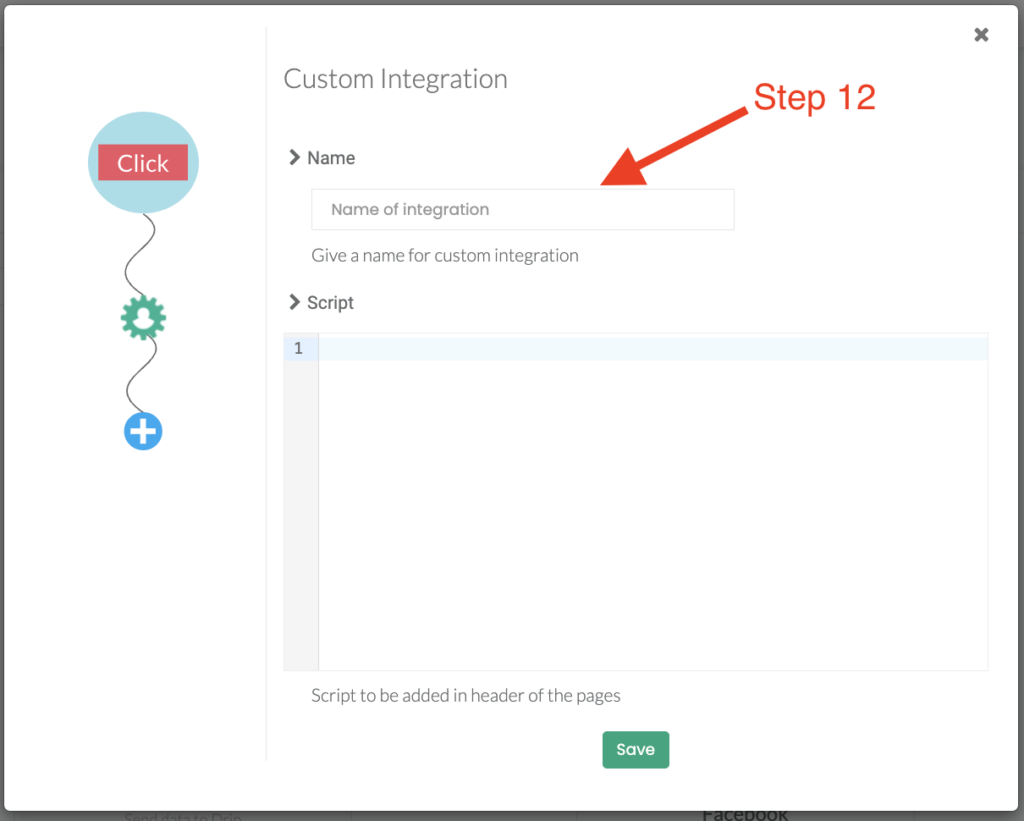
Name the integration and update the below script.
Scenario 1 : Single path
(function() {
if (window.location.pathname == “/” && window.location.host == “duxxxx.com”) {
var cluid = window.CLabsgbVar.generalProps.uid;
var queryParams = new URLSearchParams(window.location.search);
if (!queryParams.has(‘cluid’)) {
queryParams.append(‘cluid’, cluid); //add the field name here after the comma
window.location.search = queryParams.toString();
}
}
})()
Note : The above Script should be update only if you are using one page form fill
Scenario 2 : Multiple path
If your form is present in multiple pages please use the below code
(function() {
if ([“/”, “/collections”].includes(window.location.pathname) && window.location.host == “duxxxx.com”) {
var cluid = window.CLabsgbVar.generalProps.uid;
var queryParams = new URLSearchParams(window.location.search);
if (!queryParams.has(‘cluid’)) {
queryParams.append(‘cluid’, cluid); //add the field name here after the comma
window.location.search = queryParams.toString();
}
}
})()
Once all configurations are updated, please conduct a test run to verify that the hidden ID is successfully captured in the designated hidden field.
Now you have successfully captured the lead event from the front end. Followed by this Integration Connect your Go High Level CRM with CustomerLabs on Custom Source/ Server level.
Setup a custom source in customerlabs
What is a Source in CustomerLabs?
When a platform is connected as a Source, you will be able to bring all the event data from that particular platform through webhooks to CustomerLabs. This will enable you to enrich existing user profiles and create a unified view of the customer in one place.
Currently CustomerLabs supports integrations with server-side and cloud app sources. View platforms that you can connect with CustomerLabs here.
Getting Started
Sources is currently accessible to all users of the platform. See how you can access Sources from your CustomerLabs home screen below,
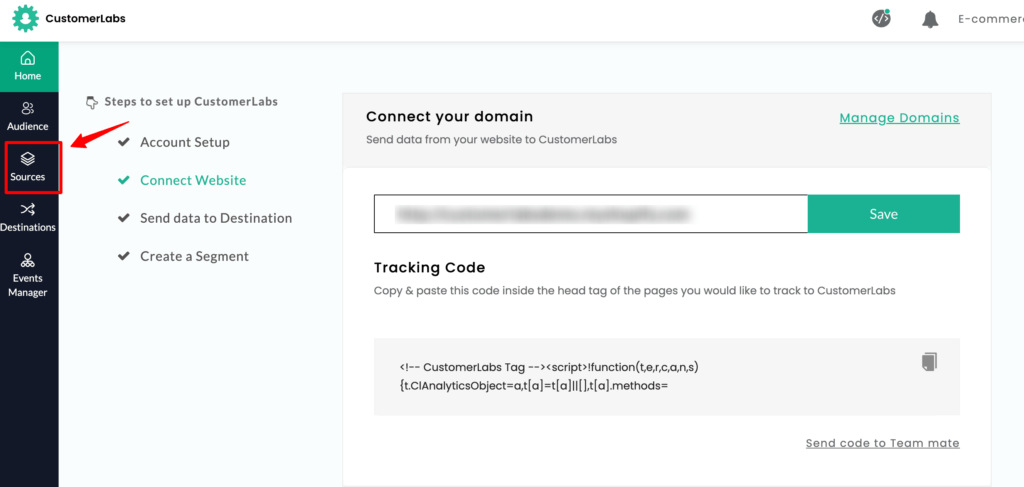
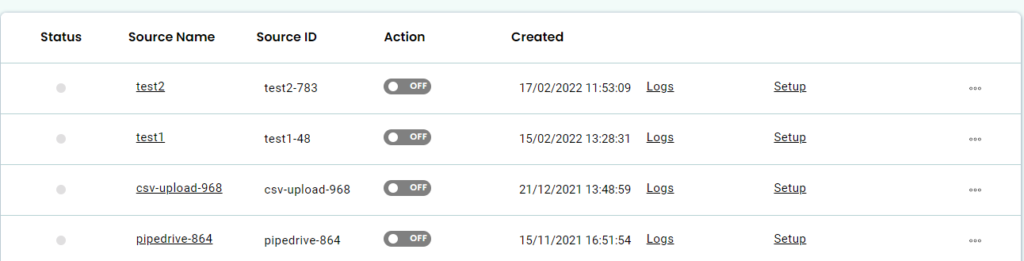
The Sources dashboard, gives a complete overview of the number of sources connected, their status, and the ability to access their setup.
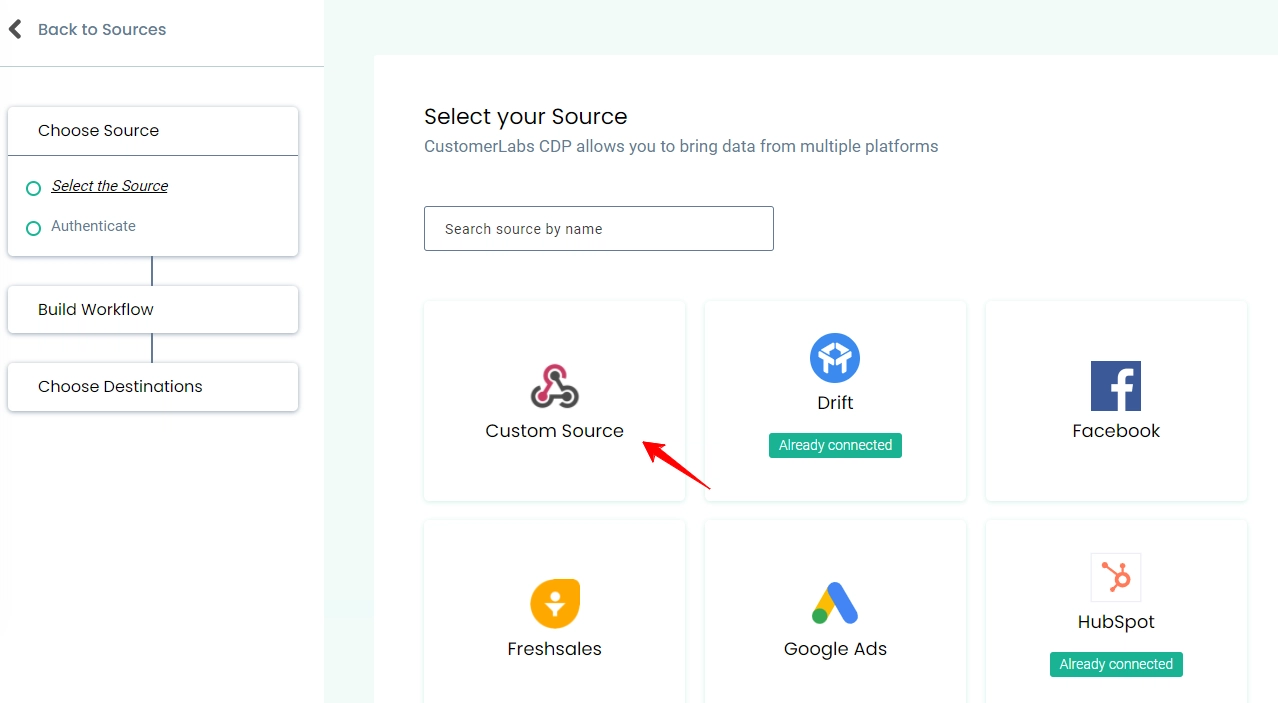
To connect a new source, Click on Connect Source on the top right corner. This will open up the list of sources that CustomerLabs currently offers.
Step 1: Select your source
Once the platform integration is complete, you can now create workflows to bring specific customer data into CustomerLabs.
What is a Workflow?
A Workflow helps you to turn the raw data you receive from the source into specific event data based on the workflow configuration which includes filtering and modifying the parameters. You can create multiple workflows inside a Source. A workflow is a one-time setup that constantly receives customer data & updates user profiles in CustomerLabs in real-time.
Once a Source platform is authenticated, users can build workflows without writing a single line of code.
How to build a Workflow?
The four-step process to build a workflow are as follows,
Step 2: Setup the workflow
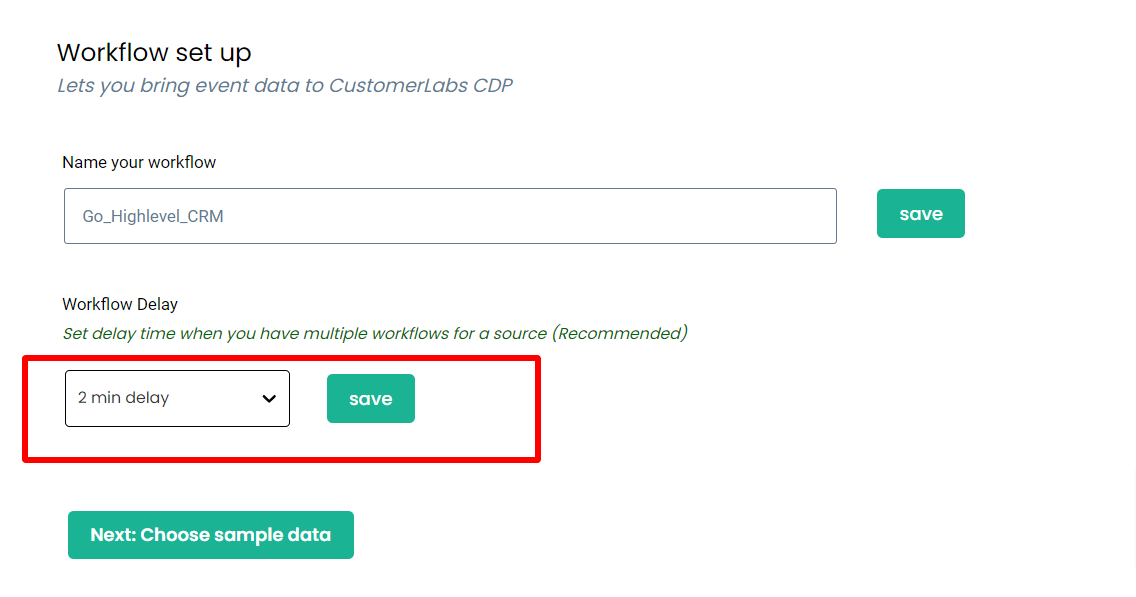
Name your workflow
This helps you quickly select relevant workflows – just for internal purposes.
Example: If you want to receive the data of users whose stage is changed to “Lead” in your CRM through this workflow, you can name this workflow as “lead_updated” or “lead_created”.
Workflow Delay
Workflow delay is recommended when you have multiple workflows in a source.
The data coming into the source will be sent across the workflows at the same time if the workflow delay is not given. This may result in concurrency issues.
For example, Whenever a user enters from the source, CustomerLabs checks if the user is already available in the database or assigns a unique user id to the user. Say, you have 4 workflows for the source and when the data is sent across all the workflows at the same time, 4 new user ids will be created for the same user if the user is not there in the database. Hence, setting up the delay time will make sure the new user is assigned a single unique id.
Step 3: Choose sample data
To receive event samples, trigger an event in that particular Source. For example, if you’re setting up a workflow to receive contact information as and when it gets updated in your CRM. Update a test contact in your CRM to receive event information in CustomerLabs.
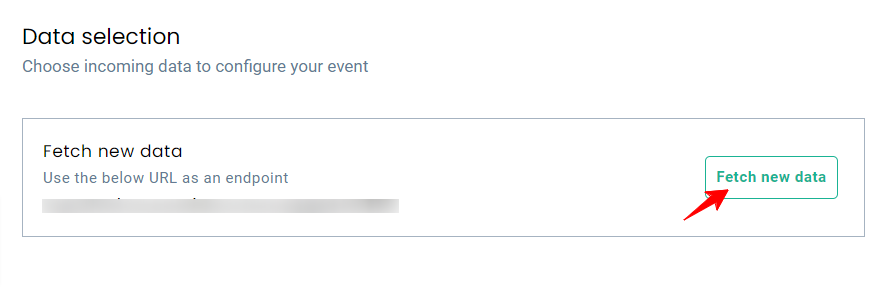
You will be able to update up to 5 samples at once. Fetching sample data in a few source platforms might take time. In that case, please wait for some time before you try again.
You can view the incoming sample data and select the sample that suits your use case.
You can view the incoming sample data and select the sample that suits your use case.
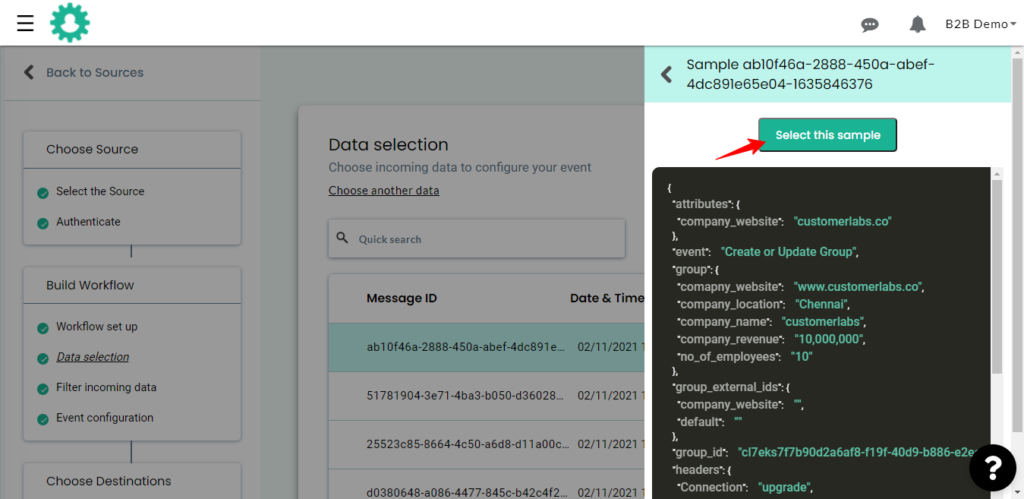
Note: While selecting the sample, ensure the data contains no parameters with null values as given in the image
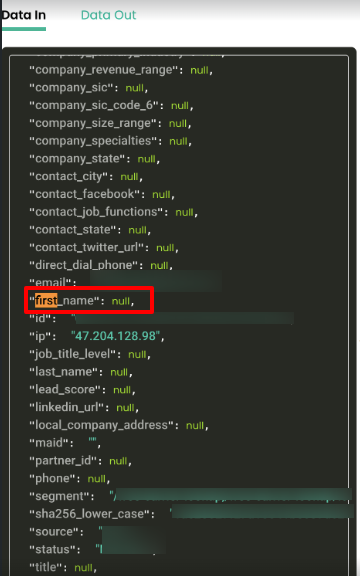
The Customer Labs will not process parameters with null values. This is because null values are not considered valid data by the destination. If the sample data consists of any field with a null value, it will not be pushed to the destination.
We suggest passing all the required parameters with a value or an empty string.
For example, if the parameter is “first_name”, you could pass the value “John Doe” or the empty string
” “. Only if you pass all the required parameters with a value or an empty string, we can process the data and send them to the integrated destinations successfully.
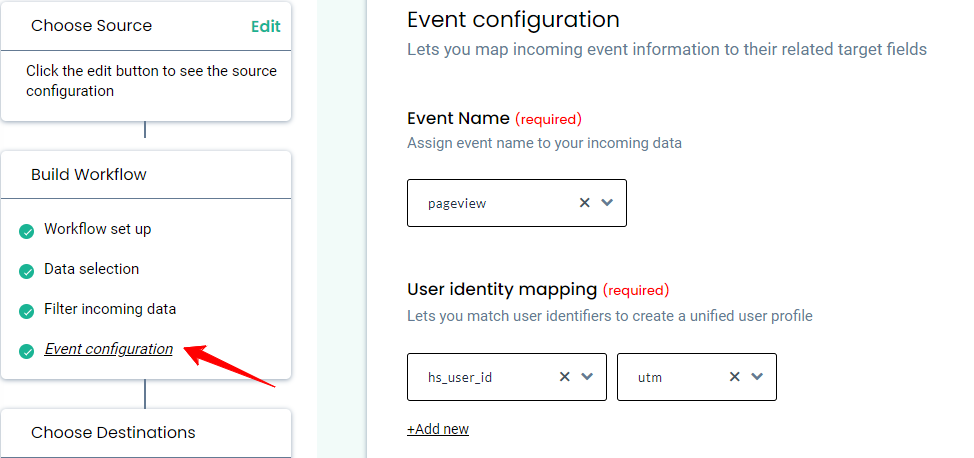
Step 4: Event configuration
Event configuration is the final and the most important step of the workflow setup.
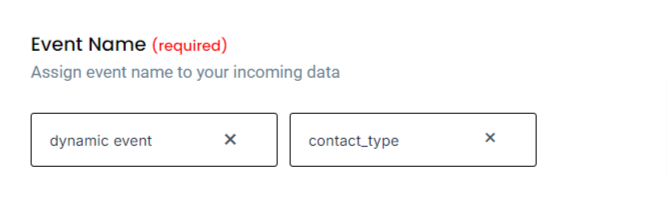
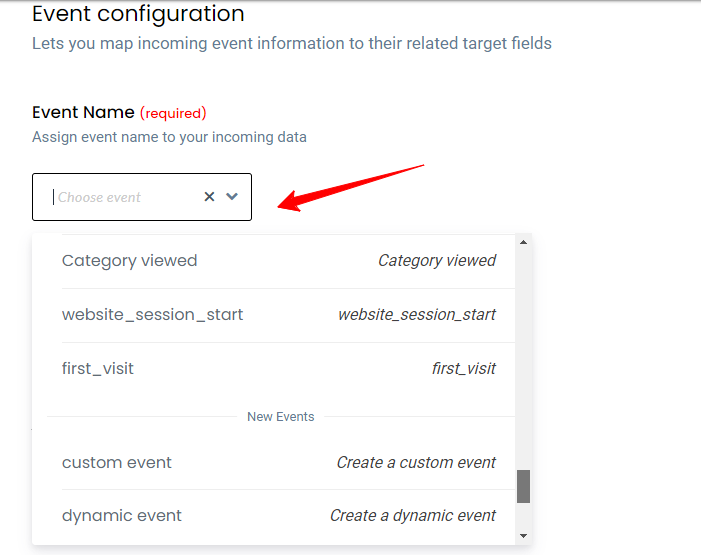
4.1. Event name
You can assign an event name by selecting from the drop down as shown below.
| Event type | Description |
| Custom event | Lets you give a new custom name to your incoming event |
| Dynamic event | Lets you choose the name of the incoming event as sent by the Source |
| Create or update group | Can be chosen if the incoming event is an account level update |
| Create or update user | Can be chosen if the incoming event is an user level update |
| Assign group to user | Lets you add company level updates to user |
4.2 User identity mapping
User identity mapping in CustomerLabs helps in merging incoming user/contact data to existing information.
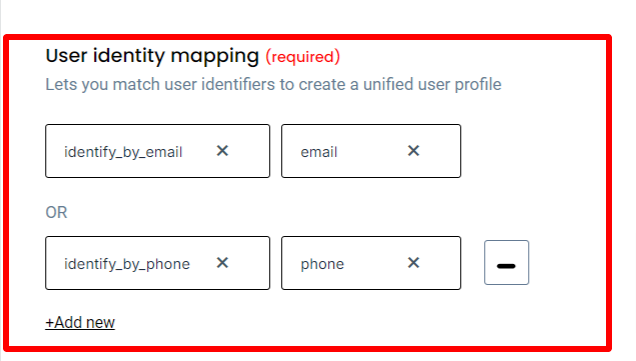
You can choose upto 3 different identifiers including external IDs to map user information. These external IDs will be stored by CustomerLabs to create an enriched user profile.
If you add Facebook as a Destination, CustomerLabs will sync the facebook_fbp to Facebook so that you can easily target the right users thus considerably increasing the audience match rates. Some of the common user identifiers supported by CustomerLabs are shown below.
| ID type | Description |
| identify_by_email | User email address |
| identify_by_phone | User phone number |
| google_analytics_client _id | Unique identifier for a browser–device pair that helps Google Analytics link user actions on a site |
| facebook_fbp | User identifier saved automatically by the Facebook pixel that uses first-party cookies |
| facebook_fbc | User identifier saved automatically by the Facebook pixel that uses first-party cookies when a user clicks on ad |
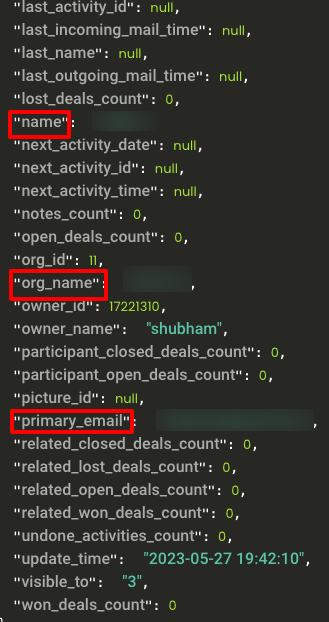
User traits: All user/contact/individual related information can be added under user traits and an screenshot example is given below
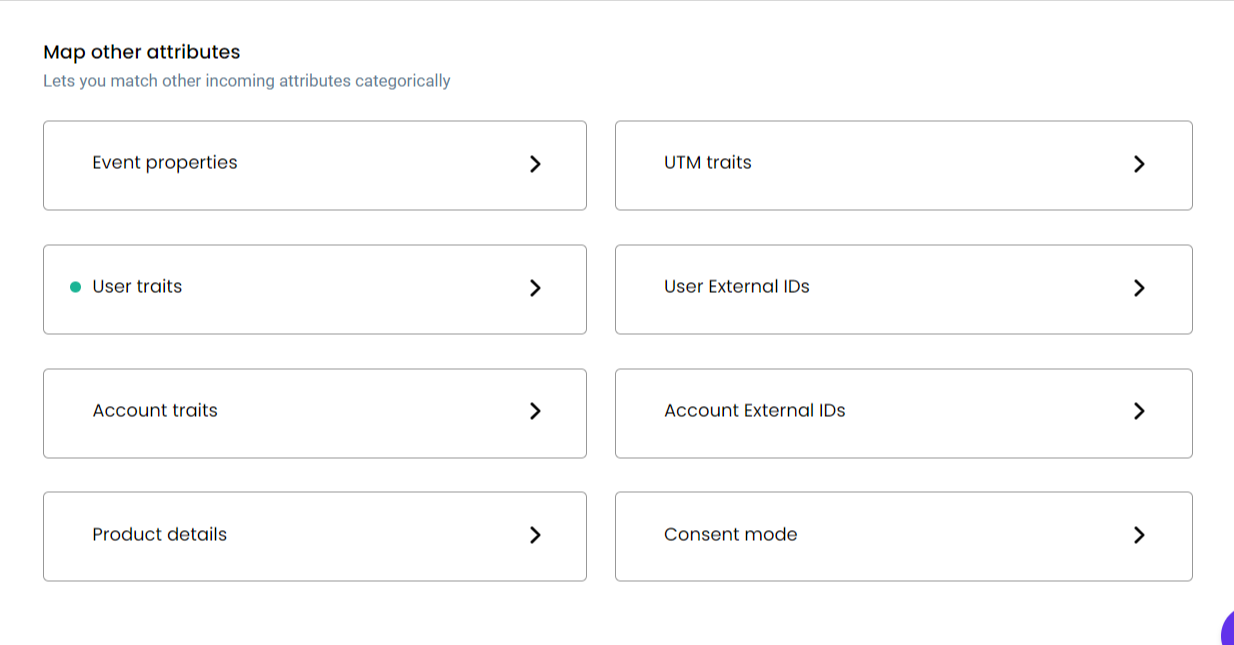
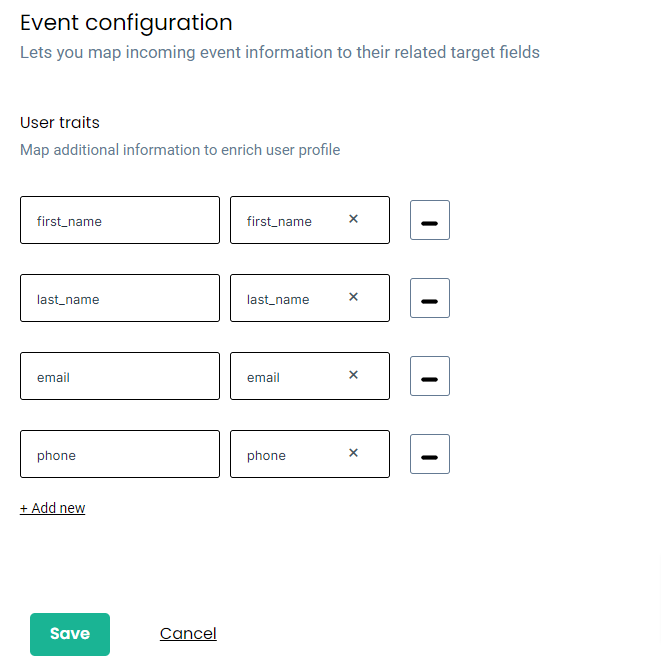
To send the user traits to the destination, you must map the user details under this section. This mapping process will allow you to send this valuable user information to the intended destination.
For example, if you’ve set up a workflow to receive all contact updates from your CRM to CustomerLabs. Information such as Contact first & last name, phone, email, address, company, lifecycle stage, job title etc. can be added under user traits. One such scenario would be when you want to run an email campaign with Klaviyo, you should add email ID as a user trait in this section to pass this information to Klaviyo or any such destinations in this case.
Source Logs
Source Logs show a list of events received by the source webhook before being sent to the workflows for event processing. There may be a delay in displaying the events items of up to 10 minutes, which is currently optimized.
You can see the logs by clicking on “Logs” from a particular source as shown below.
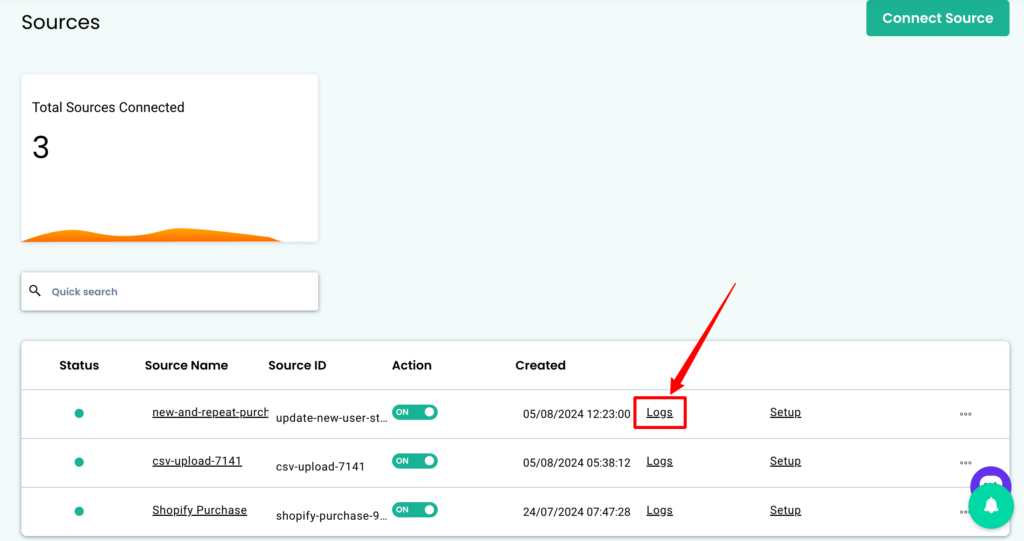
Every single message received by CustomerLabs will have a unique message id and we’ll be logging them so you can see how it is being processed in various workflows before appearing in the event manager.
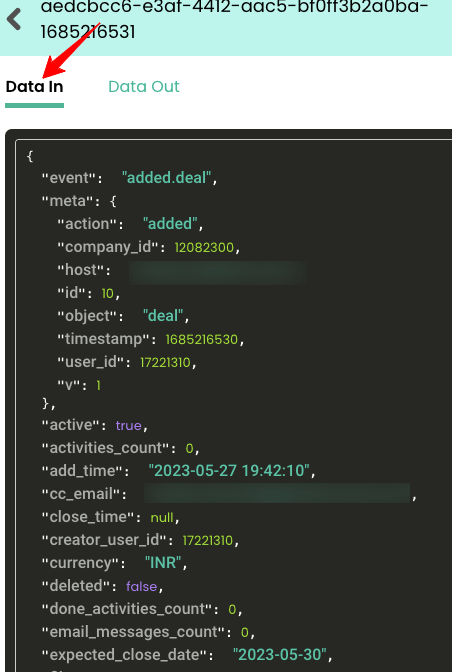
Source ‘Data in’ log
The below image shows the log data of the message received from that particular source and data variables in JSON format.
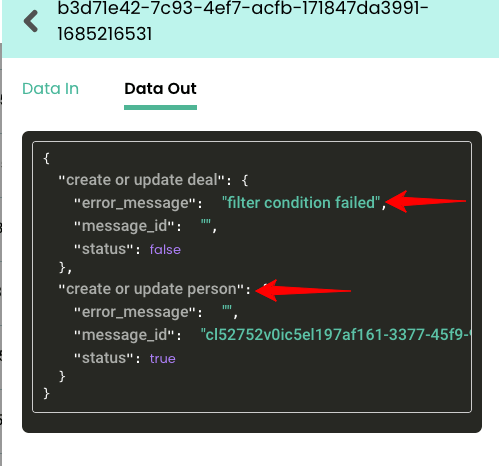
Source ‘Data out’ log
The below image shows the log data of the message processed and sent to respective workflows along with a new message id.
Workflow Logs
Individual workflows will also have their own logs, and you can use them to see how the event is transformed including user traits, event attributes, group(account) traits, external ids, group(account) identities, and other attributes.
Few tips on workflow status messages in ‘Data out’
You’ll see the following messages in the workflows and the reasons are listed below.
a) Mapping not found – When a workflow is in draft mode, the message as “Mapping not found” is thrown.
b) Filter condition failed – When a workflow filter condition is failed, this message is thrown.
c) User ID missing or Account ID is missing – We assume every event should have User identity or account identity fields. When the data is missing we’ll throw an error and the event won’t be processed further.
d) Data not found – This message means the data is still being processed, sometimes when there are a lot of requests the systems will take up to 10 minutes to process the data.


